This application of WebRotate 360 began as a project at the Cleveland Museum of Natural History to create online 3D models of insect specimens, enabling easy examination for scientific research. These specimens are normally stored in museum collections and are available to researchers who can afford the time and expense to visit the collection, or they can be shipped to the researcher at the risk of loss or damage to the fragile specimens in transit.
Online specimen models would be safely available anytime, anywhere, and to anyone for free.
3D models of real objects are usually produced using 360-degree photogrammetry or by 3D scanning. The latter technique is very fast but a micro 3D scanner is expensive, and has limitations in the resolution of tiny details, as well as difficulty with transparent or shiny surfaces. Producing a 3D model from photogrammetry typically involves processing the camera images through meshing and modeling software to create a rotatable screen object. In our experience this approach results in a loss of high-resolution photographic details that are important for scientific analysis of specimens.
Zoomed image provides microscopic detail not seen in 3D models
This is where WebRotate 360 excels for our application. We are able to create screen models of insects using multiple 2D macro images that retain all of the high-resolution details and simulate looking at the actual specimen under a microscope – a "virtual specimen".
The process we use is time-consuming, but almost entirely automated. We shoot between 182 and 254 views of each specimen as it is rotated and tilted at specified angles. Because the insects are so small (typically 3 - 50 mm), each one of the views requires focus-stacking 10-40 macro images with extremely shallow depth of field. It can take up to 10,000 photos and 4 hours to shoot one specimen, although most are half that.
We’re using a Canon 5DS R camera for maximum sensor resolution (50MP) with macro lenses attached to a motorized focus-stacking rail, with the specimen mounted (using its existing mounting pin) on a 360° motorized turntable. This in turn is tilted on a motorized arm for 5-7 rows of images. The motors are programmed and controlled with a StackShot 3X from Cognisys.
Full rig with laptop for museum travelTilted Z-axis with view of flash diffuser drawn back on its own rail to view specimen. The Z-axis is tilted in 20-30 degree increments, depending on the specimen. Also visible is a special mount to accommodate insects with off-center pins (such as the tiny "point-mounted" beetle shown here)
The 50-megapixel images are then batch-processed over several more hours (or concurrently) with Zerene stacking software and Photoshop to create the cropped views that are imported into WebRotate 360 – retaining 3000-4000 pixel resolution for online magnification.
360-degree images are imported into WebRotate 360 software for 360 view configuration and publishing
The final web model (example) is then created in a matter of minutes, after adding canvas text, logo, and hotspots. Top and bottom (dorsal and ventral) views of the specimen are created, respectively, from a single focus-stacked image which is rotated in 10° increments in Photoshop to create the 36 views that fill the first and last rows of the WebRotate 360 import.
Hotspot button shows popup with insect’s pin labels
The resulting web site interface provides easy controls for manipulating the virtual specimen and zooming in for full-resolution details. A hotspot button provides an image of the identifying labels that are kept on the insect’s pin in the museum’s collection drawer.
We have currently imaged over 150 specimens, which can be viewed online at Ento360.
Happy to announce the new release of WebRotate 360 Product Viewer. v5 is packed with great new features and important fixes. In this post we will summarize the key enhancements you should care about.
Polygonal Hotspots
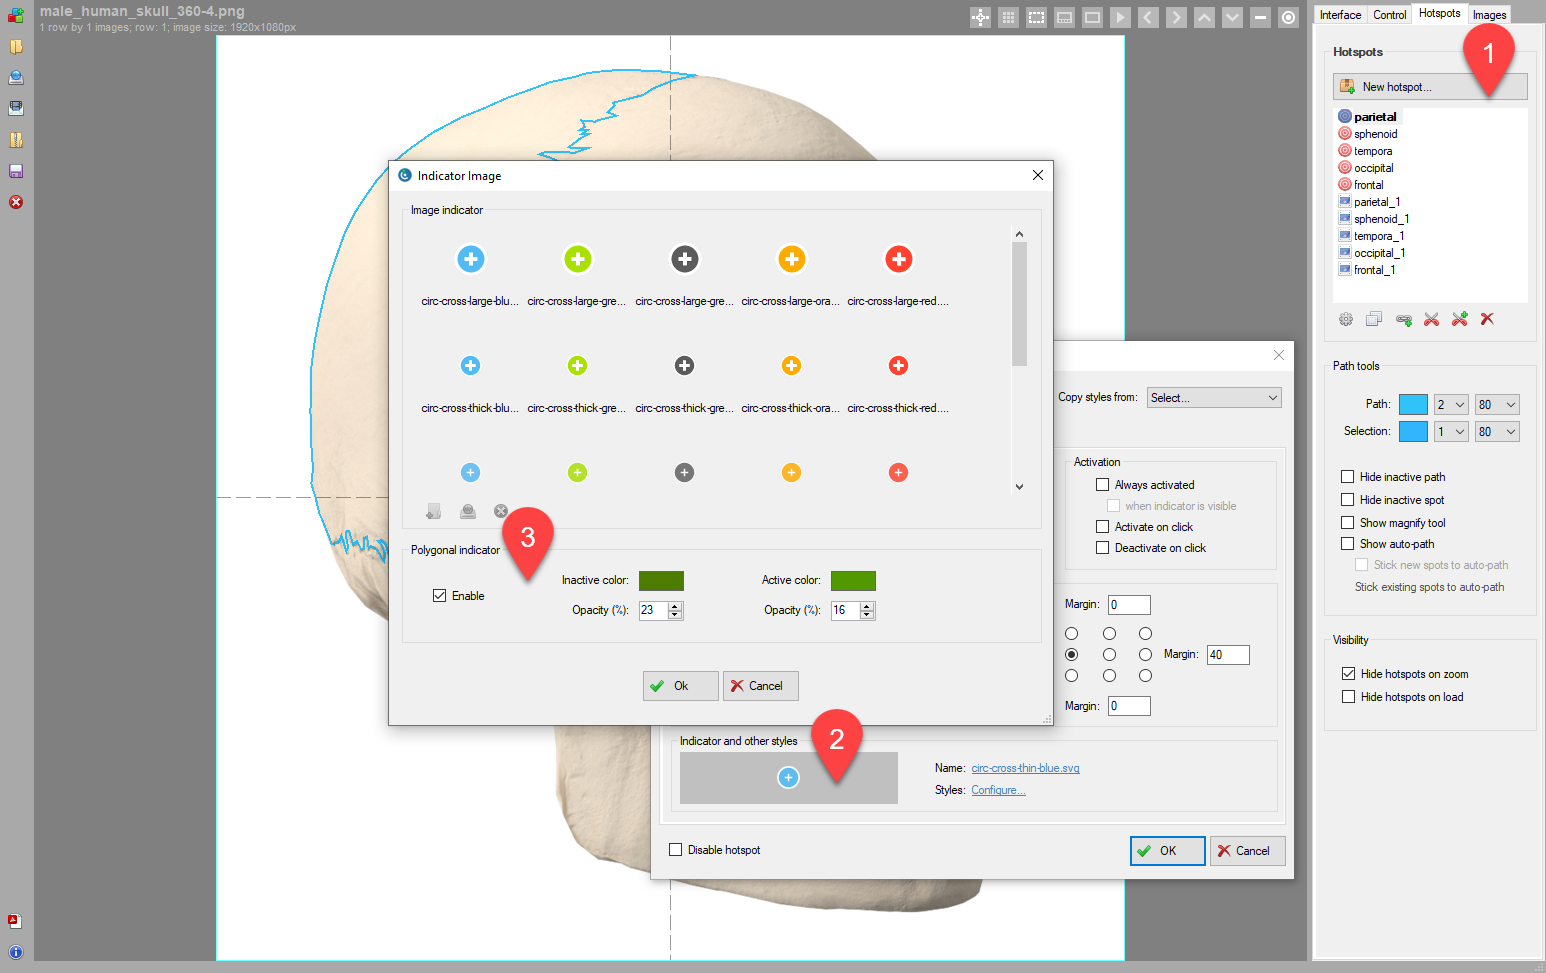
We are thrilled to introduce one of the most requested features: Polygonal Hotspots. For years, our users have been asking for a way to outline specific areas in their 360-degree product images. While traditional hotspots have been useful, they typically rely on indicator images like circles or rectangles with a fixed shape. However, for those designing architectural presentations or producing eLearning material, this often isn't enough. That's where polygonal hotspots come in, and we are excited to announce that they are now available in version 5 of WebRotate 360 Product Viewer.
Here's a quick example using a single image of a skull to illustrate what is possible:
Colored bones are polygonal hotspots. Click or tap to explore.
There are two methods for creating polygonal hotspots: manual creation and our new Blender plugin, which we'll describe below.
Manual polygonal hotspot creation:
Start by creating a new hotspot.
In the Hotspot form, click on the image with the blue hotspot indicator at the bottom of the Hotspot tab.
Rather than selecting a different indicator image, check the "Enable" option under Polygonal Indicator.
Customize the active and inactive colors of the polygon and adjust its opacity as needed.
Close both forms and begin drawing polygons on the images to cover the desired areas. Complete each polygon shape by placing the last polygon point close to the first one or via a double-click.
To fine-tune the polygons, use the adjustment boxes at their edges or click and drag the entire polygon using the white space inside the polygon.
Navigate through the images with arrow keys or the mouse wheel and draw new polygon spots as necessary.
How to create polygonal hotspots in WebRotate 360 SpotEditor
Automated WebRotate 360 Turntable Animator for Blender:
With version 5, we are excited to introduce an advanced Blender addon that automates the creation of both polygonal and standard hotspots. This plugin streamlines the process for published 360-degree product models in Blender. Simply select the desired mesh or pick a vertex within your 3D model, and the plugin will automatically generate a complete 360 view with perfectly positioned hotspots. You can then further edit and customize these hotspots using WebRotate 360 SpotEditor.
See how simple it is to create a polygonal hotspot from a mesh
See the Turntable Animator section below for more details.
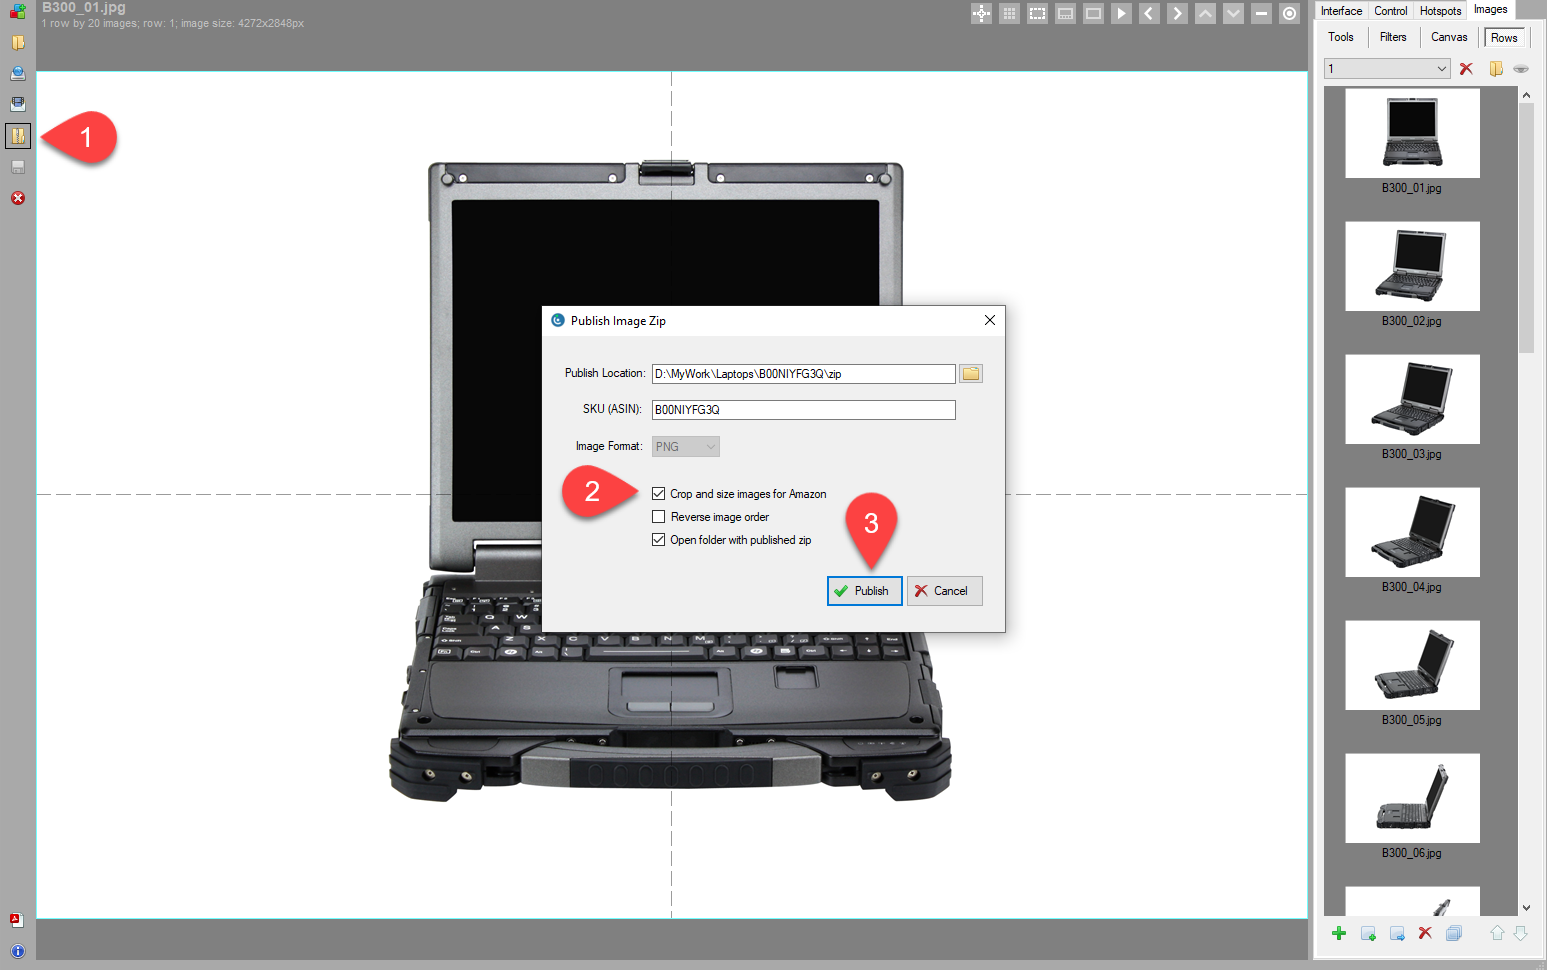
Zip Publishing for 360 views in Amazon listings
Amazon has taken the initiative to introduce 360 product views in recent years. While they offer their own 360 product viewer, which is still quite rudimentary, our v5 update now enables you to publish zip packages containing processed images that are fully compatible with Amazon. This means you can effortlessly create interactive 360 product views using the WebRotate 360 SpotEditor for your website or your clients' websites, as well as conveniently package and upload these views directly to your Amazon listings. It's a highly convenient solution.
This feature is not limited to just Amazon. The ability to generate conveniently sized and packaged 360-degree product images proves useful for various other applications you might encounter.
Publish 360 image zip for Amazon uploads
To utilize this feature, simply click the new Zip button located in the application toolbar on the left side of the main window. Then, set your zip SKU (unique product identifier, if different from the project name), specify its Amazon compatibility, choose the desired image quality, and press OK.
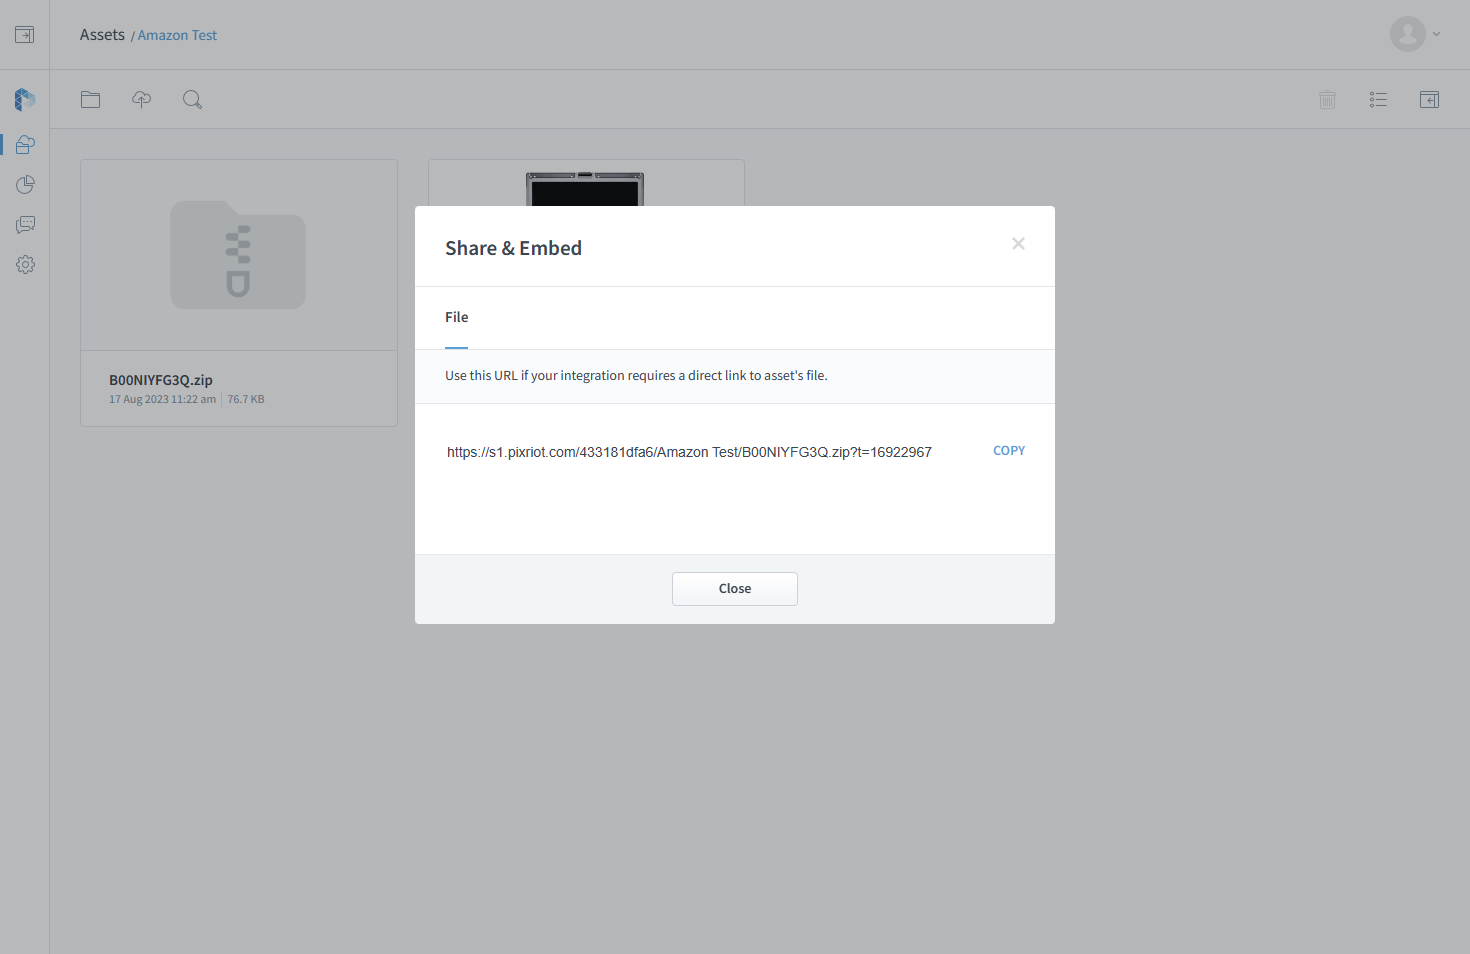
Once published, you can upload your zip to PixRiot and get a shared link you can use in your Amazon vendor dashboard:
Upload your Amazon 360 zip to PixRiot to get a link for Amazon
WEBP image format
With nearly all modern browsers now supporting WEBP images and the phase-out of IE 11 complete, v5 introduces support for publishing 360 product views in the WEBP format. Compared to JPG images with similar compression levels, WEBP can achieve up to a 40% reduction in overall image file size.
This results in faster loading times for your end-users. Additionally, our optimized PixRiot service, bolstered by a global CDN, now accepts WEBP uploads, guaranteeing top-tier performance for PixRiot users.
To utilize this feature, simply choose WEBP from the 'Image Format' drop-down menu on the Publish Form. Then, adjust the quality settings for both low-res and zoom (high-res) images as desired. While it's possible to keep the same quality for both image resolutions, we suggest lowering the quality for zoomed images. This is because compression artifacts tend to be less noticeable on high-resolution images.
Hotspot Auto-path
A standout feature of our product is the hotspot capability. However, creating smooth hotspot paths or trajectories can be challenging. Manual adjustments can lead to a jerky presentation, ruining the overall 360 viewing experience. While our Magnify tool was a step forward, it was clear we needed more.
Introducing the Auto-Path: this innovative tool simplifies the process of crafting smooth hotspot trajectories.
Manually mark your point of interest on at least 5 images, then apply Auto-path
To use the new feature, start by following these steps:
Create a New Hotspot on the Hotspots tab.
Uncheck the preview mode and zoom in via toolbar at the top (see the following video).
Optionally, check "Show magnify tool" to help with positioning.
In "Path tools" on the same tab, check the new "Show auto-path" option.
Identify a point of interest in your images.
Next, using either arrow keys or the mouse wheel for quick navigation, scroll through the images and place at least 5 spots (one per image) following the trajectory of the point of interest.
No need to be precise in positioning the initial spots! For the best results though, ensure that two of these spots lie close to the left and right edges of the hotspot's visible path.
After placing the fifth spot, an elliptical trajectory, indicated by a dashed line, will automatically appear. If needed, add extra spots or tweak the existing ones either by dragging them with the mouse or using the keyboard shortcut, (Ctrl + Arrow on Windows; Option + Arrow on macOS). Spots can be also individually removed using the Delete key or the right-click menu.
Once satisfied with the trajectory, enable "Stick new spots to auto-path". Then, click "Stick existing spots to auto-path" to align the initial spots with the auto-path.
Now, as you navigate through the rest of the images and set new spots close to your selected point of interest, they will automatically snap to the auto-path. You can also drag them left or right along the trajectory as required, ensuring a consistently smooth elliptical path.
New hotspot creation workflow in v5 using Auto-path
WebRotate 360 QuickView app
When you publish a 360 product view on your hard-drive using WebRotate 360 SpotEditor, it generates an HTML file inside the "published" folder. However, viewing this file offline outside of SpotEditor can be less straightforward. Although there are simple workarounds available, using your default browser for previewing might feel too heavy or intrusive for such previews.
Additionally, when delivering your work to a client for an offline review, they may encounter difficulties when trying to open the HTML file (consider using PixRiot to share your 360 product images with your clients instead).
WebRotate 360 QuickView is the solution to this problem.
It is a standalone application designed to open your published 360s offline with ease. By simply double-clicking on a .view file, which you can now find in v5's published output folder under published/360-assets/project-name, you can instantly view your 360 product spins without any hassle. QuickView is also available under the "Test Browser" drop-down on the publish form in SpotEditor (Windows version only at this time), so you don't have to mess with your browser tabs while testing your webrotate views.
Double-click .view file to launch the QuickView app
Furthermore, QuickView is an essential tool for quick previews of your rendered 360 product images created using WebRotate 360 Turntable Animator for Blender, a new feature we are introducing with v5. You can find more details about it in the post below.
For Windows users, WebRotate 360 QuickView can be downloaded here. The macOS version will be released soon, so stay tuned for updates.
WebRotate 360 Turtable Animator for Blender
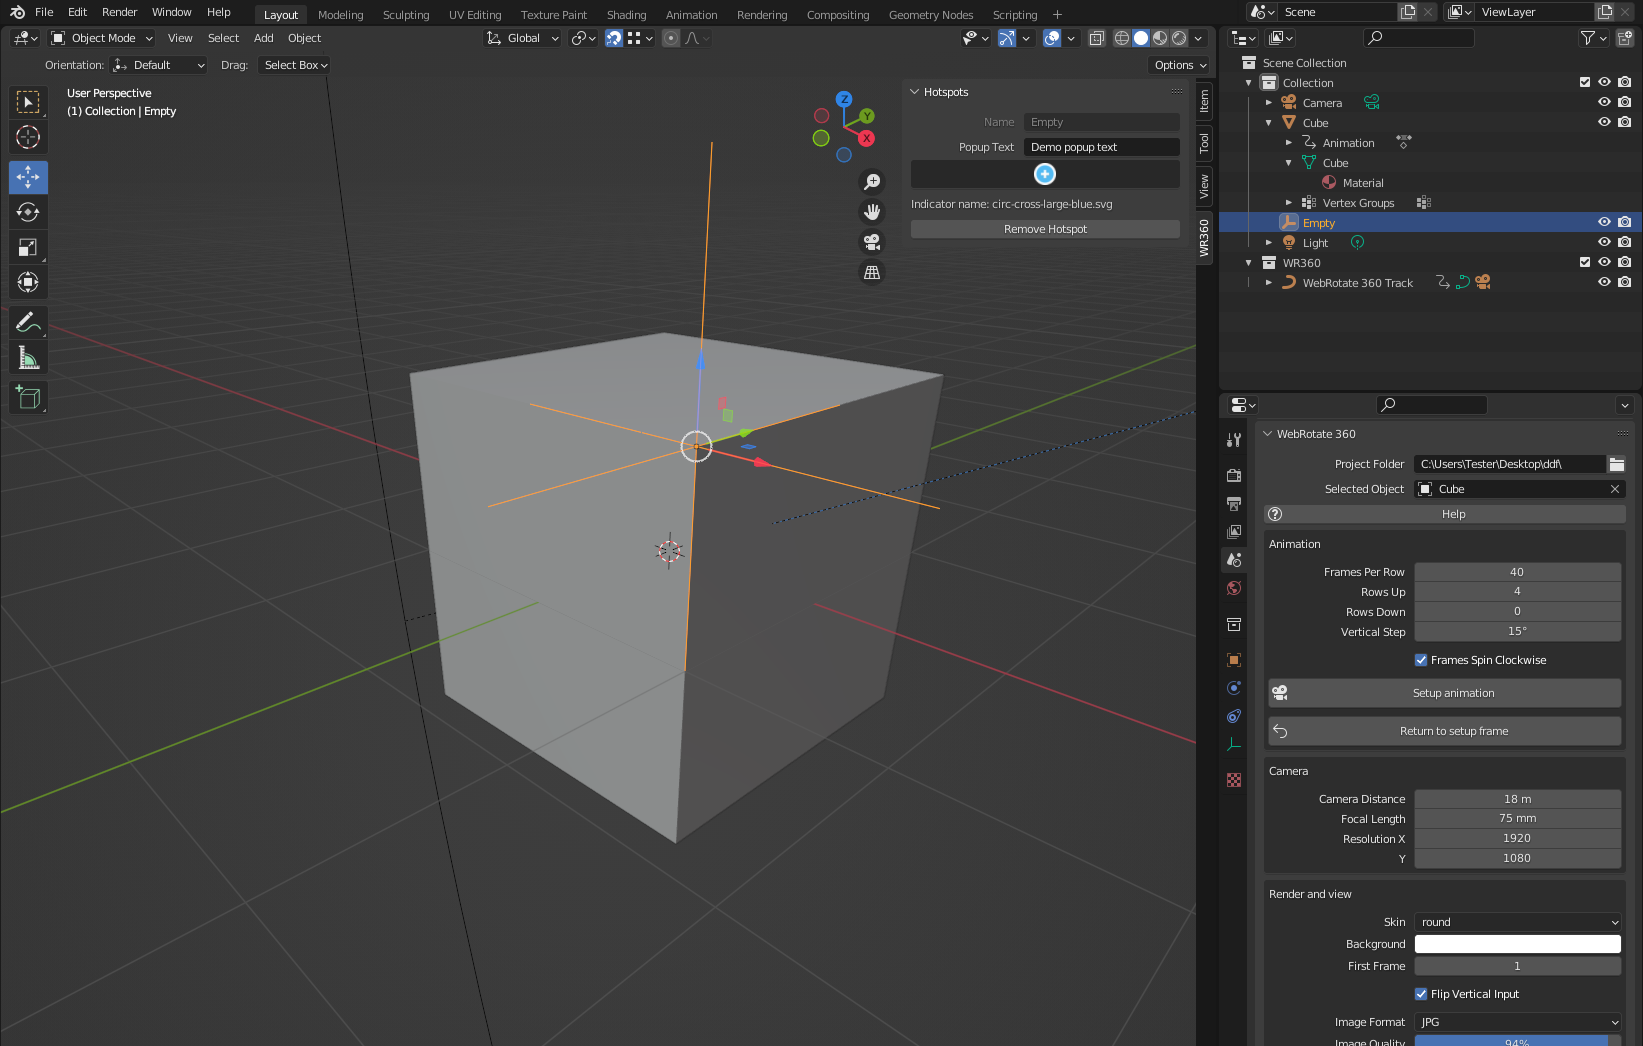
We are thrilled to introduce our Blender addon, the WebRotate 360 Turntable Animator! This exciting addition opens up a whole new world of possibilities for 3D designers who are familiar with Blender, making it easier than ever to work with WebRotate 360.
This plugin provides similar functionality to SpotEditor, including the ability to publish finalized 360s that can be uploaded online or viewed locally. When combined with the QuickView app mentioned earlier and integrated with SpotEditor, it streamlines your 3D production pipeline, enhancing your workflow.
"How to" video is coming here soon
Here's a brief overview of what you can achieve with the Turntable Animator:
Easily set up 360 animations for single-row and multi-row rendering with just a few mouse clicks. The plugin animates the target object instead of the camera, resulting in realistic studio-like lighting.
Render animations using Blender's built-in rendering engines or via a fast draft render for quick reviews.
Automatically create hotspots, including polygonal ones from meshes or vertex groups, saving you time and effort in the hotspot creation process (see this quick demo).
Instantly preview the results as an interactive view in QuickView and/or upload them to PixRiot or elsewhere for easy sharing and showcasing.
Seamlessly open the output in WebRotate 360 SpotEditor for further editing and advanced publishing, giving you full control over your 360 projects.
Refer to our detailed user guide for comprehensive instructions on using the Turntable Animator.
As of now, the plugin is exclusively available to users with a valid PRO or Enterprise license. If you have previously purchased our software and are still within your free upgrade period, you can request access to the Turntable Animator here.
Performance and SEO
One of the challenges in SEO with 360-degree product views has been a performance metric known as "Largest Contentful Paint" (LCP). Put simply, search engines like Google evaluate how quickly users can view media in the most prominent section of a website. They often judge site performance based on this metric (among others) since it reflects the user's perception of page performance.
In past releases, our 360-degree product views, which are often the main content on a page, faced challenges with LCP. The first image would only load after all the viewer scripts and configuration xml were in place. This delay sometimes led to slower-than-expected LCP times, which Google could flag as a performance issue. Moreover, it meant users had to wait longer before seeing any content within the viewer container.
LCP has a major effect on your SEO performance ranking
With v5, we've revamped the viewer's loading process. Now, a "pre-loader" image can be visible even before any scripts are loaded. This is achieved by incorporating a direct link to the first image in the HTML integration snippet, ensuring considerably faster LCP times.
All SpotEditor publishing templates have been updated accordingly. They now produce viewer HTML that ensures the first image loads immediately, and importantly, before any page scripts. To emphasize this enhancement, we've added a new integration template named template_fast_largest_contentful_paint.html in the integration templates.
Additionally, come late September, core WebRotate 360 plugins and PixRiot iFrames will be updated to support this faster loading mechanism.
There's more!
In the next post, we will cover other interesting features and enhacements in v5, including:
Noxon turtable integration.
Google Analytics v4 integration.
Auto-play on drag release for smooth non-stop 360s (jewlerly mode!)
Centered pulsating animation as a progress indicator.
Copy styles between hotspots.
New hotspot action that can trigger another hotspot.
To get the latest release using your existing installation, start SpotEditor and click the blue "info" icon in the bottom left corner, then select "Check Updates". Free version can be downloaded using this link:
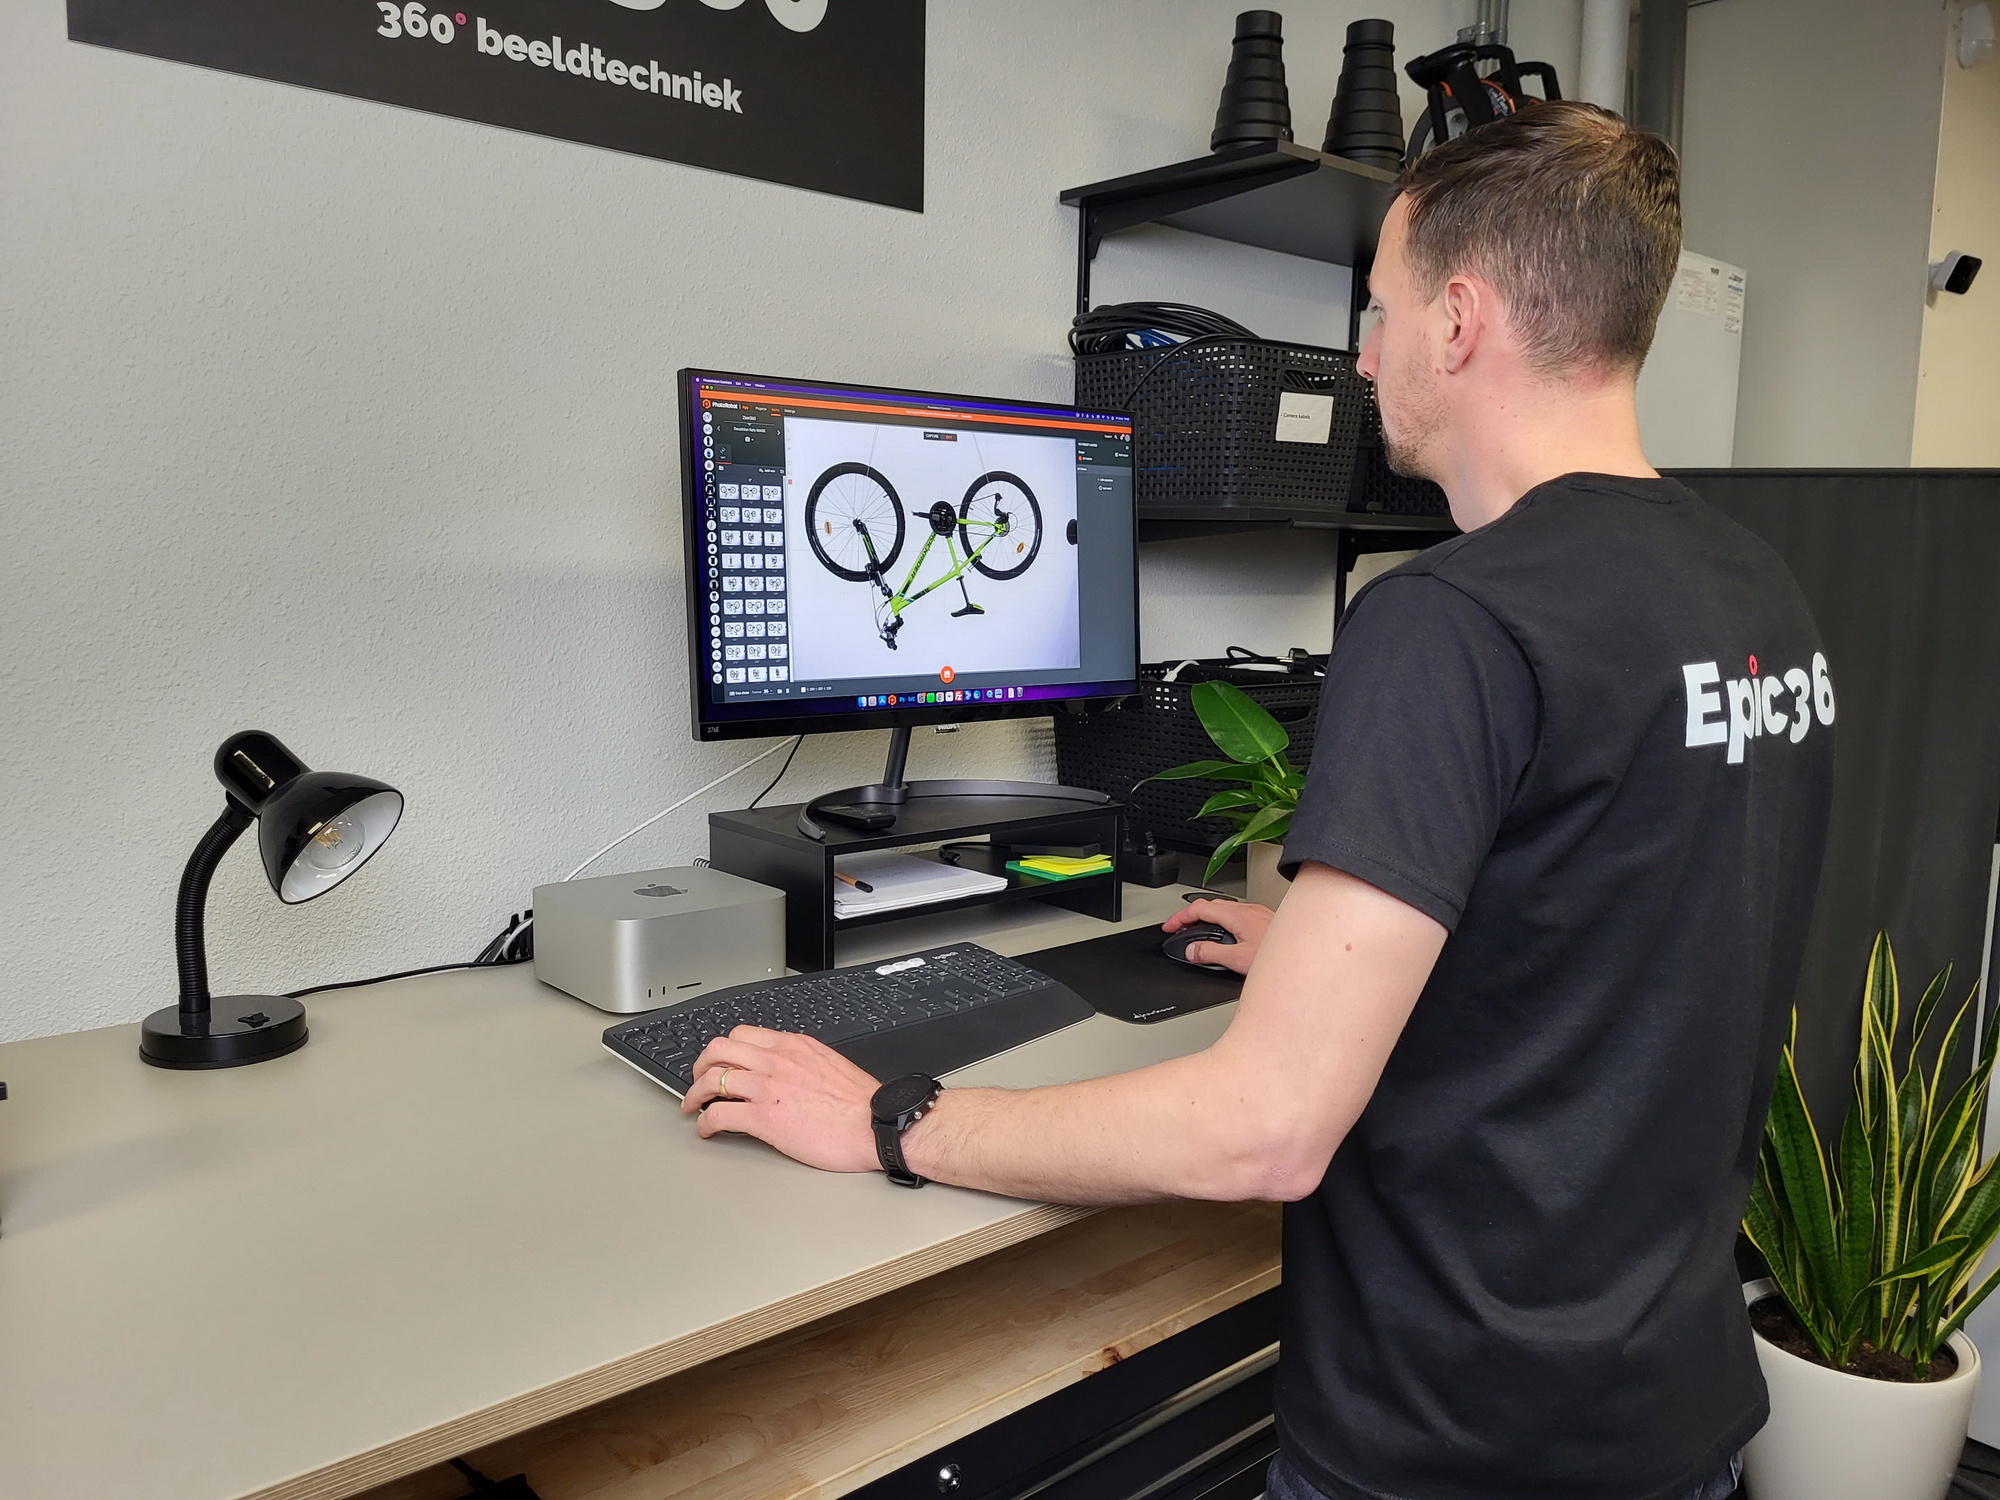
Hi, I'm Martin Jan Hoekstra, and I'm the founder of Epic36 (https://epic36.com/), a photography studio specializing in 360-degree product photography for e-commerce businesses. We have been using WebRotate 360 since the beginning and have found their software and support to be exceptional.
I was asked to write about an interesting project, and I thought I would share some tips on how to capture a 360 degree photo of a bicycle. Photographing a bike can be challenging, but with the right techniques and equipment, it's possible to create a stunning 360 product image. So, let's dive into some useful tips and tricks.
Overview of the process
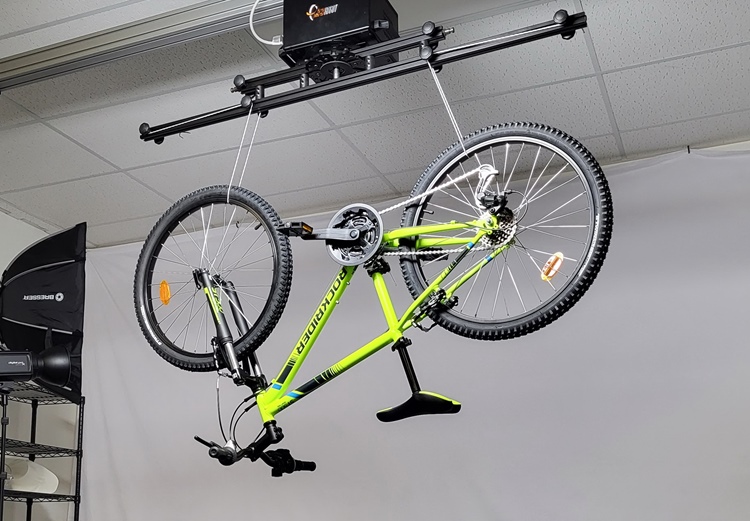
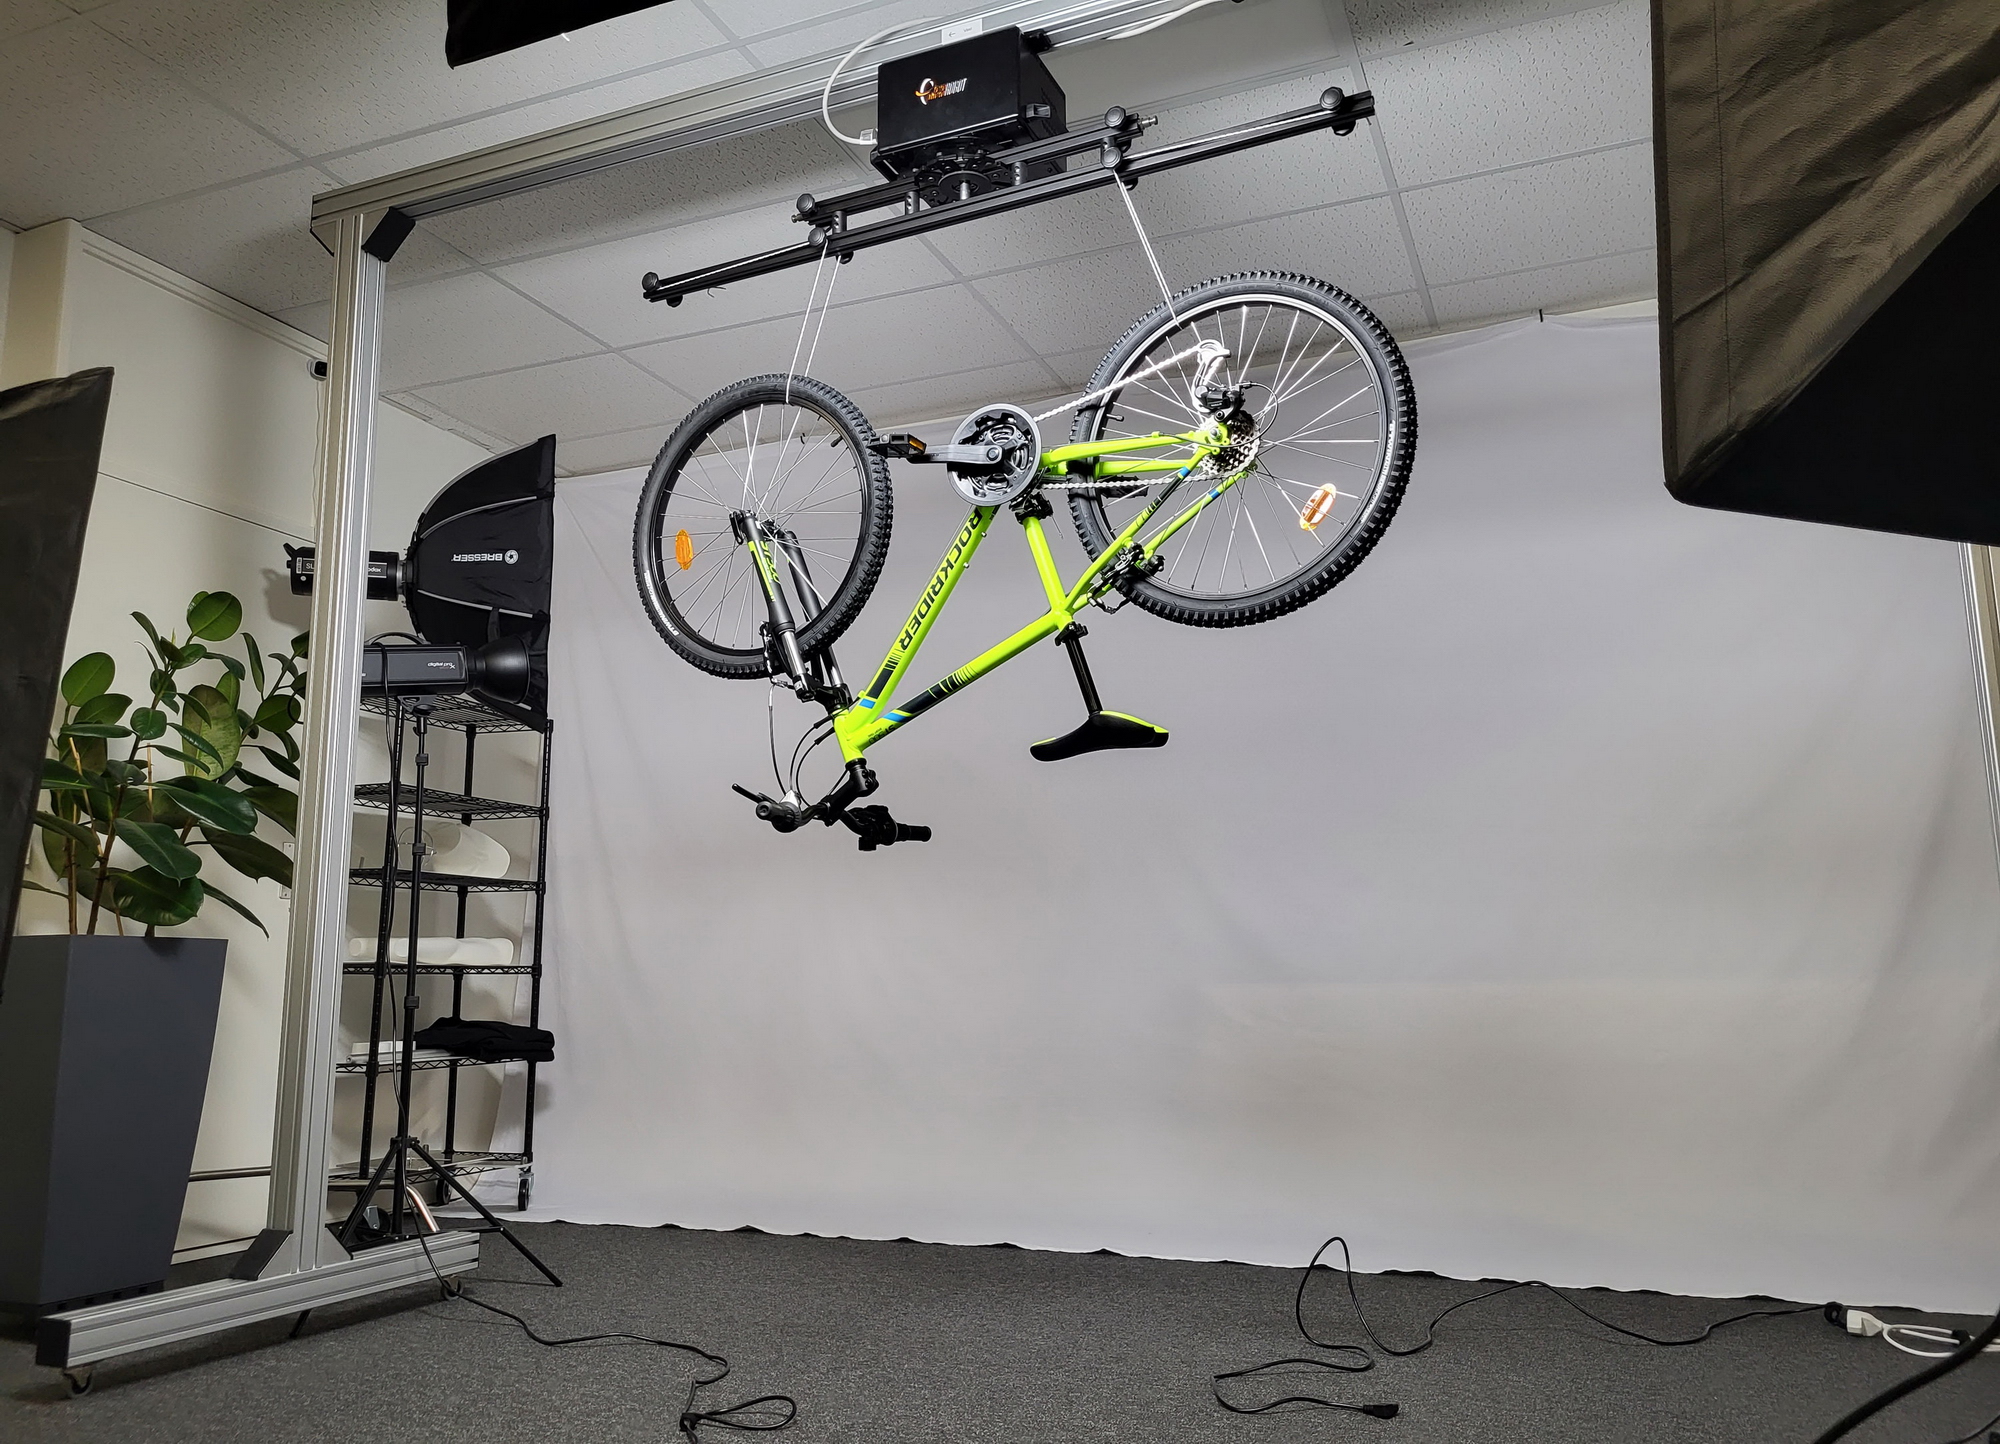
Contrary to what you might expect, we don't place the bike on a turntable to take photos. Instead, we hang the bike upside down to photograph it. We use two key lights, one fill light and two background lights for the shoot.
Taking pictures of bicycles requires a decent amount of space, and it's best to have ample room between the bike and the background to prevent the background lighting from affecting the subject. Below I will share a trick that can help you if your studio doesn't have enough space.
Hanging the bike has the advantage of making the bike stand upright in the end result. However, the downside is that all 36 photos need to be edited manually. Fortunately, I can share a handy brand new Photoshop tool to help you in this process.
Let's get started.
Preparing the studio
When it comes to photographing a bike in 360 degrees, having enough space is crucial. This allows you to position your lighting equipment in the right place and create the necessary distance between the bike and the background lighting to achieve optimal results.
So make sure to allocate enough space in your studio or shooting location to move around freely. Consider using a plain white wall as a clean and unobstructed background, or a white cloth or sheet can also be used. If possible, invest in lighting equipment with wheels to make it easy to move around and create the necessary space for each project.
Preparing the bike for the shoot
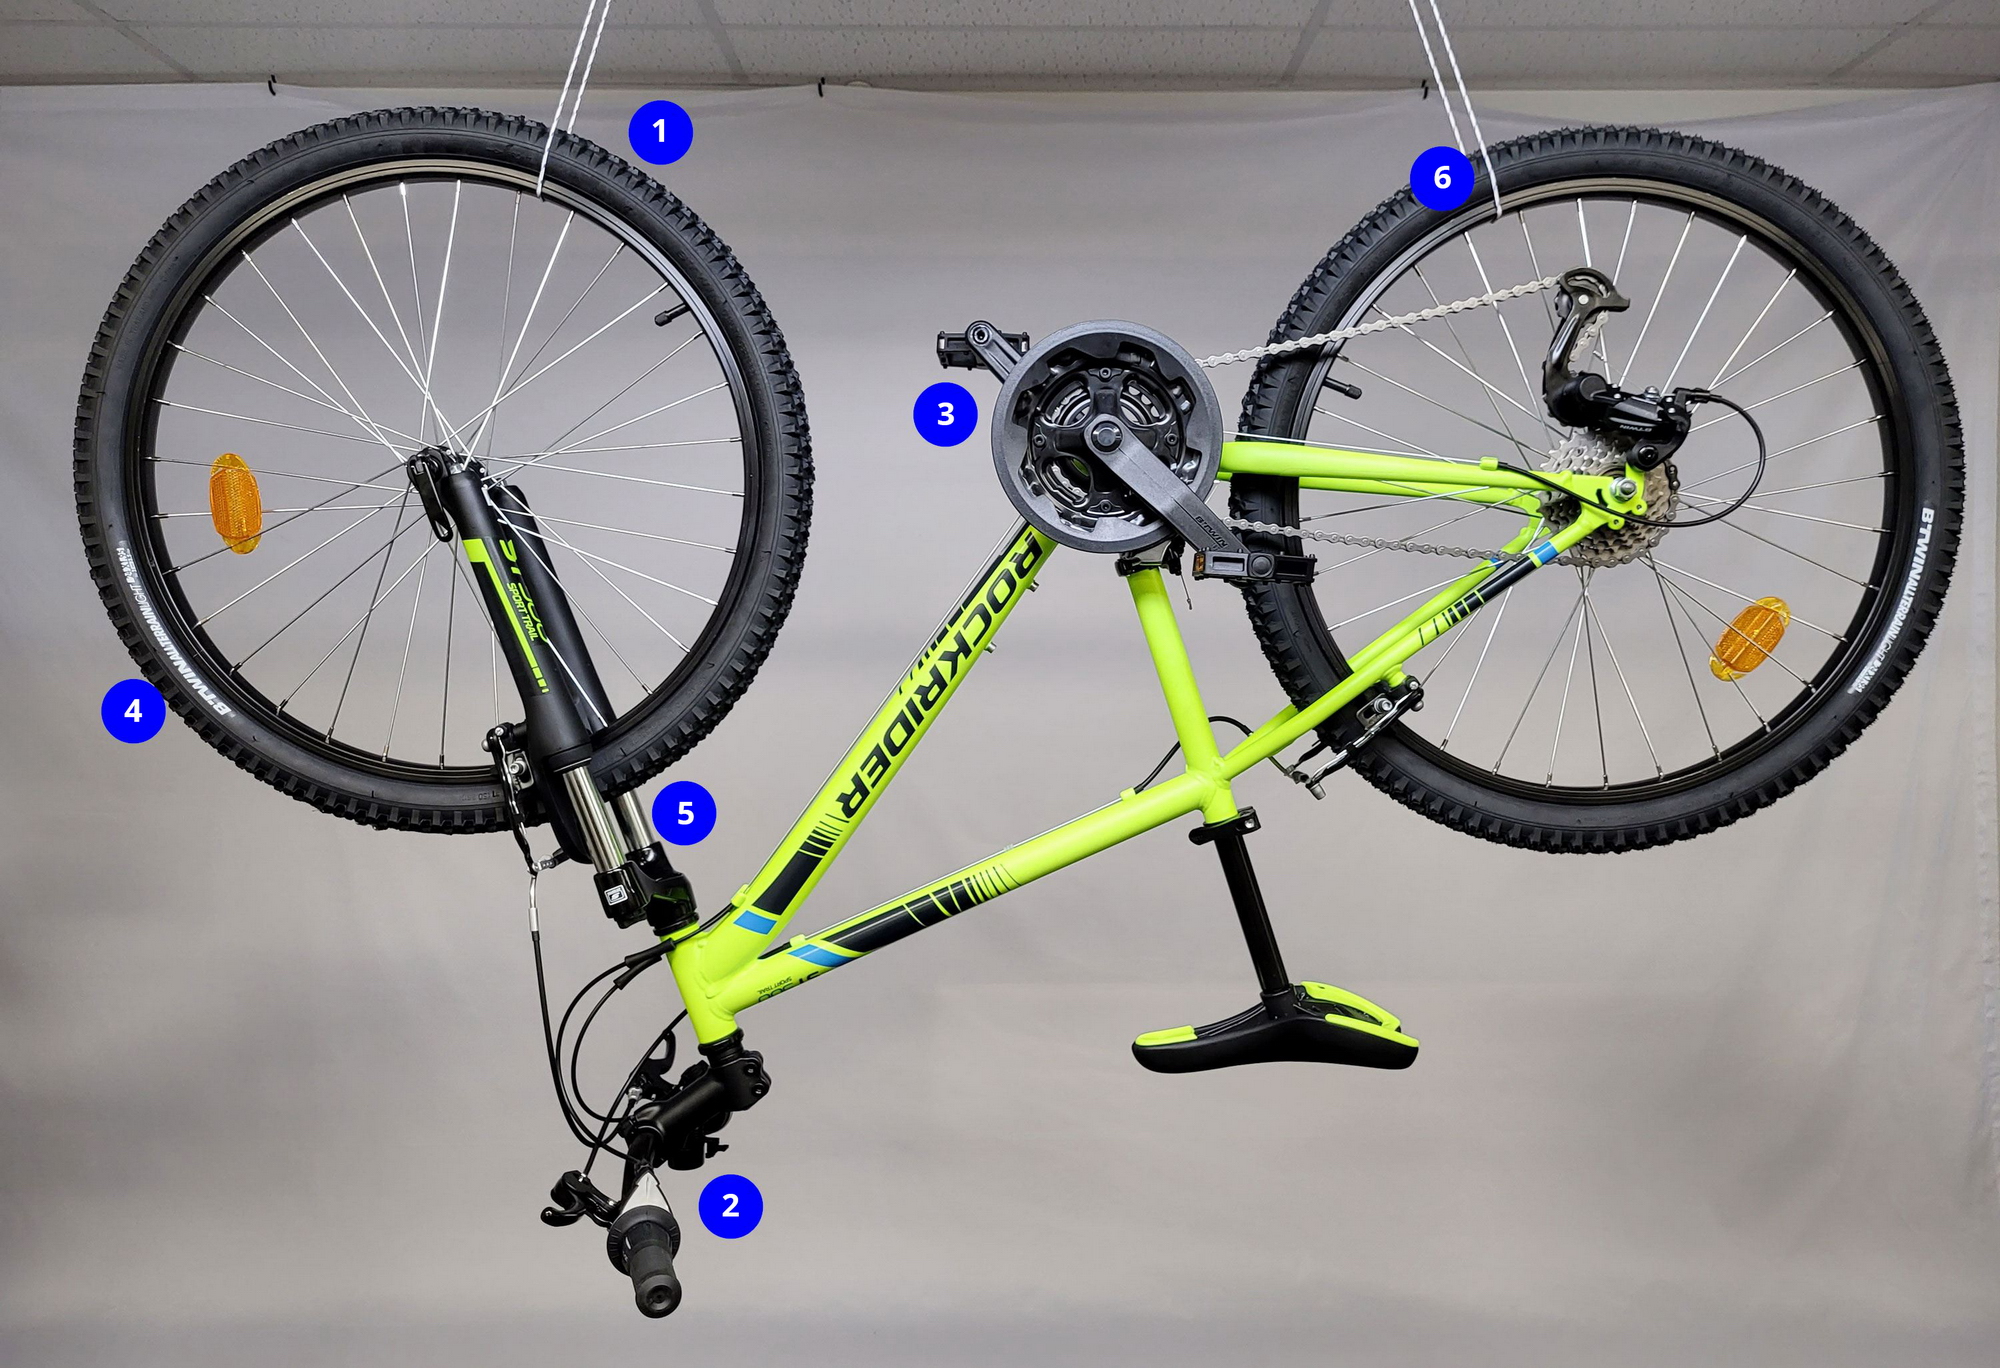
Before the shoot, you want to make sure the bike is clean, in good condition, and presented in the best possible way. In addition to removing any accessories that may obstruct the view of the bike, it's important to set the handlebars straight, align the pedals, and ensure the logos on the tires are at the same height. Also, when hanging the bike, be sure to avoid hanging the rope or string over the logos on the rims or tires. This will make it more difficult to remove in post-processing.
A few things to keep in mind:
Hang the bike straight
Straighten the handlebars
Align the pedals
Align any logos on the tires
Clean the bike, even if it is new, there may still be some visible grease here and there.
Place the rope or whatever you use to hang the bike in the center of the spokes and not over the logos on the tires.
Setting up the equipment
To photograph a bike in 360 degrees using this method, you need a hanging system. I use an automatic hanging system that rotates and takes pictures of the bike while being controlled by a computer.
Jarring movements
It's important to note that the bike may move quickly due to its hanging position, so it's crucial to rotate the bike slowly and smoothly to avoid any motion blur or jarring movements. If you're using a start-stop system, it's important to ensure that the starting and stopping is as smooth as possible. However, the best method is to let the bike rotate slowly and continuously without stopping and have the camera automatically take all the pictures.
Capturing the 360 degree photo
Capturing a 360 degree photo involves rotating the bike and taking a specific number of photos as it turns. I usually take 36 photos to achieve a nice result. Taking more photos can be a drawback since each photo has to be manually edited. But that is up to you of course.
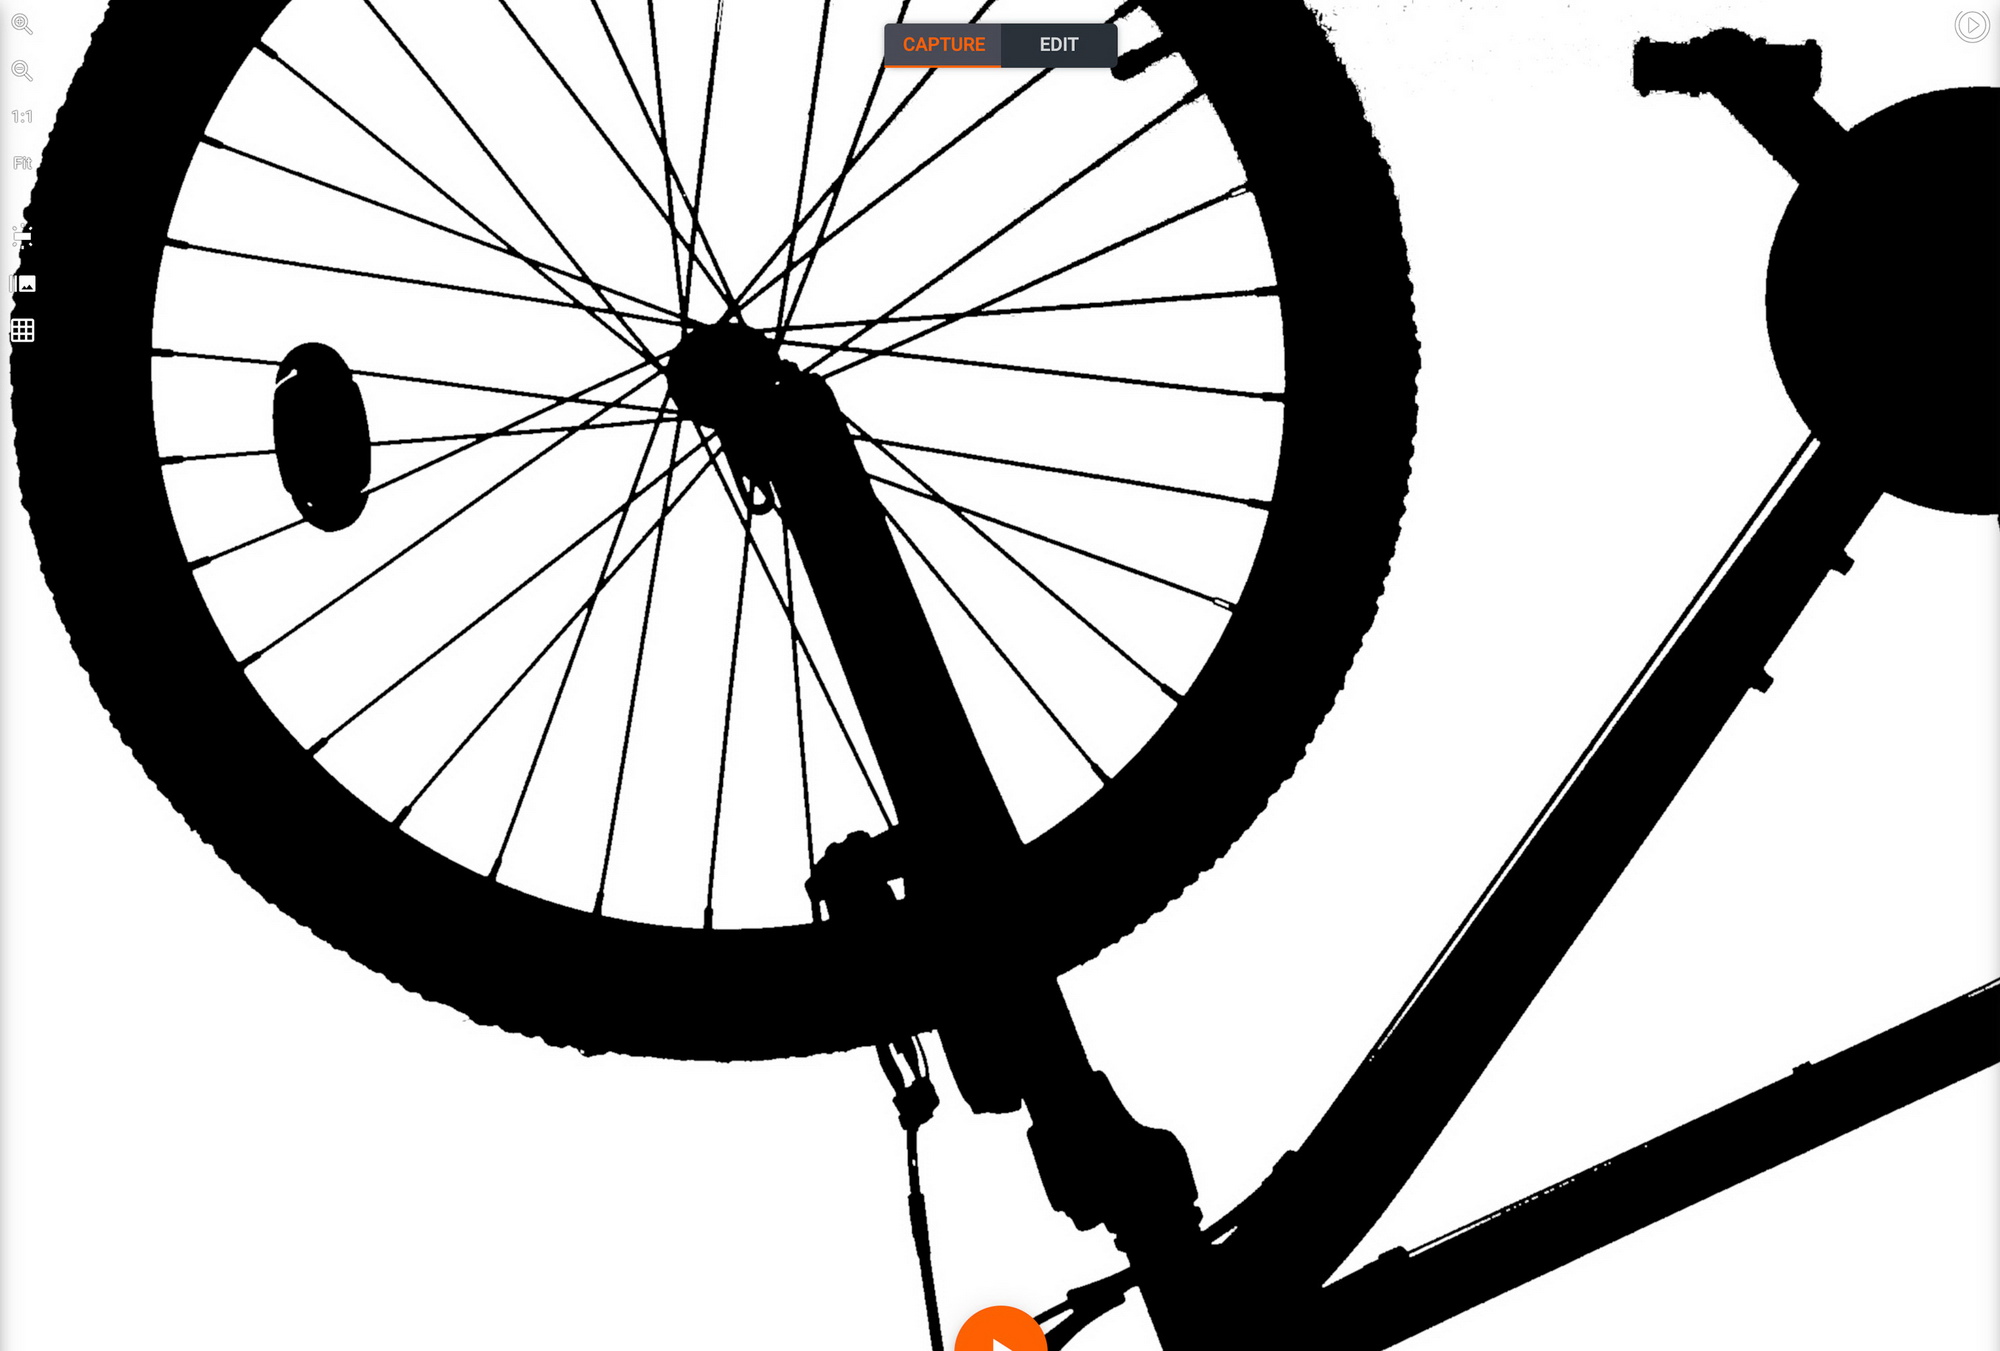
Not enough space?
When photographing a subject like a bike, it's important to have enough space to ensure that the background lighting doesn't affect the subject. If there is not enough space, the background lighting can cause small details such as the spokes become less visible.
Look at the spokes that are almost invisible
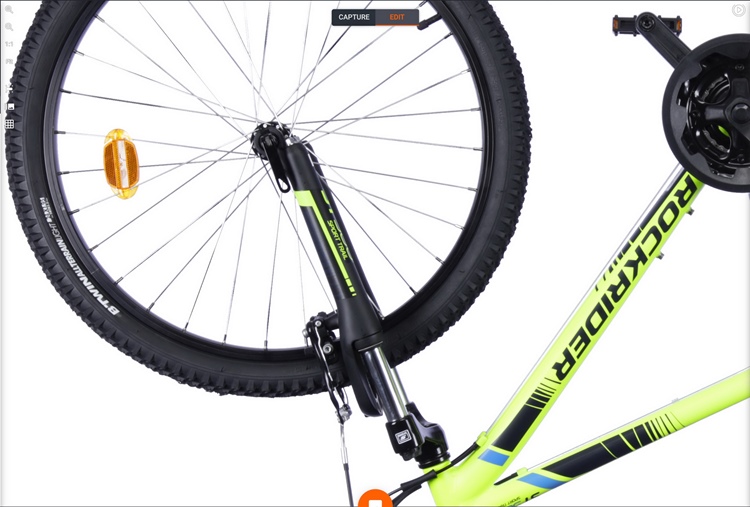
In such cases, it can be helpful to take two photos per frame, one with slightly underexposed lighting and the other with just the background lighting. Having these photos allows creating a mask of the object for each frame, so it can be separated from the background in post-processing.
First, make a mask of the bike.
The underexposed lighting helps reducing the impact of the reflections while the mask ensures you can still have pure white background.
Use the mask to remove the background.
However, this technique requires taking more photos and can be time-consuming. In most cases, it's not necessary and can be avoided by using enough space between the subject and the background lighting. So, it's always best to create enough room to position the lights in the right place and prevent the background lighting from interfering with the subject. By doing so, you can save time in post-processing.
Post-processing the photo
After capturing the photos, post-processing is necessary to refine the image. Initially, the standard adjustments such as making the background 100% white, cropping, adjusting exposure, and sharpening the image need to be done. When using the hanging method, there are two additional steps that need to be taken. First, the support system used to hang the bike, such as a rope, must be removed.
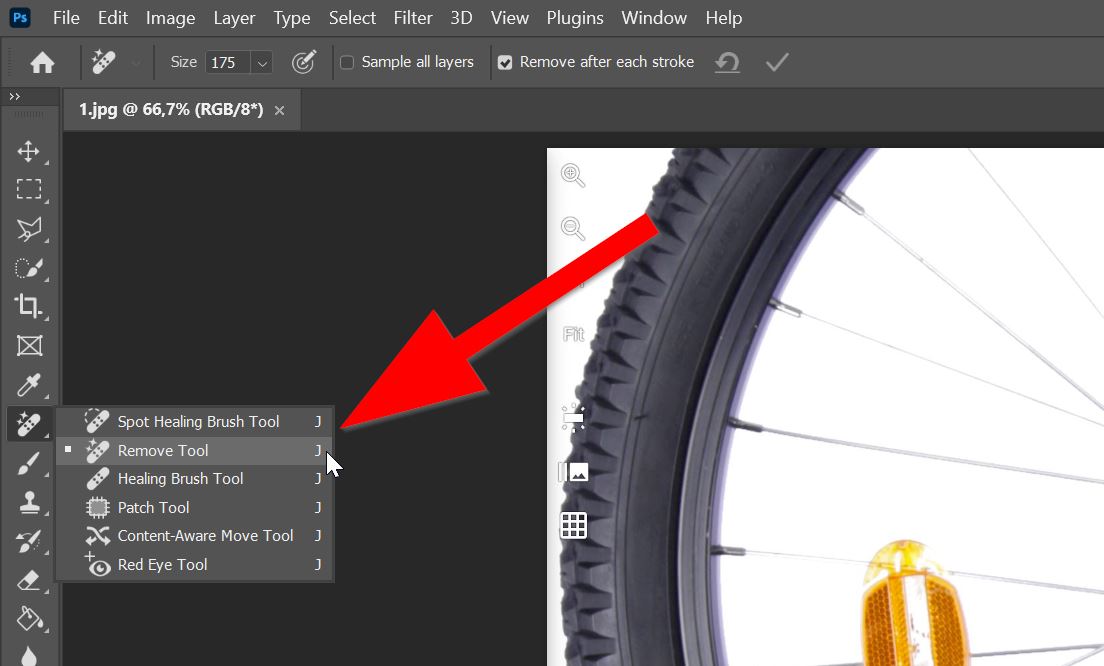
Second, the bike needs to be flipped over into an upright position. When it comes to removing the support system, the color of the rope doesn't matter. Even a black rope is visible and must be removed. I use Photoshop for this process, and until recently the Healing Brush was the go-to tool.
Photoshop remove tool
However, removing the rope from some photos can be a more challenging task, as the perspective of the photo makes it harder to achieve a clean removal. The new Remove tool in Photoshop (Beta version as of 2023) is an excellent new feature that works exceptionally well in removing the support system. It's far superior to the old Healing Brush for this task. Although you still sometimes need to try two or three times like with the Healing tool to achieve a good result.
When faced with difficult elements, the new Remove tool is much better.
Currently, the tool is only accessible in the Beta version of Photoshop. If you have an Adobe subscription, you can download the Beta version through Creative Cloud.
End result
Here is the final result of the 360-degree bike photography process: a perfectly upright image of the bike that can be viewed from any angle. This image showcases the bike in its entirety, allowing customers to examine its design and features in detail.
Hopefully, you'll find some helpful tips throughout this post. And of course, I'm happy to help if you have any questions, feel free to contact (https://epic36.com/contact/) me.
Due to popular demand, let's review two ways you can publish multi-row 360 product views in WebRotate 360 SpotEditor.
Multi-row in WebRotate 360 is a feature that let's you spin 360-degree images both vertically and horizontally. Although rare, some folks also use our multi-row support to create product configurators and tours, where you can instantly switch product options like colors within the same view.
Using "multi-row" for configurators is problematic in that we load all images from all rows upfront, and so it can be quite slow if you need to cover lots of options (e.g. color, fabrics, etc.). For image based configurators, we usually recommend using "reload" feature that lets you load separate 360 spins or animations within the same view on demand. The feature is available via viewer API or using Hyperlink hotspot action with viewer config as action URL. More details on both the hyperlink action and APIs can be found in the user guide.
We have a few blog posts dedicated to image production workflows for multi-row 360 product spins using both photographic setups as well as 3D image rendering in specialized 3D software (e.g., post1, post2, post3). You may also find a couple of live multi-row examples on our website (e.g., here and here). We also support a unique two-row rotation mode that you can learn more about in the following post. While technically a "multi-row", the two-row feature is not covered in this blog post.
Each row in a multi-row 360 product view consists of the same number of images. The software will warn you if this requirement is not met or will automatically add dummy grey images to even out all rows. If you edit a published 360 view manually (i.e via config xml) or generate it programmatically and end up with inconsistent number or images in rows, the viewer will fall back to treating it as a single-row 360-degree product animation.
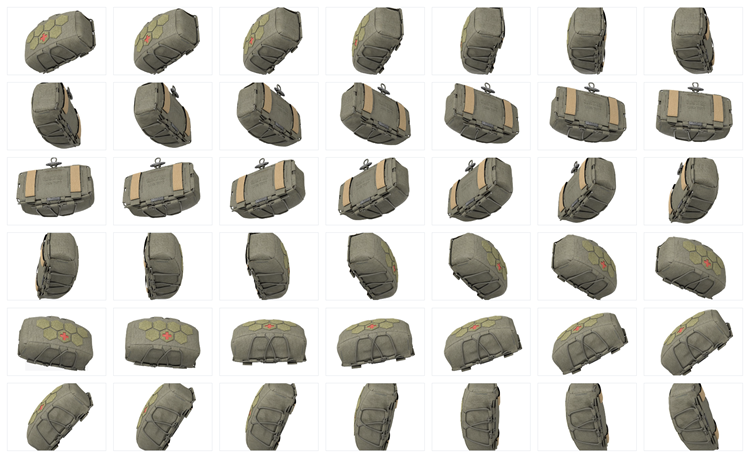
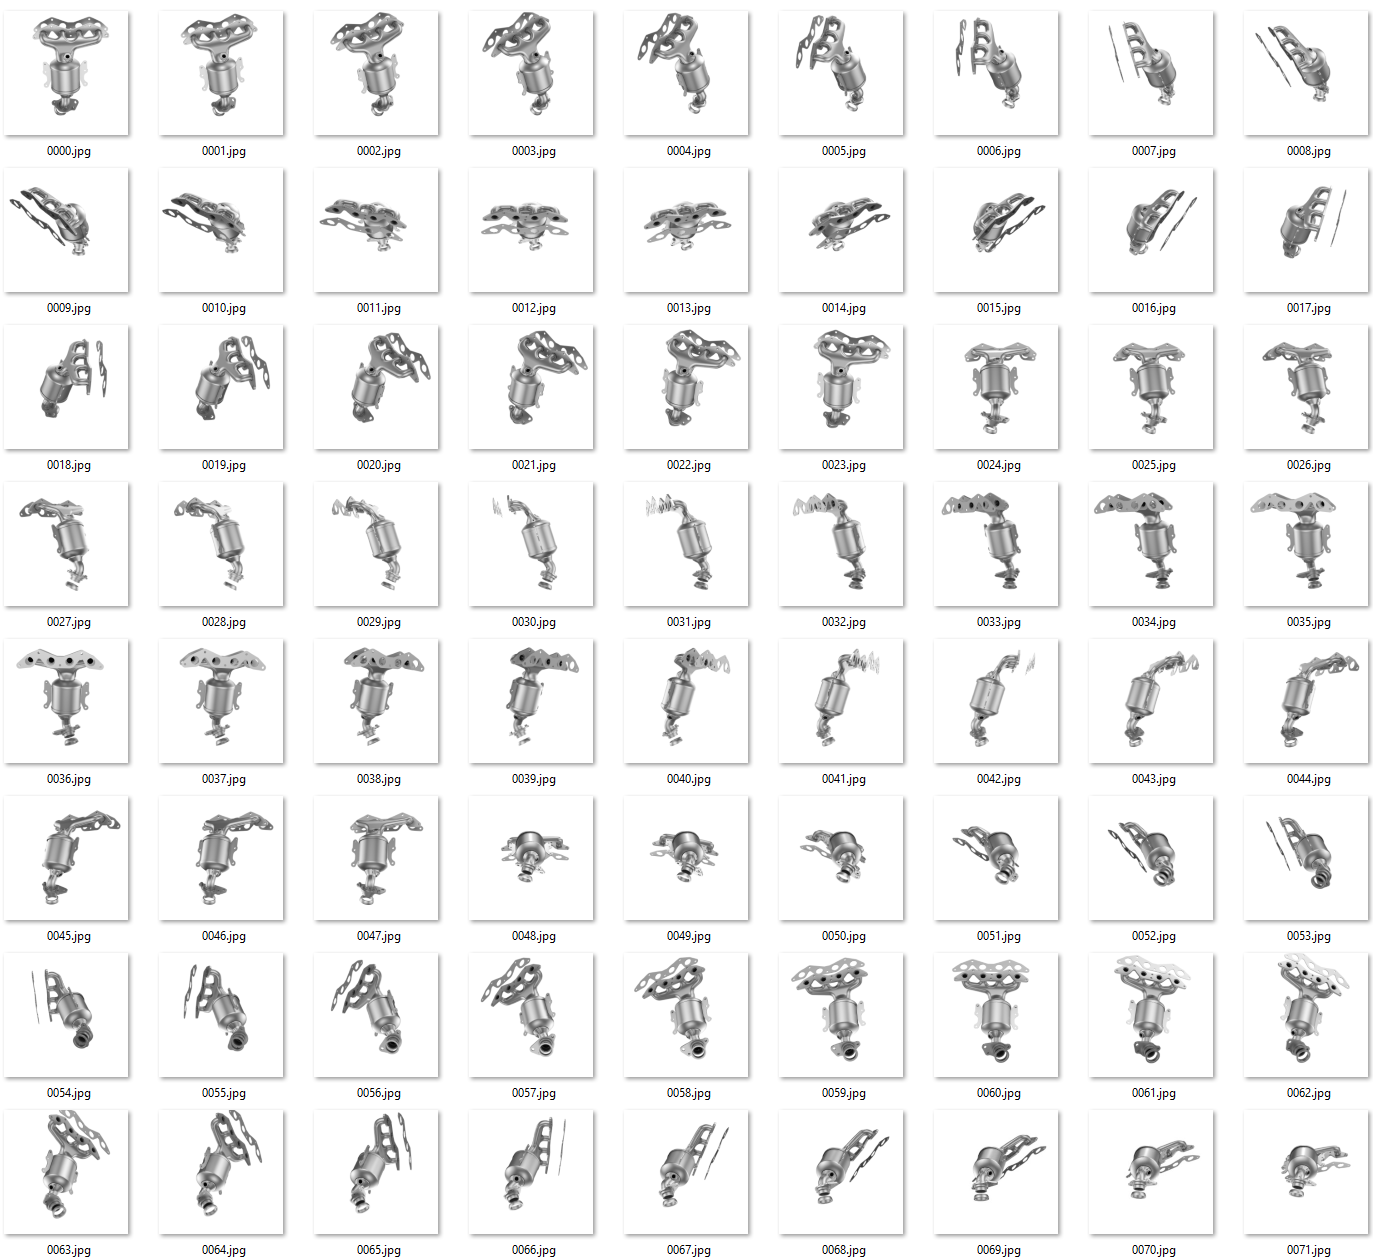
There are three ways to create multi-row spins like the following example in SpotEditor.
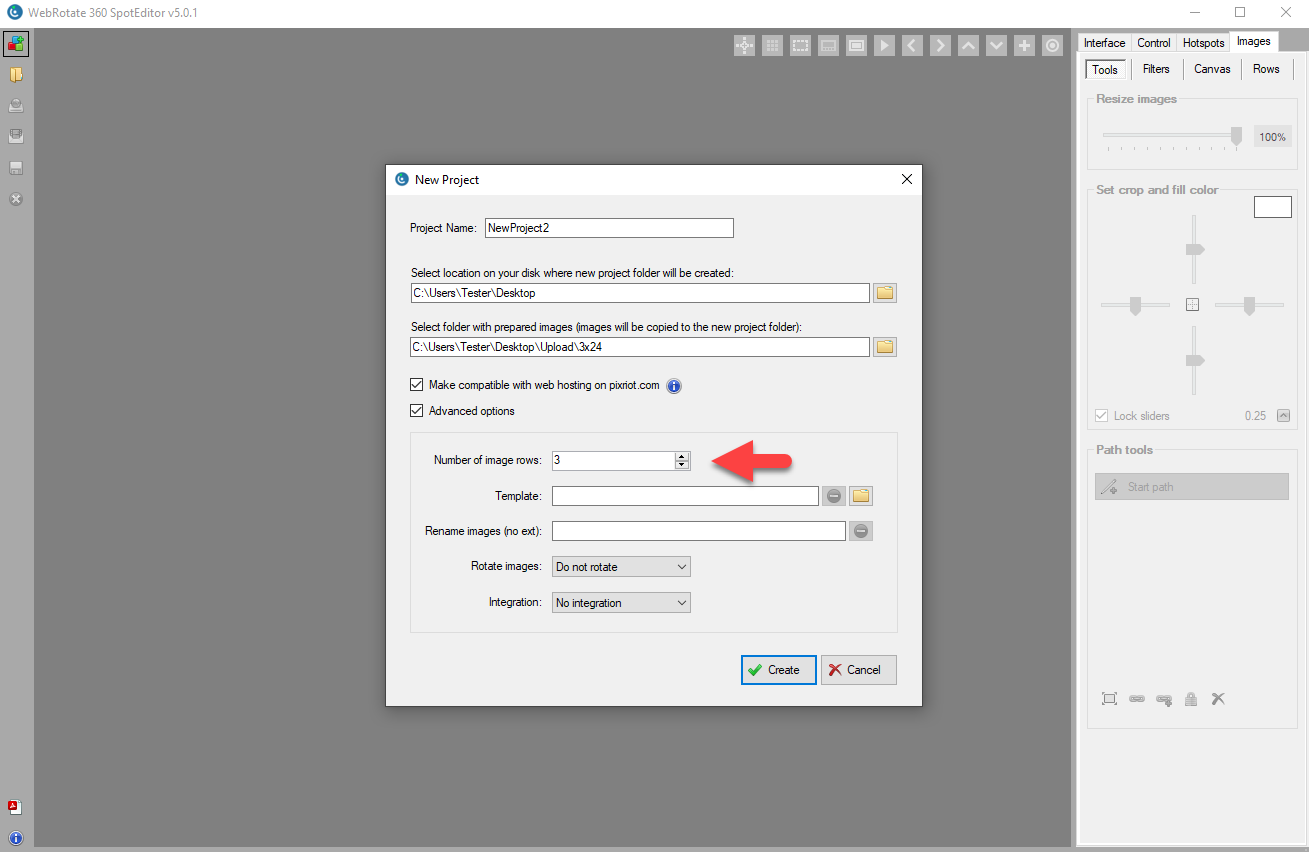
1. New Project Form
Start by organizing your images in a single folder. They have to be named sequentially through the rows. For example, if you have 3 rows consisting of 24 images each (72 images total), and the first image of the first row is named image0.jpg, then the last image of the last row is going to be image71.jpg.
The following screenshot illustrates the folder contents with 3 x 24 rows:
Once images are prepared in a source folder, select New Project in SpotEditor, enter the name of the project, its location and the location of the source folder with the multi-row images on your hard-drive. Check Advanced options and enter the number of rows in the source folder via "Number of image rows".
Download example 360-degree images with 7 x 36 images here and enter 7 under "Number of image rows" for a quick test.
Select Create to load the images.
While it's possible to drag images left and right in the preview window in SpotEditor right away, to switch rows you need to either use the vertical arrow buttons in the top toolbar or flip the rows under Images -> Rows tab. The reason you can't drag images vertically in the Preview is due to how we load images in SpotEditor. To apply edits such as image crop or levels in real-time as you drag images, we have to keep the images ready in memory which can be quite taxing on your computer. It would be more likely to run out of RAM, if we were to load all image rows upfront.
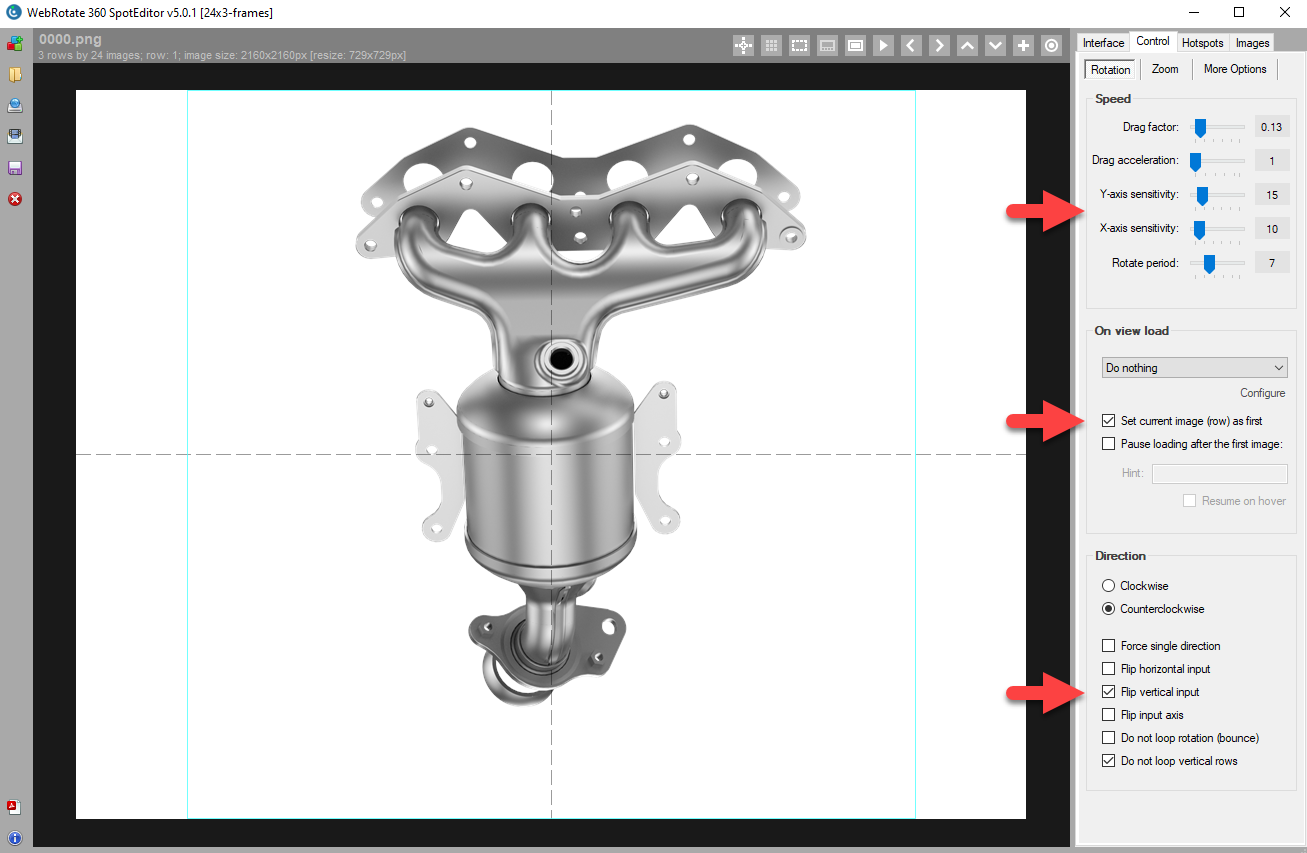
There are several important settings under Control -> Rotation related to 360 multi-row views in SpotEditor that you need to be aware of:
Speed -> X and Y sensitivity
A smooth multi-row 360 product view should be easy to navigate both vertically and horizontally which is not always doable. As even a tiny vertical mouse movement can trigger transition to the next row while dragging 360-degree images horizontally. To control the ease of the transition between rows and frames in individual rows, use X and Y sensitivity options for horizontal and vertical drag respectively. They are basically pixel values that tell the viewer how much drag movement in pixels to ignore until it can flip a row (Y) or jump to the next frame (X).
On view load -> Set current image (row) as first
As you may already know, this setting sets the first image that the viewer will have to load and show right away and before loading the rest of the image sequence. For multi-row spins, this also sets a starting row user will interact with, which is a row that corresponds to the "first" image.
Direction -> Flip vertical input
Depending on the order of image rows, which mostly depends on how photography or rendering was setup, you may end up in a situation where dragging images down will move rows up and vice versa. This setting can quickly fix this by switching the direction of vertical row animation in response to user input.
2. Images > Rows
If you need more control, there's also Images -> Rows tab where you can add or remove rows and images individually. That can be useful if you create an empty project without specifying a source folder on the New Project form, or if you capture additional rows for an existing project that you need to append. Using options under Images -> Rows you can add rows or images either individually or in a batch. The panel options at the bottom of the tab also allow repositioning or replacing individual images in each row.
To add a new row(s), click the green plus and enter the number of rows you are adding and optionally select a folder with prepared images (if you are adding multiple rows at once, prepare images in the folder as discussed in the beginning of the post). If a folder is not selected, a empty row is created and you can then import images into the row using the panel button with a small plus sign.
If you end up with dummy grey thumbnails that are automatically added when the number of images in rows is not the same, select the thumbnails with your mouse (Ctrl key for multiple selection) and click the button with an arrow to pick matching replacements.
3. WebRotate 360 Turntable Animator for Blender
Blender is a popular 3D modeling and rendering software and we have just released an advanced plugin for it. With this plugin, you can:
1) Setup a 3D scene for multi-row rendering in a few mouse clicks. 2) Render all images using Blender's built-in rendering engines. 3) Instantly view the result as an interactive view and/or upload it to PixRiot. 4) Open it in WebRotate 360 SpotEditor for further editing and publishing.
Find more details about WebRotate 360 Turntable Animator on our Blender plugin page.
 Zoomed image provides microscopic detail not seen in 3D models
 Full rig with laptop for museum travel
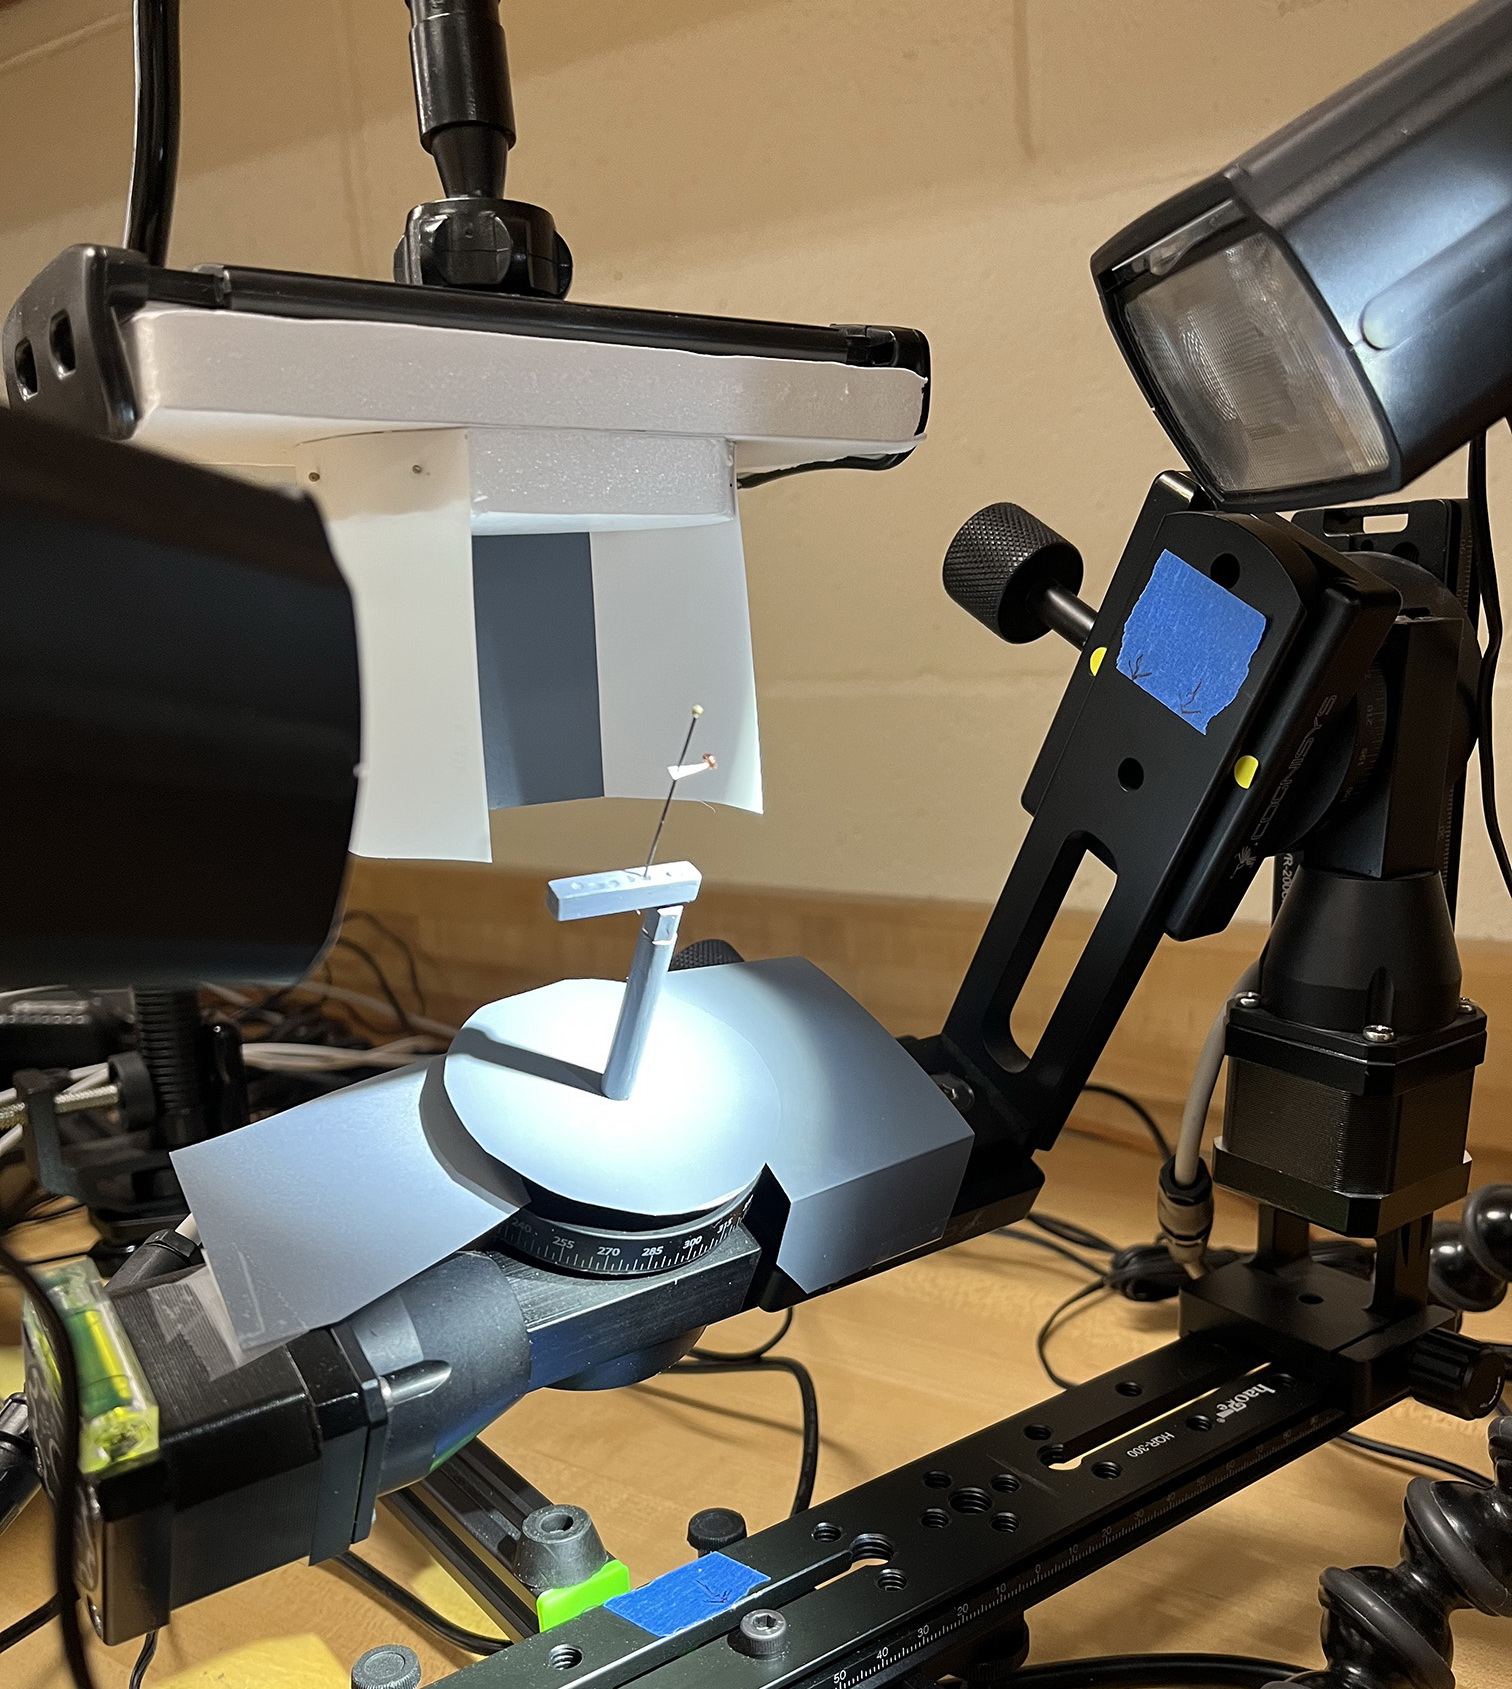 Tilted Z-axis with view of flash diffuser drawn back on its own rail to view specimen. The Z-axis is tilted in 20-30 degree increments, depending on the specimen. Also visible is a special mount to accommodate insects with off-center pins (such as the tiny "point-mounted" beetle shown here)
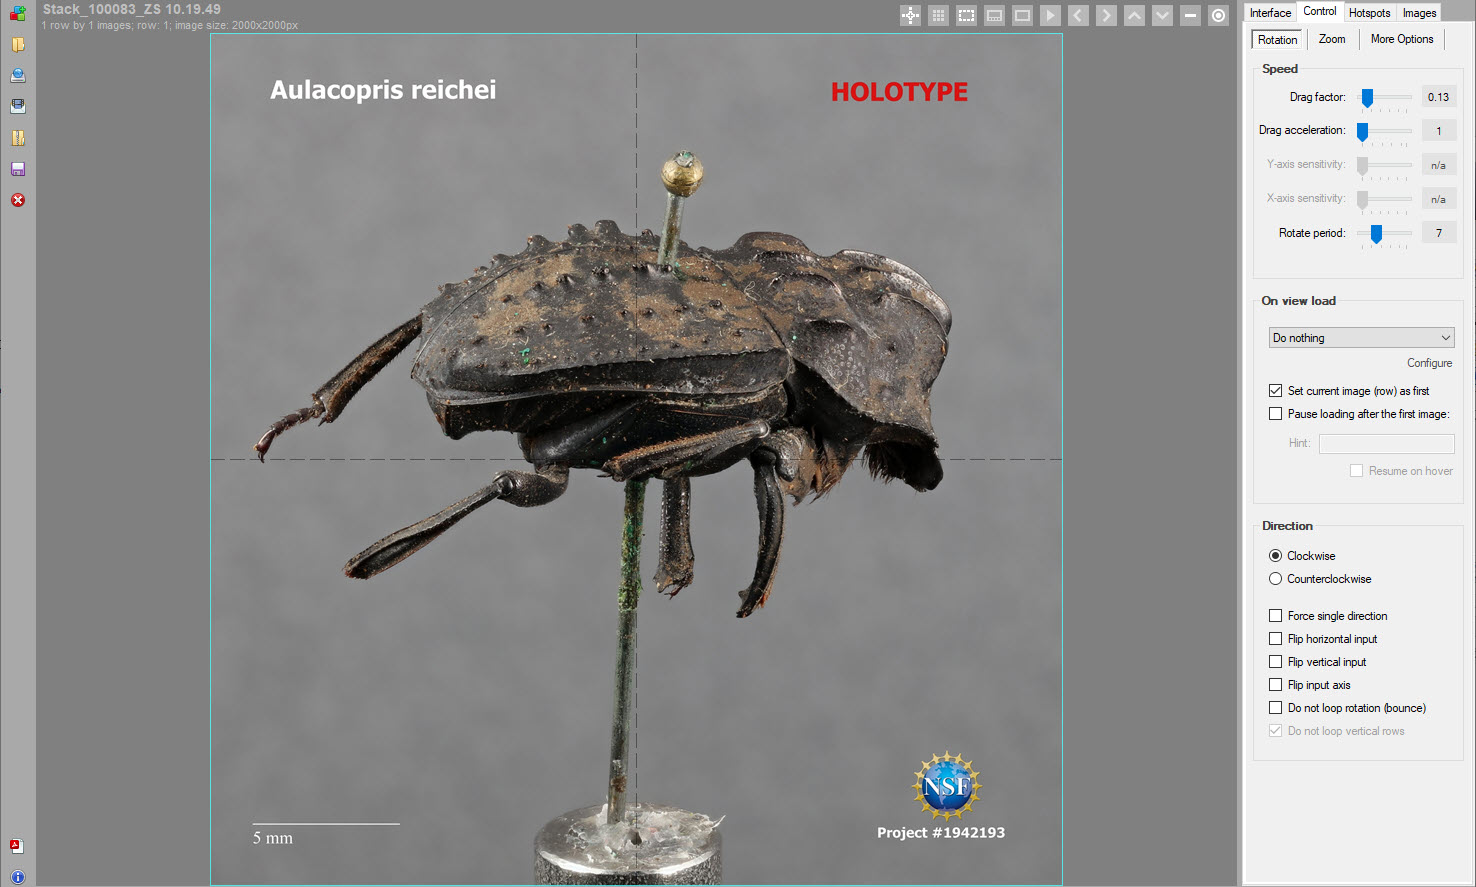 360-degree images are imported into WebRotate 360 software for 360 view configuration and publishing
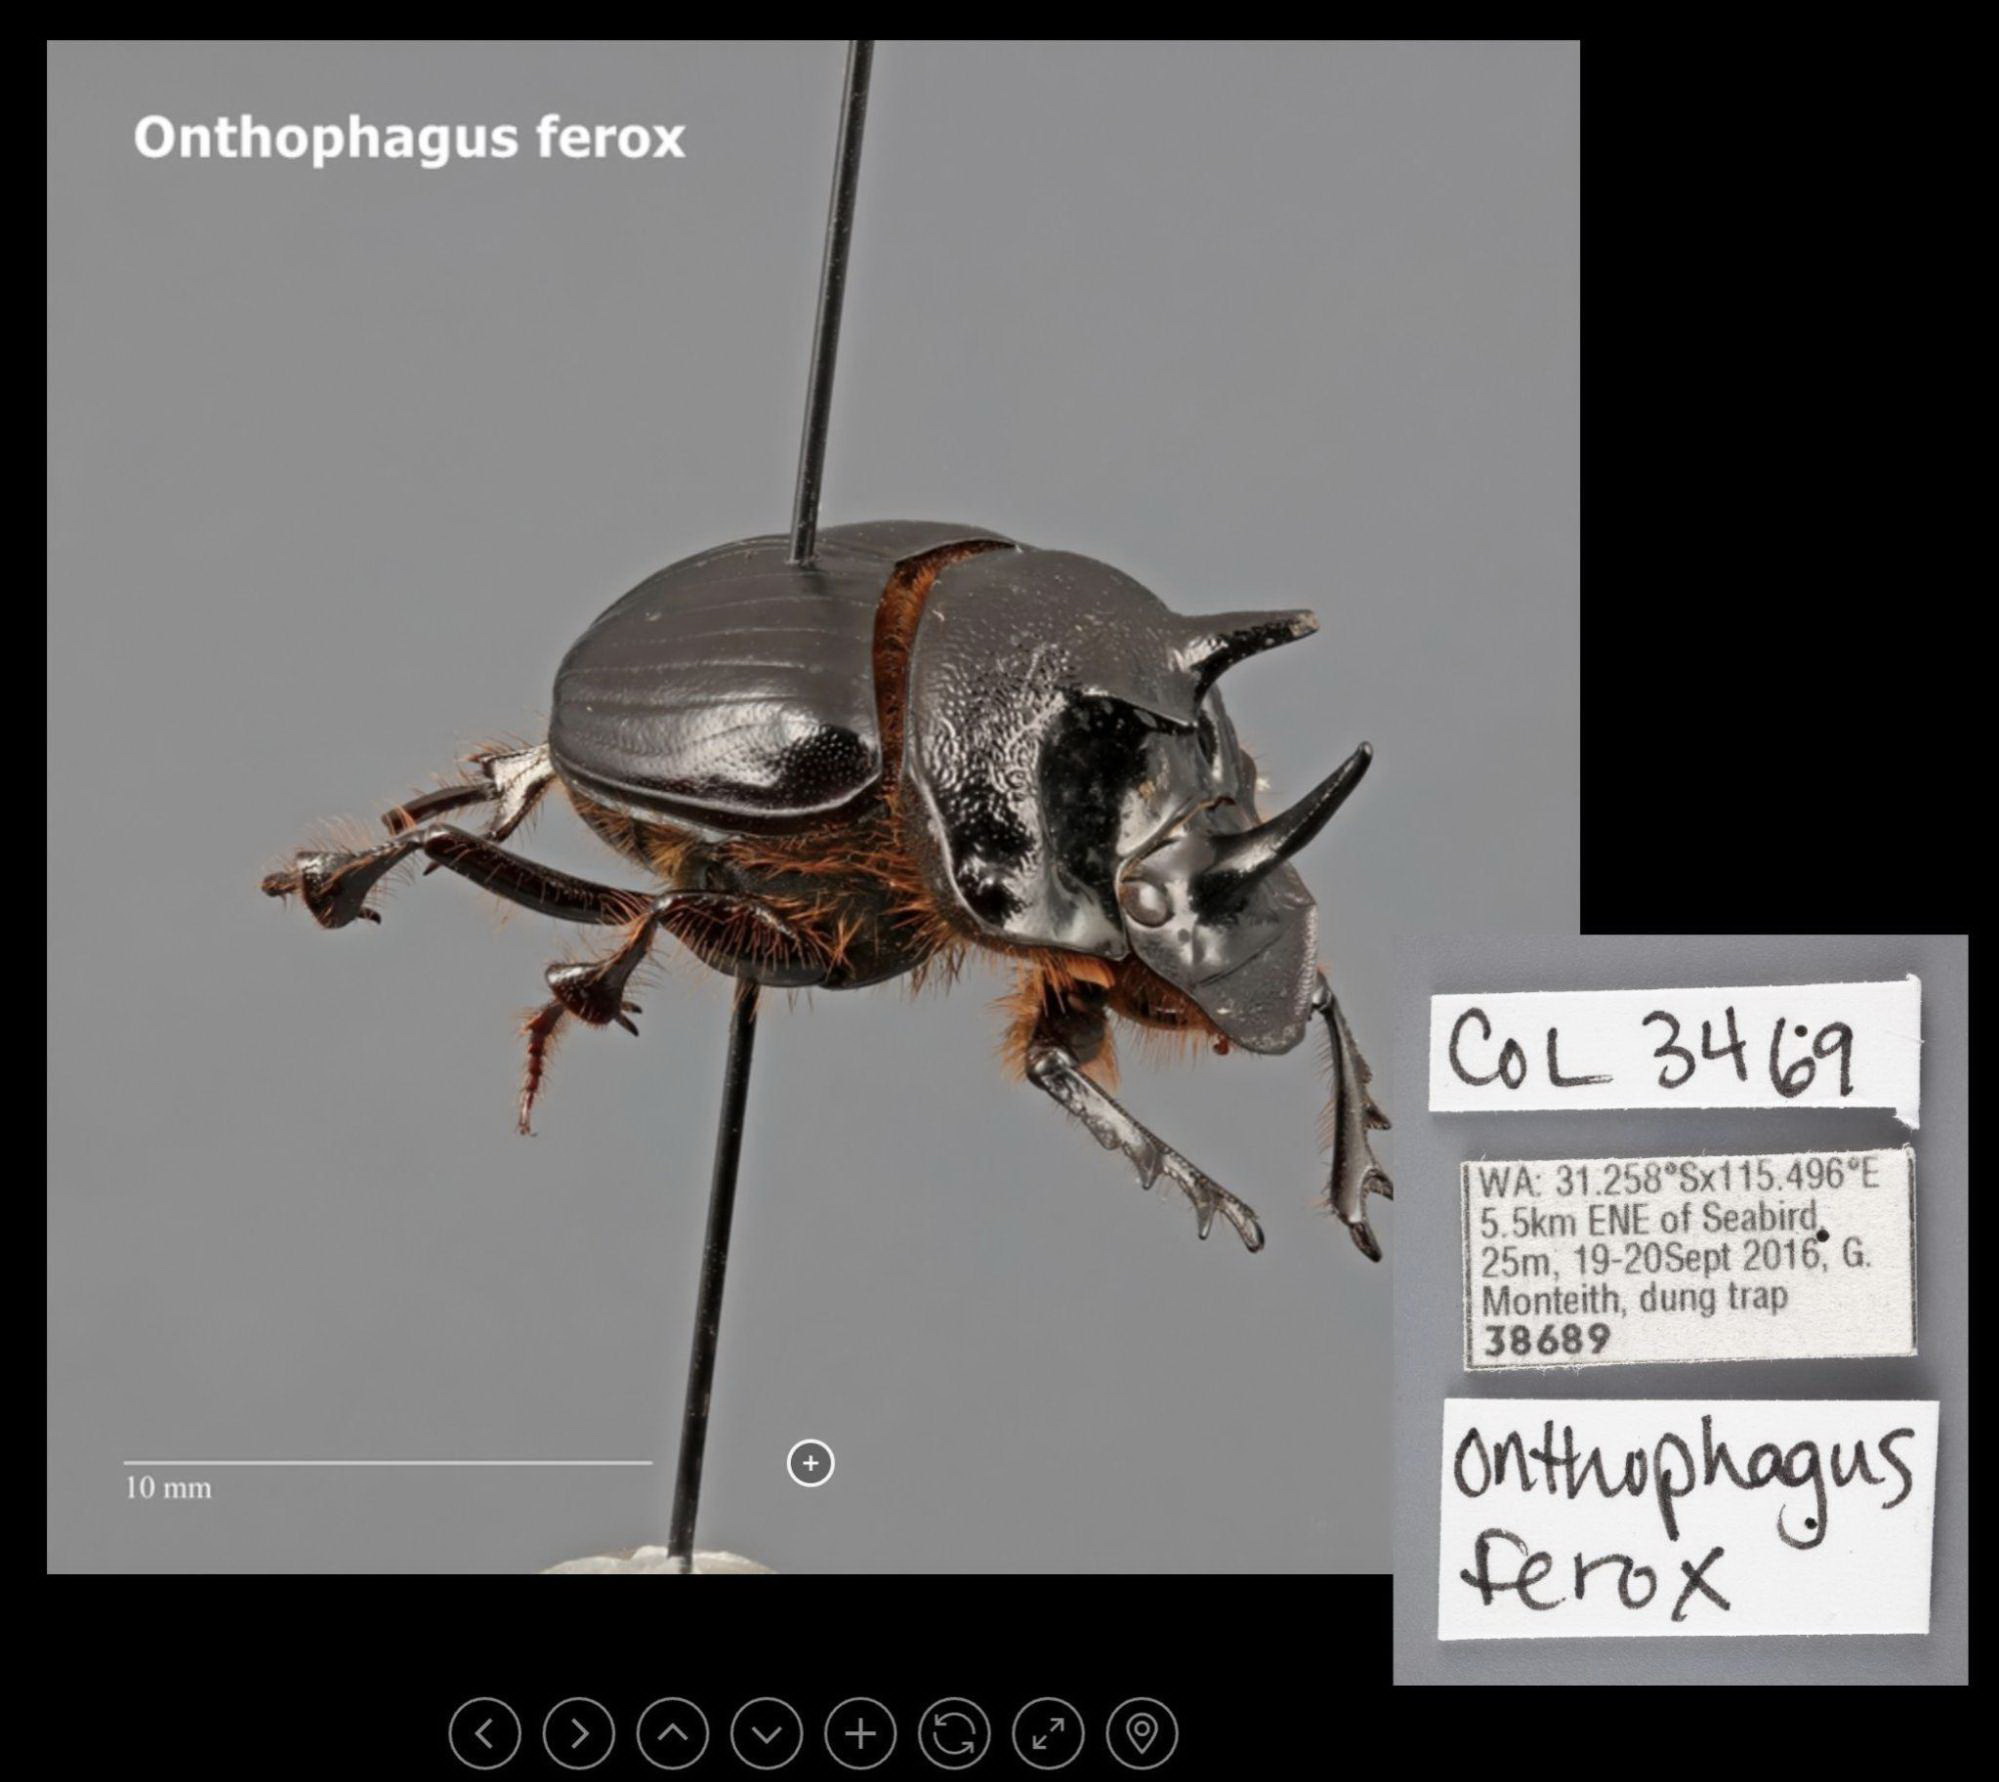 Hotspot button shows popup with insect’s pin labels