A popular problem with the e-commerce industry is the “expectations vs reality” experience most consumers suffer from. It mainly happens because they have only examined the product through a couple of photos that cannot represent what the product actually is. Interaction with the product plays a huge part in converting the visitors into paying customers, which is why physical stores are more successful at it.
The way out from this drawback for your e-commerce website is a perfect and interactive presentation of the product. 360 product photography has evolved how products are viewed online, clearing the path towards this way out.
What is 360 product photography?
360 product photography is a technique that allows the viewer to inspect the product from different angles. Series of photos are taken and then combined to develop an interactive rotating view. This more realistic experience almost edges out the advantage that physical stores have over online stores. The technique is being rapidly adopted throughout the e-commerce industry and has proved to be beneficial in increasing sales and lowering the return rate.
Why do we need it?
The sales conversion in the e-commerce industry depends on how well the customer perceives the product. Some flat photos are not enough for an effective perception and that is the answer to why we need 360 product photos. Certainly, 360 product photography will soon become a standard in e-commerce. The concept of capturing a 360 spin might seem complicated but the process is actually simple. This complete guide will show you everything you need to know about 360 product photography. Let's jump into it.
What do you need?
IDEAS:
Always start with a fresh and creative brainstorming session. It will be the base of the whole process. Make sure that you surf the web and find some great and innovative ideas. Always do your research accordingly to your product and what you have in mind.
That's how I make a perfect start!

CAMERA:
A great thing about 360 product photography is that you don’t have to look for any complicated specifications while choosing the camera. Any camera may it be a DSLR or mirrorless can be used as long as it offers a manual mode. Always remember that a camera is a mere tool here. The factor that will impact the most is how you use your creative juices to bring the most out of the next steps.
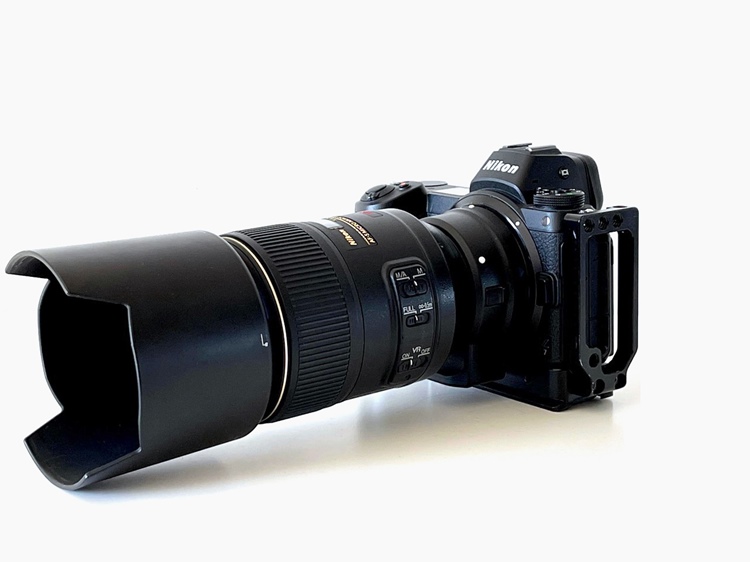
I use the Nikon Z7 with the Nikkor Macro 105 mm 2.8.
TURNTABLE:
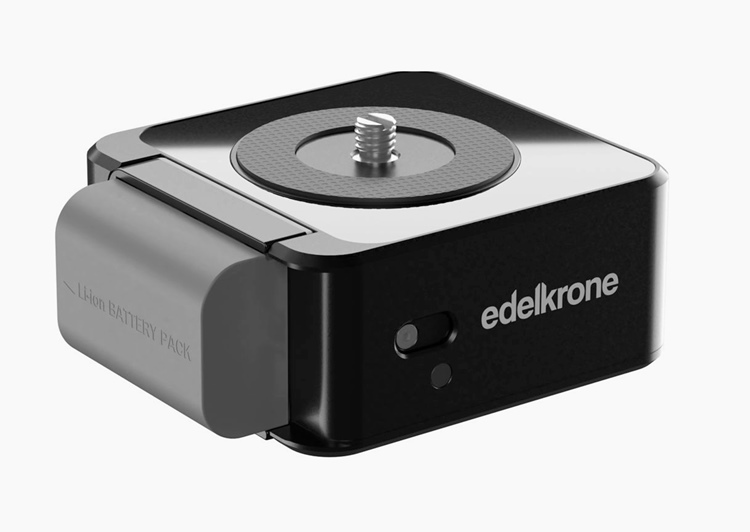
Using a specific 360 product photography turntable increases the effectiveness. Various companies make 360 turntables specifically for product photography and most of them come attached to their own software. The one I use is the edelkrone HeadONE with the turntable kit and it isn't tied up with software. The turntable kit comes with white matte and black glossy base options that you can choose from. It also includes a shutter release extension cable. The kit is attached to a motorized pan system that provides the rotation. The control app for the pan system allows regulating the rotation with the help of different settings making it a practical solution for 360 product photography.
The one I use is the edelkrone HeadONE with the turntable kit.
BACKGROUND:
As mentioned above, the product's success in the e-commerce industry depends on its visual representation. The key here is to present the product in a way that will make it stand out. So we need something which will not distract the viewer's attention. That’s why almost 80% of the websites use a pure white background. A pure white photographic paper will be the ideal solution to go for.
Savage Pure White Seamless Paper #66 is popular with product photographers.
TRIPOD AND REMOTE SHUTTER RELEASE:
The photos should be perfectly clear without any camera shake so we can get a flawless 360 product view. If there is a camera shake even in a single frame, the spin can be affected. To keep the camera in place, use a steady tripod, and if you can add some weight to keep it in place and to avoid shakes while pressing the shutter release, use a remote shutter release. Usually, the turntables have their own app that you can trigger the camera without touching it and at the same time control the rotation.
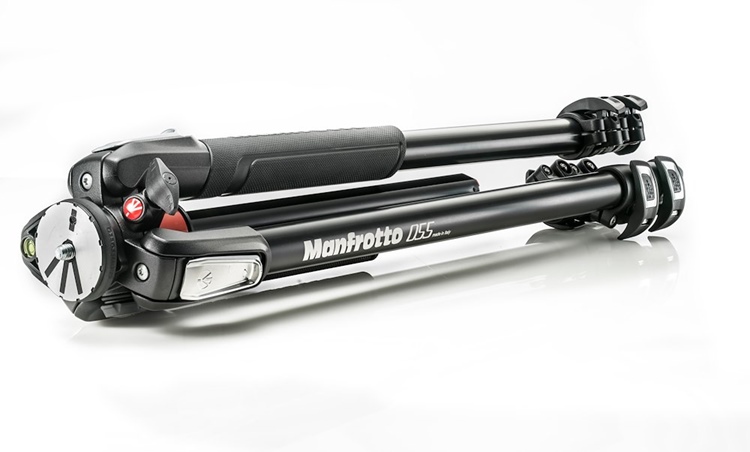
The one I use is Manfrotto MT055XPRO3 tripod with arca Swiss plate and MH057M0-RC4 ball head.
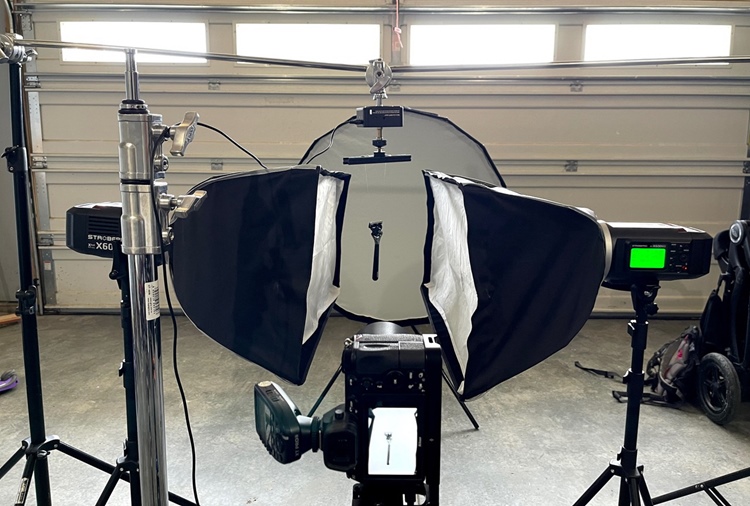
LIGHTING EQUIPMENT:
Typically, two types of lights are used in studio product photography.
- Strobe lights: Usually referred to as flash, strobe lights provide a high output lighting for a fraction of a second when the shutter is pressed. The biggest advantage is that it allows you to lower the ISO (50 – 200) and close down the aperture to f8 – f16 (depending on your lens).
- Continuous lights: Continuous lighting for instance LEDs are kept on throughout the shoot. This type of light allows you to keep a check on what you are getting right away. You can also check if there is any variation during the rotation.
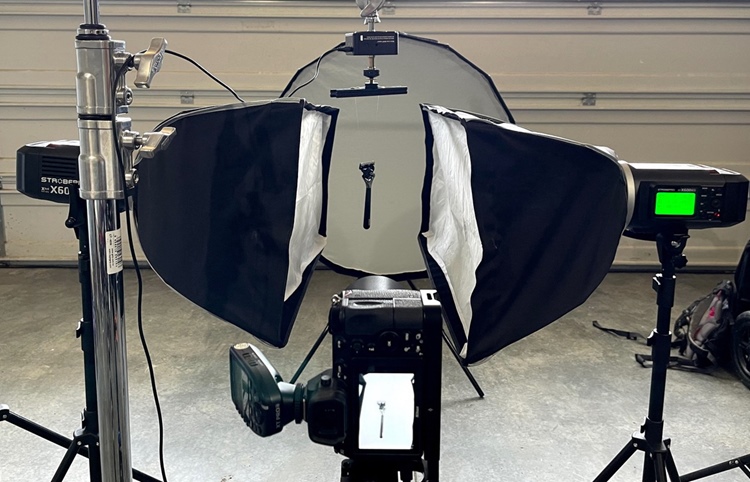
I use Godox strobes (2x AD200, 2x AD600) with XT Pro radio trigger and softboxes (Elinchrom strip boxes and Phottix Raja). See a quick "behind the scenes" video using my lighting gear in the following section.
In addition, using softboxes and diffusers is recommended to deal with hard light and nicely wrap the light around the product. You can make the photos look more professional with the help of additional accessories such as white foam (to bounce light), larger diffusers, light cutting black flags, etc. We will discuss an extremely effective lighting setup that I personally use further in the article.
Setting up the shoot
Now that we have all the necessary equipment, let us get to set up a perfect 360 product photography shoot.
MAKE THE PRODUCT PRESENTABLE:
As mentioned earlier, how good your product looks will directly affect sales. Using photo editors to clean up the product in every frame is far more daunting than just nicely cleaning the product during the shoot. You can use additional accessories such as a lint roller, canned air, gloves, etc. Also, be careful that your fingerprints are not visible on the product.
SETUP THE CAMERA & CENTER THE PRODUCT:
Set your camera on the tripod and make sure you are zoomed in enough to have white space in the background.
Perfectly rigging the product can be puzzling, but do not continue unless you are satisfied with this. Carefully place the product at the center; otherwise, each product frame will appear to be at different positions while spinning. Before placing the product straight away, measure a reference point. A reference point will be helpful even if the product is misplaced during the shoot. Perform a few test spins to make sure that the product does not wobble from its position.
SET UP THE LIGHTS:
Now let us come to the most important element of 360 product photography i.e. lighting. The way you are going to control the light will decide whether your 360 product spin will look professional or amateur. Throughout my experience in this niche, the setup I have been most satisfied with is using 4 – 5 strobes.
- 1 – 2 for the background, depending on the size of the product
- 1 top-down with an octabox
- 2 stripboxes on each side of the product
See one of my shoots using this setup in this BTS video:
One of the reasons I work with strobes is that they have a clear advantage when the power comes in and that is important when shooting products because at the right aperture (f/8 – f/16) with continuous lights a higher ISO value (around 1000) would be needed to get the precise exposure and that could introduce some noise.
The next step would be changing the light positions accordingly to the object. The goal is to evenly lit the object and make the background look as white and clean as possible, and here, the top-down softbox will help you get the perfect white. Alter the lighting to achieve that balanced 255 white. Once you are there, you can even lower ⅓ of the stop on the background light. Avoid overexposing the background at all costs. It will kill the image quality by reducing the contrast due to diffraction.
One quick tip to avoid diffraction is to create enough space between the product and the background, in that case, it is safe to overexpose a bit of the background. A very helpful alternative to get a pure white background is with the blinky tool that almost every DSLR has nowadays.
The approach will also vary depending on whether the product is reflective or non-reflective. Non-reflective products are simpler to shoot than reflective objects. Reflective objects will need extra attention and different diffusers.
Time to start shooting
Now the real fun begins. Let us take look at how to shoot a flawless spin.
START WITH SOME TEST SHOTS:
A few test shots are helpful to find out any complications at the very start. You do not want to run into some unexpected problem in the middle or even after you finished shooting.
CAMERA SETTINGS:
- Manual Mode: Always use manual mode to keep the exposure, aperture, shutter speed, and white balance consistent in every frame of the spin.
- White Balance: Never use auto white balance as the color of the product might change with rotation. The best way is set the white balance accordingly is that if the background is white then it should look white in the camera frame. The colors should be not too cool or not too warm. If you are shooting RAW, you can easily adjust the temperature afterward. However, it is recommended to keep the colors as realistic as possible while shooting. A grey card can be helpful to set the white balance and if you want an even more professional look, you can get a color checker to make the color representation perfect.
- ISO: Using the right ISO is crucial to get a clear and crisp photo. ISO basically controls the digital sensitivity to the light. At a higher ISO, the camera absorbs light faster whereas, at a lower ISO, the camera absorbs light slower. As we will be getting enough light through the lighting equipment, so there is no benefit of keeping the ISO higher. It is recommended to keep the value at 100 – 200 to avoid noise.
- Aperture: For an overall sharp image of the product I use an aperture ranging f/8 – f/16 accordingly to the scenario. The reason I don’t suggest a certain aperture is that each lens has a sweet spot where they are sharper and usually it is in the center of these aperture values.
- Image stabilization: If your camera has "image stabilization", you need to turn it off. It can result in complications by making the images slightly blurry. Although it is subtle, we want to get the best 360 product spin possible. However, the mirrorless cameras now with advanced technology don’t produce blurry images with the image stabilization on.
THE NUMBER OF FRAMES:
No one will like a 360 product spin that looks like a high-end video game running on the lowest spec console. 12 – 24 frames can be enough to get a nice and smooth spin. This also depends on the nature of the product. If it is a high-quality product (e.g. expensive jewelry) and you want to capture a higher degree of realism, you can go for even 72 frames. Personally, I find using frames above 72 to be overkill but it is totally up to the nature of the product.
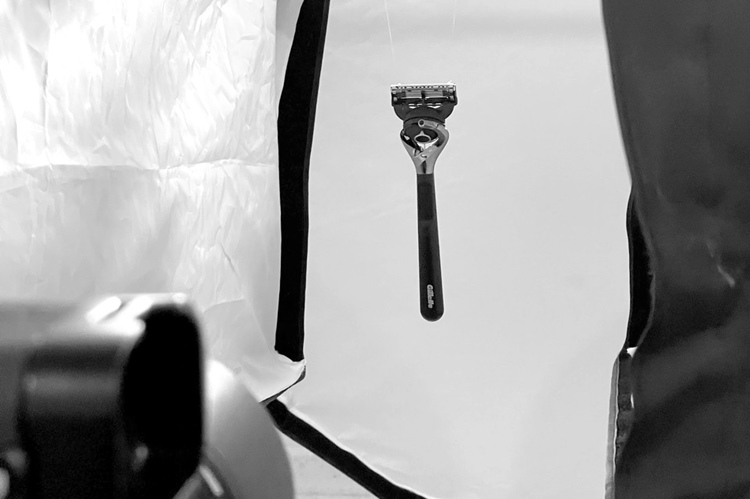
This 360 product view from my BTS video above has 22 frames:
An important point to consider is never shooting the same frame (such as starting frame) twice. If the starting frame appears twice, it will give an impression of pause.
IMAGE FORMAT:
You can use either RAW or Jpeg format. Jpeg format can help you in bulk image processing as they are smaller in size. However, I always use RAW format because it gives me more control over the photo while editing.
BE CONSISTENT:
If you shoot different products for the same website, always note down the settings you are using. It will help keep the consistency in all the products listed, ultimately giving a more professional look to the website. Taking some reference photos of the setup can also be helpful. Moreover, if you will be consistently shooting products for a certain client, you need to measure tripod height and lens angle.
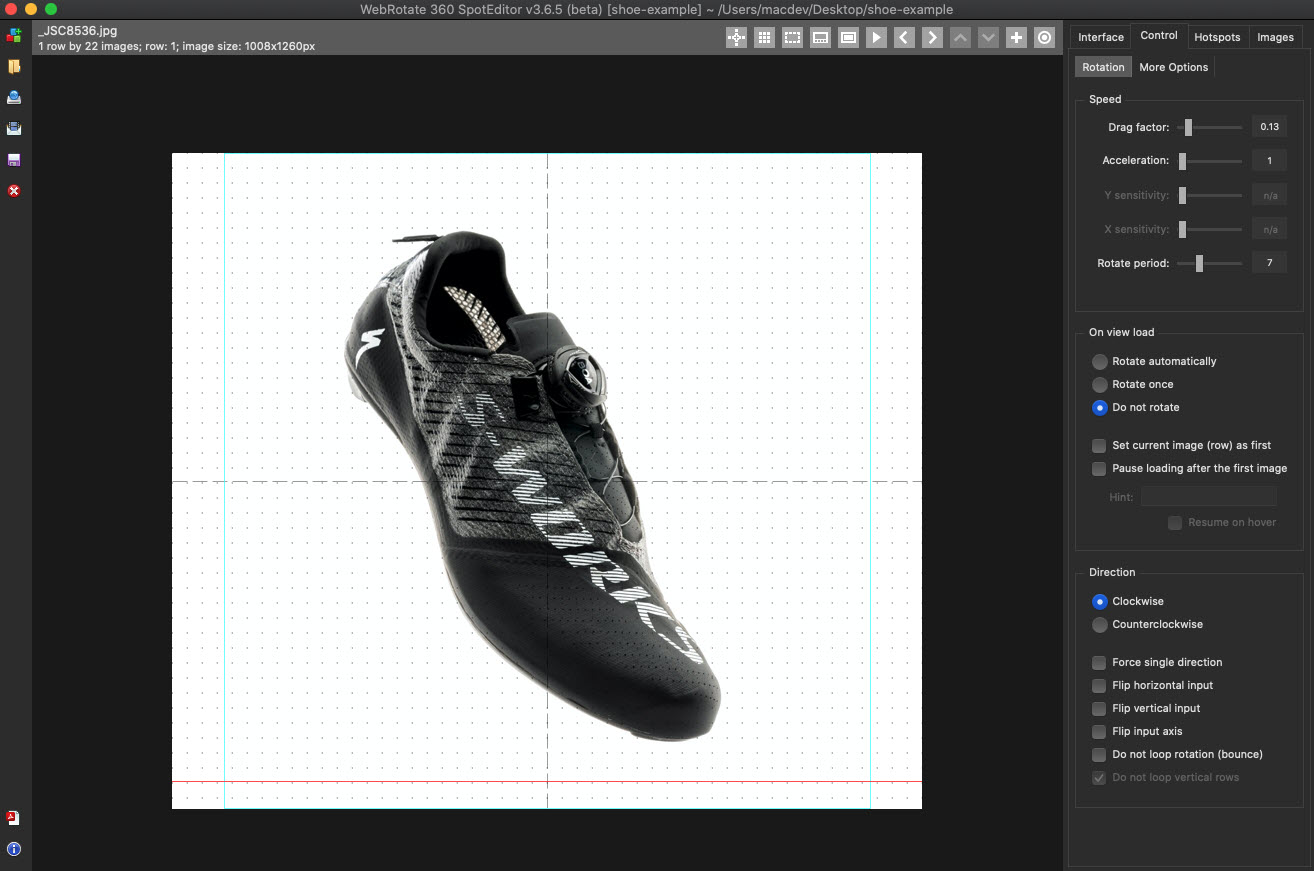
360 PUBLISHING SOFTWARE:
After capturing some perfect frames, it is time to take them into the software. The market is filled with various 360 product photography software that can do the job but my go-to option always is WebRotate 360. I have come to this decision with proper and thorough research.
Final Word
Wrapping it up, this guide delivers an overview of a complete 360 product photography process. The only way to achieve the best result is by practicing and experimenting. Every product is photographed differently, Look for the pathway from this article and alter it accordingly to your own requirements and needs. Have a great day photographing!
Jose Soriano is a commercial photographer based in Calgary, Canada. His studio specializes in product photography (including 360 product photography), food photography, editorial and portrait photography.