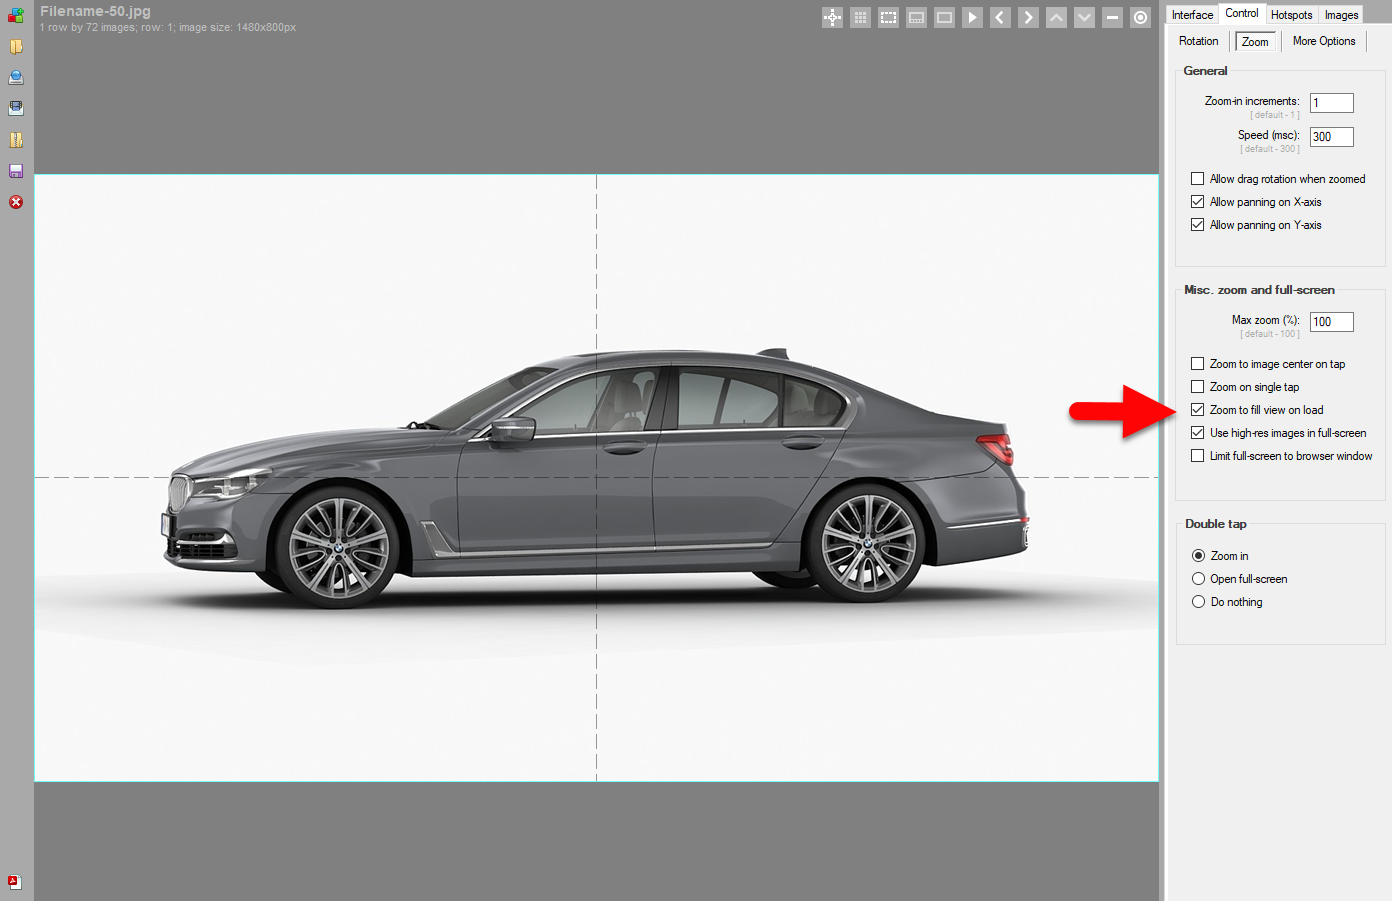
The v5.4 update of WebRotate 360 Product Viewer includes a handy new option in SpotEditor called Zoom to fill view.
Let's start with the problem. Many 360 product photography projects and even 3D renders are not shot or rendered on a perfectly uniform background. It could be a subtle grey studio gradient, a floor shadow, or a real-world environment such as a car photographed in 360 on a parking lot.
When images like these are imported into SpotEditor and published in a responsive viewer, extra empty margins around the image can stand out on different screen sizes. Viewer controls may look detached from the 360 product view, or the surrounding space may simply look odd.
To help with this, Zoom to fill view scales the images to cover the viewer area and remove empty margins around your 360 product spins or 3D product views. Depending on the image and viewer aspect ratio, the edges may be cropped slightly, so it's worth previewing the result before publishing online:
To enable it in SpotEditor, go to: Control -> Zoom -> Misc. and check Zoom to fill view on load and re-publish.
If you've been rendering products in Blender and want interactive 360-degree or multi-row 3D product views ready for web, mobile, or marketplace use, without rigging cameras and keyframes from scratch every time, the WebRotate 360 Turntable Animator for Blender is built to streamline that process. This plugin brings powerful 360 spin automation, hotspot support, and web publishing integration directly into Blender's familiar interface.
360 product spins made simple (single & multi-row)
Whether you need a standard 360 spin or a more advanced multi-row 3D product view, Turntable Animator takes the guesswork out of setup. It uses Blender's Scene Properties panel and viewport as your "viewfinder" so you can frame your model, set the number of frames per row, and automatically generate a clean turntable animation ready for rendering. This brings consistency and speed to your workflow, especially for eCommerce catalogs with many SKUs.
Hotspots that help sell
Interactivity is key for product engagement, and our Blender plugin lets you add hotspots directly in your scene.
Point hotspots (via Blender "empties") to call out features.
Custom polygonal hotspots using meshes or vertex groups for precise clickable areas.
These can be extended later in the WebRotate 360 SpotEditor with rich content, video, images, HTML, tooltips, and even custom actions for interactive walkthroughs.
Standalone 360 product image sequences (great for marketplaces like Amazon).
Interactive 360 assets for web and mobile using WebRotate 360 Product Viewer (free version).
SpotEditor projects for more advanced publishing and styling.
Rendered output works with WebRotate 360's broader ecosystem, including CMS and eCommerce plugins and our optimized PixRiot CDN with analytics and collaboration, so teams and agencies can deliver polished product experiences faster.
New Teams feature in PixRiot lets you add multiple users to the same account with defined roles, so projects stay organized and secure. Four roles are supported: Admin, Editor, Viewer, and Billing.
Roles at a glance:
Admin: Full control of the account. Manage members, settings, and billing.
Editor: Upload and manage assets. Suitable for producers and vendors.
Viewer: Read-only access. Ideal for clients and stakeholders.
Billing: Manage subscription and invoices, view analytics without access to assets.
How to setup:
Open PixRiot dashboard and go to Settings -> Team -> Invite more or click your avatar in the top right corner and select Invite User.
Add teammates by email.
Assign a role (Admin, Editor, Viewer, or Billing).
Send invites. Teammates accept via email and join your PixRiot workspace by filling out a quick signup form.
Admins can remove existing users at any time.
For external collaboration, use PixRiot's folder sharing with passwords and configurable Editor/Viewer folder access.
PixRiot recently added a simple but useful feature: the ability to share folders with people who don't have a PixRiot account. This can be helpful if you're working with clients, freelancers, or vendors, like 360 product photographers or 3D design studios, and need a way to either show your work or collect files from them.
What's changed
Here is what's been improved in the latest update:
Folder sharing is now available to all users (not just paid accounts).
The process is much faster than before.
You can choose between Viewer (read-only) or Editor access.
Content inside the shared folders is now searchable for anyone with the link.
How to share a folder
To share a folder, follow these steps:
Go to your Assets and choose the folder you want to share.
Click the globe icon next to it.
In the Access tab, make sure the folder is set to "Everyone" as Private folders can't be shared.
Go to the Share tab.
Set a password and choose whether the access should be Viewer (read-only) or Editor (can upload and manage files).
Click Create and then copy the link and select Update.
You'll get a public link you can send to anyone. Just make sure to note the password before closing the form as it won't be shown again.
A few things to be aware of
If you share a folder, all subfolders will also be accessible to anyone with the link and password.
You can stop sharing at any time by going back to the Share tab and clicking Delete.
If you give someone Editor access, they'll be able to upload, delete, copy files, so only share that level of access with people you trust.