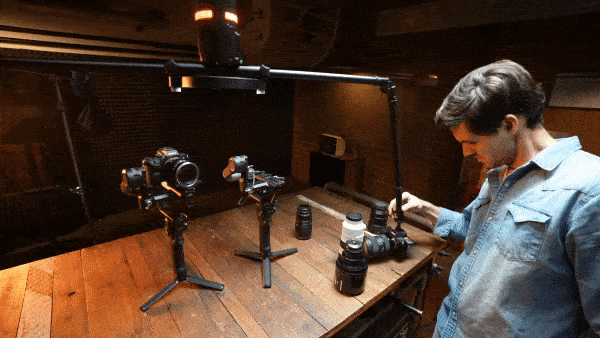
Recently we started recording short video clips to help with some of the most frequent inquires and to showcase the latest updates in WebRotate 360 SpotEditor.
In case you missed these video tips on our Facebook or Youtube channel, here's the latest with some extra notes:
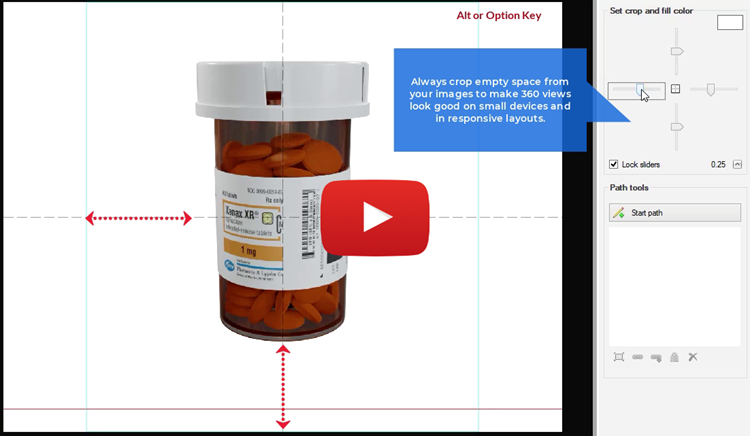
#1 - Crop Imported 360 Product Images
Always crop your images to remove as much empty space as possible, leaving just enough padding inside the turquoise rectangle for the images to look good. This is true even when the viewer preview in SpotEditor provides ample padding space for the images as-is like in this video. This is because the same 360 product view can be viewed on small devices or your client may change the final dimensions of the viewer on their pages and if the images are not cropped sufficiently, the actual product may end up looking too small.
PRO tip:
Press ALT key (Option key on Mac) to drag locked crop sliders in opposite directions.
Press center button to reset your crop.
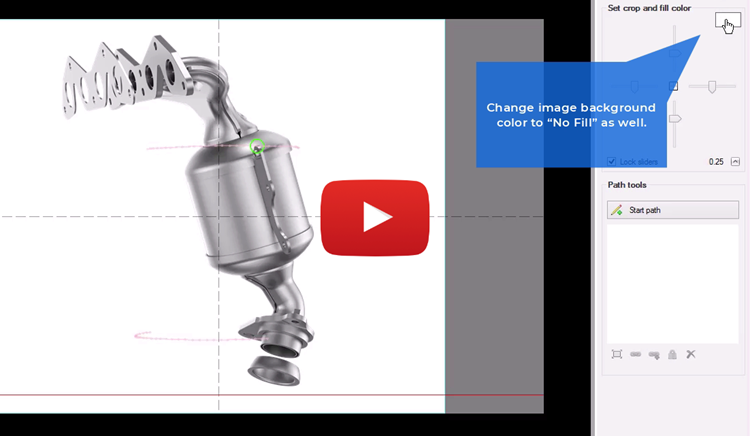
#2 - How to Publish Transparent 360 Product Views
By default, even if you import PNG images with transparent background, SpotEditor will fill the background with white. To ensure SpotEditor doesn't change the background of your 360 product images, first set Viewer background to No Fill on the Interface tab under Styles. Also set image fill color to No Fill under Images -> Tools. And finally, select PNG image format on the Publish form.
PRO tip: remember that PNG format uses lossless compression. A better alternative is to match viewer & image background with the background color of your website and publish JPGs instead. This way you can expect a combined download that is 3-4 times smaller on average.
#3 - How to Size 360 Product Images
When you publish a 360 product view in SpotEditor, by default, it creates two sets of images:
Low-resolution images for fast loading on the web
High-resolution ones for zooming and optionally full-screen
Low-res images are sized based on the viewer dimensions under the Interface tab in SpotEditor. Usually, the Width and Height there is the size of a web page container where your 360 product view is going to be integrated when the page is viewed on a desktop browser at 100%.
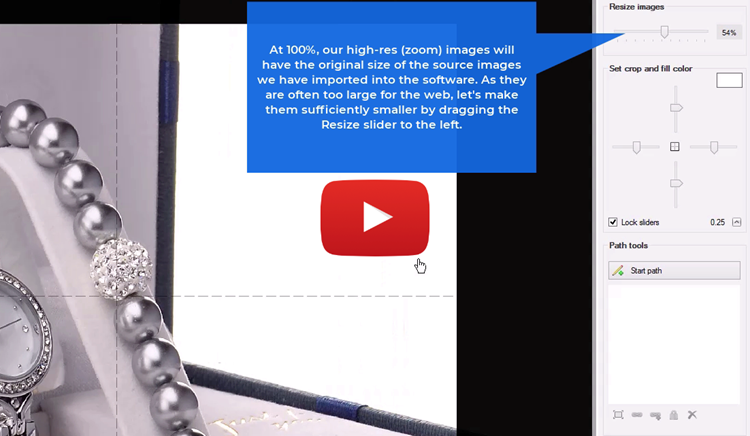
Once viewer size is set under Interface, first crop the images under Images -> Tools as per #1 and then use Resize slider to size your zoom (i.e high-resolution) images.
There's a common mistake where some users think the Resize slider is for sizing the images to make them fit into the viewer container, which is not correct.
If the Resize slider is at 100%, your zoom images will have the original size of the source images you have imported into the software. As they are often too large for the web, make them sufficiently smaller by dragging the Resize slider to the left. Note that every time you start dragging the slider, zoom preview is turned on automatically to give you a preview of the zoom depth. Simply click zoom in/out button at the top to go back to the normal view and back to zoom as needed.
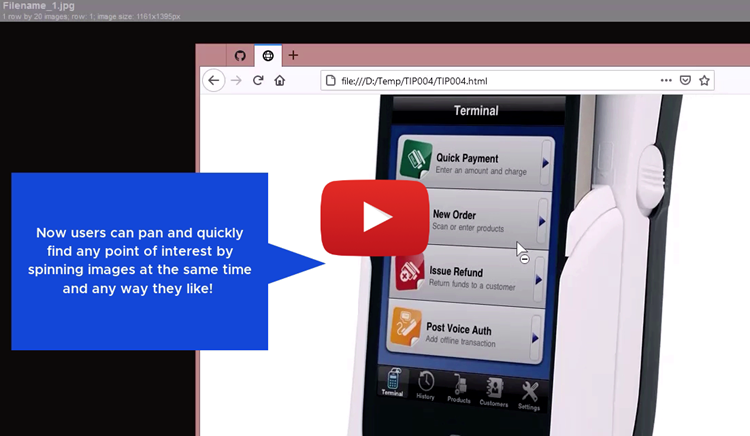
#4 - How to Pan and Spin at the Same Time
By default when zoomed-in, WebRotate 360 Product Views switch to panning mode where user can only pan left, right, up & down. User has to zoom out to spin images again or use mouse wheel, if configured. This may affect user experience.
We can make it more user-friendly, if in addition to panning, we let user spin images at the same time. This can work especially well for tall and narrow objects. To achieve this effect, select Allow drag rotation when zoomed under Control - More Options and uncheck Allow panning on X-axis. Then republish using fast publish via F6 key on Windows or Cmd + Shft + R on Mac.
PRO tip: it's never a bad idea to enable image rotation on mouse wheel when viewer is zoomed-in which you can also do under Controls -> More options tab.
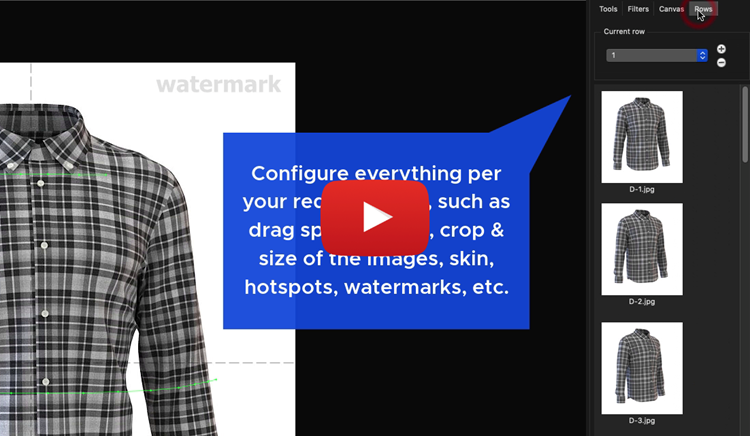
#5 - Use Project Templates to Save Time
When working on multiple 360 product views that share the same or similar presentation properties (size, hotspots, zoom, speed, etc), consider using SpotEditor project templates.
First create a new project or open an existing one that you will designate as a template. Configure everything per your requirements as you would usually do, such as drag speed, zoom, crop and size of the images, skin, hotspots, watermarks, etc.
Publish the project and verify that it works as designed and that it looks good on your web pages using various screen resolutions. At this point it's good to confirm with all of the stakeholders (your client, boss, etc) that they like it too.
Now start a New Project and point it to a folder with the images of your next product. As you do this, check Advanced options on the New Project form and navigate to your "template" project in the Copy project field. Once the new project is loaded, all settings from the template project have been carried over and applied instantly. Just hit Publish and done!
Professional level 360 product photography is usually an expensive ordeal that requires specialized gear, training, and at times even hiring out. It’s not exactly something that the every day business owner can do to a high level, and needless to say, it takes some effort. It is difficult to create perfectly equidistant 360-degree images of a product, while maintaining each photo at the same height as the last.
But what if this could all be done in house, with little training, and in a budget friendly way? Furthermore, what if this same solution can also be used to help you create 360 product photos in a near automated manner, only requiring you to set up the lighting, framing and composition?
We at MARBL may have an interesting solution for you. One that you and your wallet will probably appreciate reading. Imagine having a portable, suspended camera system that creates a perfect 360° orbit around people, environments, or products. Imagine using your camera to automatically shoot photos of a product every x amount of time as the camera rig automatically rotates above and around the product you want to photograph with absolutely zero vibrations, giving you photos at an equal distance apart, covering 360° of the product. This as a result greatly simplifies the photography aspect of creating a 360 product view, and fast forwarding you to having a unique product display online.
With the photography aspect covered, all that's left for you to do is throw your images into 360 product photography publishing software like WebRotate360, and you've all of a sudden accomplished professional level 360 product photography in-house (while nearly automating the entire process).
My goal for this article is to help you visualize exactly how you would be able to use the Marbl ORBIT, a suspended camera system that orbits around people, objects and environments at variable speeds and distances, to save you time and money by creating your own in house 360 product photography studio.
Let's explore exactly how this is done, by first introducing the Marbl ORBIT, then explaining how to set everything up. At the end, you will know exactly how to create your own 360 product photography studio.
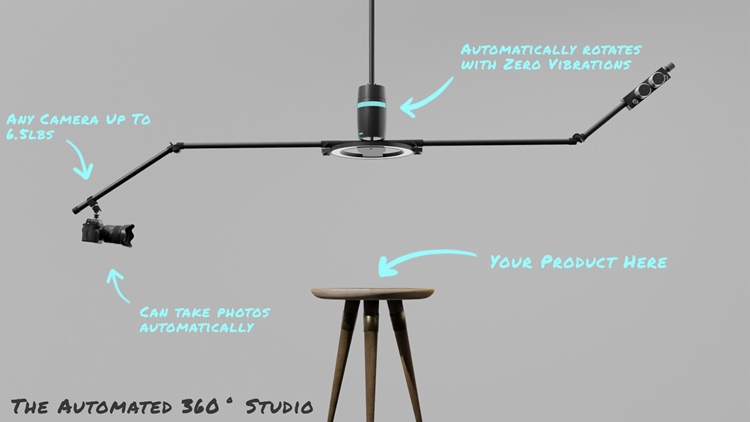
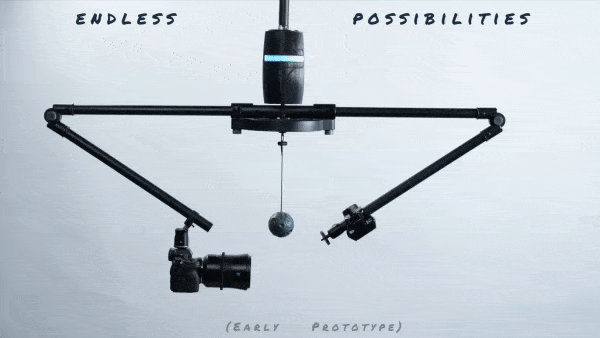
I will start with the main parts: the specialized motor, a set of arms, and the mounting accessories.
THE MOTOR
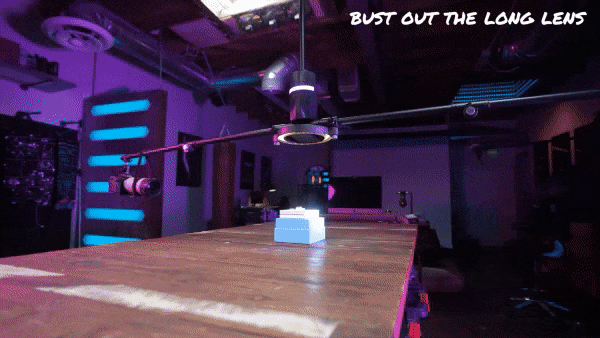
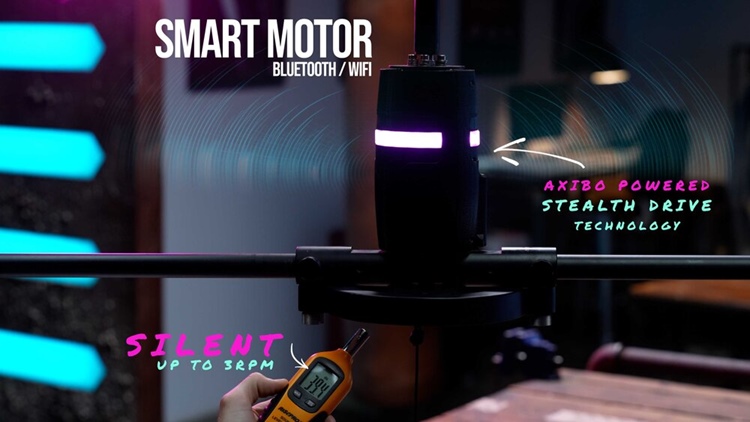
The Marbl ORBIT's motor can rotate from 1/60 RPM (1 rotation every 60 minutes), to 10 RPM, giving you plenty of room to choose your ideal RPM. It's exceptionally smooth, and utterly silent below 3 RPM. This unlocks the unique opportunity to do 360-degree product photography with lenses you've never used before, like high magnification telephoto lenses, and even the Laowa 24mm probe lens - with zero worries of any shaking or vibrations.
To ensure your photos will look the way you expect, you are also able to move the ORBIT by hand to preview and ensure your 360-degree images look the way you want all the way around.
THE ARMS
The Marbl ORBIT has two arms with swivel joints and quick release bolts. As a result, you can easily adjust the device to change how close the camera is to the subject, along with the height, tilt, roll and yaw of your camera.
The arms stretch to 84 inches (2.1 meters) while fully extended, giving you the opportunity to use high magnification lenses. We have a model with even longer arms, too! With the arms fully folded in, they only take up 44 inches (1.1 meters), and are able to fit in most rooms. While fully extended, the arms can hold 6.5lbs (or 8lbs for our pro model), so you will be able to safely use any camera you are likely to have.
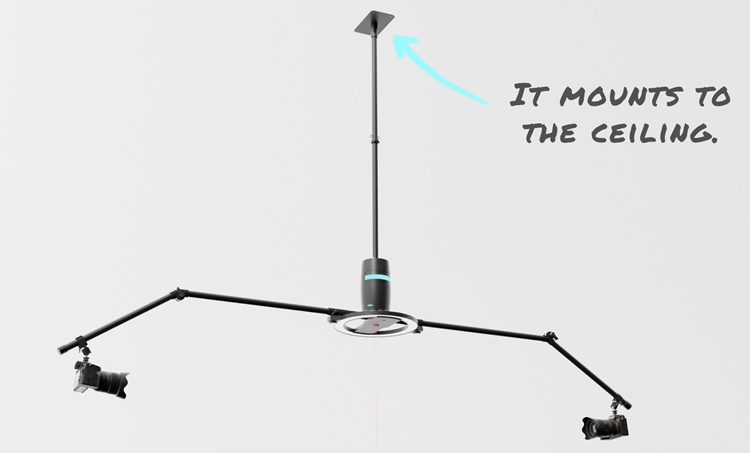
MOUNTING
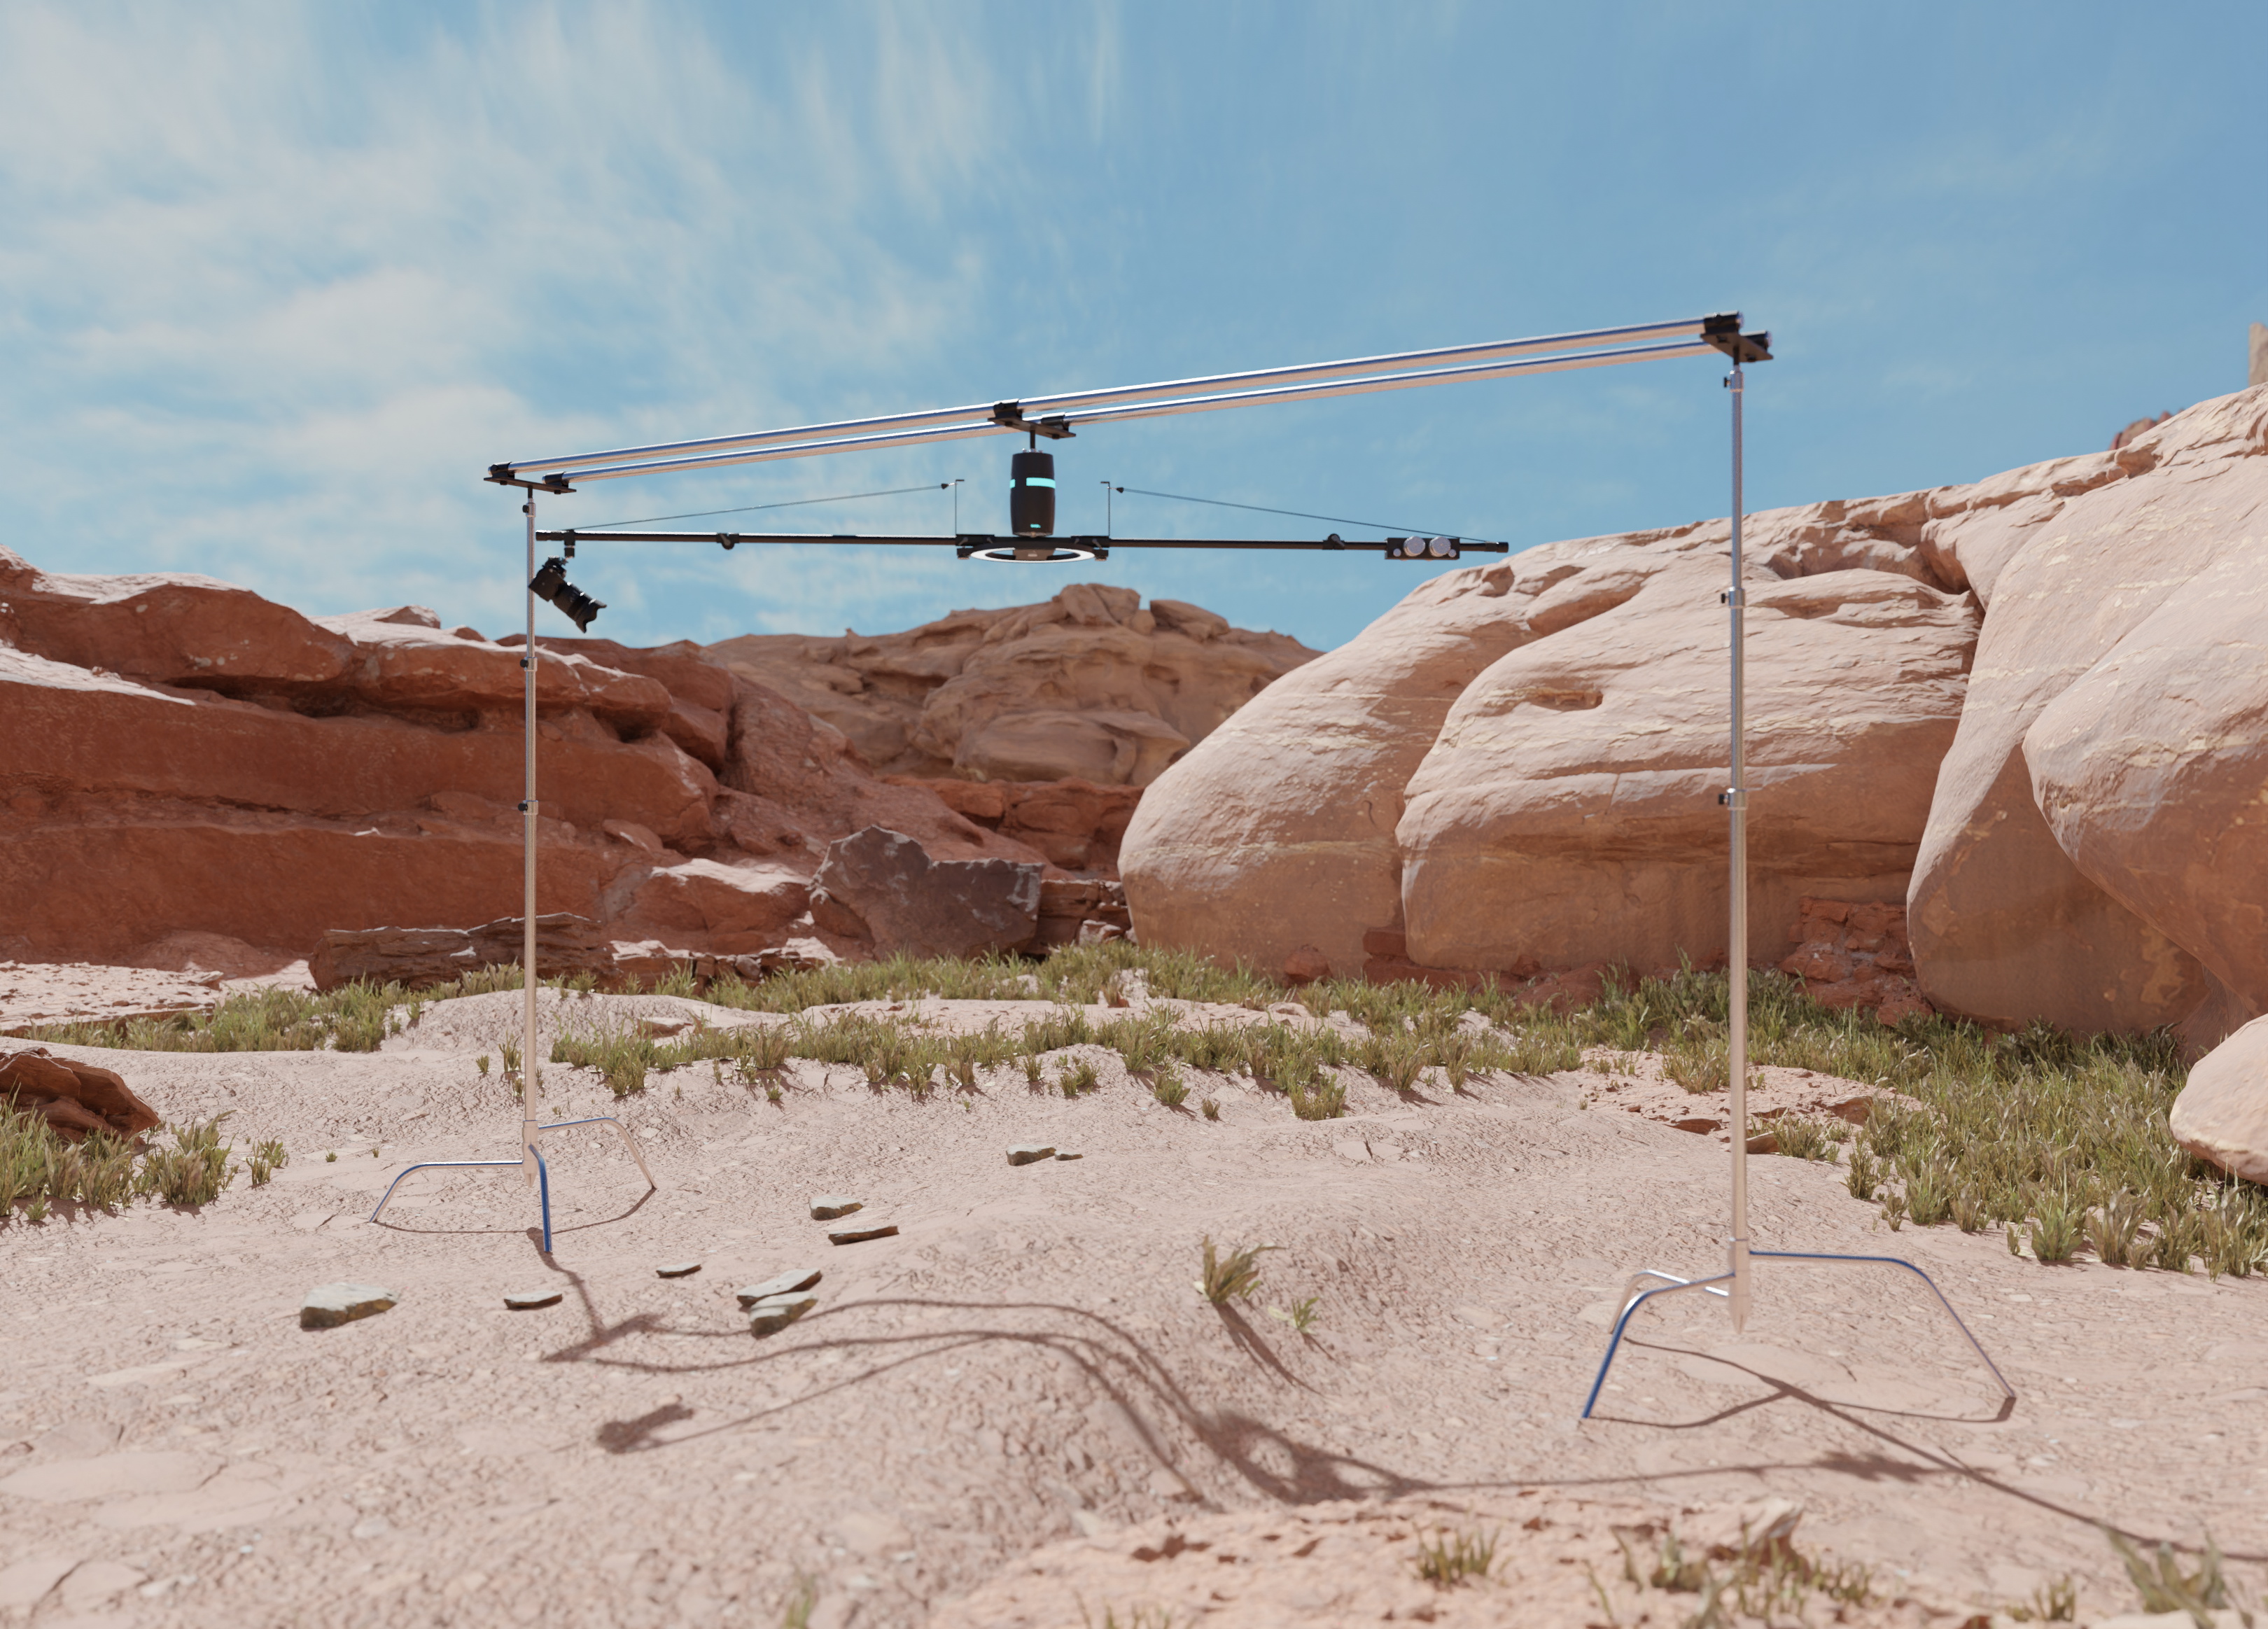
The Marbl ORBIT normally comes with a ceiling mount, but the Pro version also comes with adapters that attach to speedrails and C-Stands. This gives you the opportunity to mount the Marbl ORBIT between two C-Stands, and bring the Marbl ORBIT anywhere you'd like, instead of only being limited to indoor spaces.
Now that you are familiar with the device, let me run you through the start-to-finish set up procedure for 360 product photography, so you can see exactly how to use this to simplify your life, be home earlier and have a happier marriage*
(*Results may vary. It will help make 360 product photography more enjoyable and accessible for everyone though!)
MOUNTING THE MARBL ORBIT
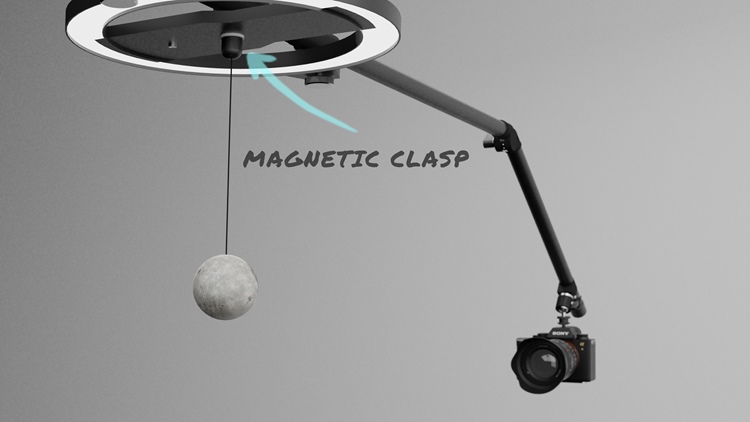
Attach the Marbl ORBIT to the ceiling by screwing in the 4 screws into a stud. Or hang the Marbl ORBIT up, suspended between two C-Stands using the additional speed rail adapters that come with the Marbl ORBIT Pro Model. You can see how the ORBIT looks suspended between two C-Stands in the photo above.
THE FOCUS
The Marbl ORBIT comes with a magnetic focus ball that attaches to the very bottom of the device, right in the middle. All you have to do is focus on the ball, then switch your camera into manual focus mode to freeze the focus settings where they're at. Considering your product will be dead center of the ORBIT, the magnetic focus ball will help you set your focus reliably, and aimed directly at the pivot point of your product, making your subject in focus the entire time. Once you are done, take off the focus ball by simply pulling it down and off.
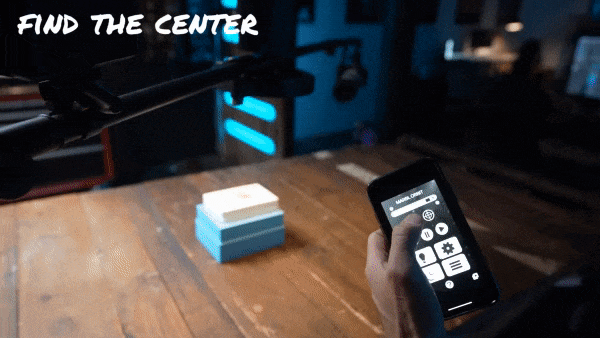
PRODUCT PLACEMENT
Use the laser crosshairs to position your product directly in the center of the Marbl ORBIT. Take note that bigger objects, or irregularly shaped objects may not be fully in focus because of their size and shape. If parts of your product are out of focus, you can play with the aperture until you achieve a satisfactory result, or you can MacGyver it by measuring the widest point of your product, then using THIS calculator to precisely calculate the aperture required so the Depth of Field between the nearest and furthest point in which the subject is in focus matches the widest point of your product.
Bonus: Dynamic Lighting
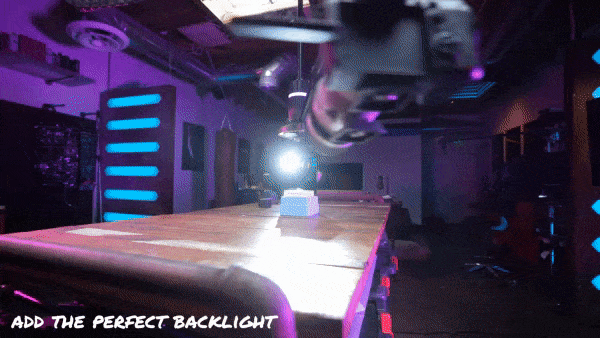
The ORBIT has two arms. Usually, you have a counterweight on the other side. But, you can also mount accessories, too. For example, what about a flashlight creating keylighting that follows the frame as it rotates around the subject, adding perfect, identical lighting to each of your photos around the product?
FRAMING THE SHOT
Simply unlock the quick release bolts and move the arms how you wish. This allows you to make big adjustments. Then, semi-release the ball joint holding the camera to the Marbl ORBIT’s arm to fine tune your frame. After you found the position you like, lock everything up! Rotate the ORBIT a full rotation by hand while looking at the camera screen to ensure you love what you see throughout the full 360-degree product spin. If something's off, now's the time to fix it.
Everything, including lighting, should now be set up! Your product is framed and ready to go. All that's left is taking the photos. The issue is, we can't touch the camera. It will introduce unnecessary vibrations. What do we do, and how do we automate this part of the process like I promised above?
Turns out, it's pretty simple. We use an intervalometer. An intervalometer is a device that plugs into a camera and controls how often a photo is taken. Once every second, once every ¼ of a second, or once every hour, if you'd like. It also controls how many shots are taken in total. Modern cameras like my Sony A7Riii have this device built in, but older cameras simply require an intervalometer attachment before they're ready to go.
We now have the capabilities for automated rotation around the product, and the capabilities for automated picture taking. All that's left now is telling the camera when to take the photos, and we're all set!
INTEGRATING WITH WEBROTATE360
Once you have all the photos collected, you are ready to create a real 360 product view for online publishing. Folks at WebRotate 360 will explain how to use WebRotate 360 to accomplish this goal:
2 Save your captured 360 product images to your computer to a folder of your choice.
3 Fire up the software, start a new project and point it to the folder with the images.
4 There're built-in image processing tools, watermarking tools and hundreds of other settings to play with, including interactive callouts (points of interest or hotspots).
5 Publish and upload your media to a web hosting of your choice or simply drag it to our optimized PixRiot hosting service. Plugins for popular e-commerce platforms are available or you can integrate it directly using advanced APIs that come with the 360 product viewer.
Back to TEAM MARBL...
One last upside to this 360 product photography set up is simplicity. This level of simplicity allows you to fairly quickly teach anyone the process of creating 360 product images, which either gives yourself as a non-technologically savvy small business owner the potential to do your own 360 product photography, or gives the multi-employee business owner the potential to train their staff how to create these same photos, too. This means you no longer have to wait for the one person with these skills to come in and make the photos you need made, and you can also systematize the entire process, giving you the ability to train people how to use this device without you being there.
Then, when you're not using the ORBIT for product photography, you can use it for all the other different uses it has, like filming your passion, filming interviews for your company, or giving other content creators the potential to create orbiting shots like these, by renting it out. It will never be sitting in a corner. Can you tell that at Marbl, we’re passionate about innovation?
TO GET YOUR OWN
We are currently running a Kickstarter to share the Marbl ORBIT with our first customers. You can visit our page to secure your own ORBIT at a discounted price of up to 36% off. Our first shipment will arrive this October. Our second shipment will arrive in January 2022. We are getting down to the last few spots within our October 2021 shipment, so be sure to secure yours as soon as possible, before spots in our first shipment run out.
All the best, Josh, Jon, Greg, Ty and Hayden TEAM MARBL
The Marbl ORBIT was designed and invented by Josh Yeo, the creator of MAKE.ART.NOW. The ORBIT has many uses going from medical field, to cinematography, to stop motion animation, to 360 product photography.
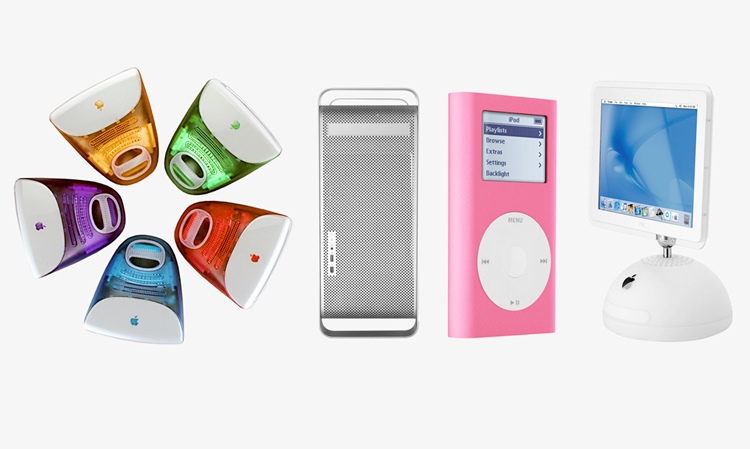
To jump straight to the Apple gallery, scroll to the bottom of this post.
Notebooks full of data CDs from the 1990s and early 2000s sat on closet shelves in my home for years. They were my archive of 360-degree product demos I made for Apple for over a decade. From 1996 to 2007 my company, Flipside Studios (then called John Greenleigh Studios) was the exclusive provider of Apple's website 360 product photography for every hardware product they released. The first iPod, the first iMac, and who can forget the eMate 300? Well…everyone.
I had always thought about digging out these old 360s to put on my website for fun and to show an important part of Apple's history – and my own. Unfortunately, Apple has not supported the platform they were meant to function on - QuickTime VR (aka QTVR) - for years, and I hadn't wanted to deal with all of the steps and hassle of updating them for current systems and browsers.
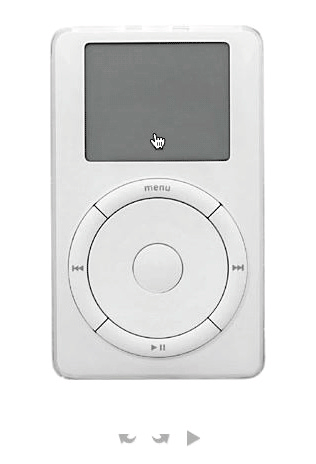
Drag and spin the multi-row 360 product view of the iPod shuffle (circa 2005) in any direction.
Recently, as I was revising the Flipside Studios website, I decided it was time to include a gallery of our Apple QTVRs. This meant finally getting down to taking the original jpeg files and making new versions of the 360s in HTML5. Unlike before, however, I now had a tool that would make the process much easier and stress free, and this was my go-to stitching and viewing software, WebRotate 360!
How our QTVRs were made
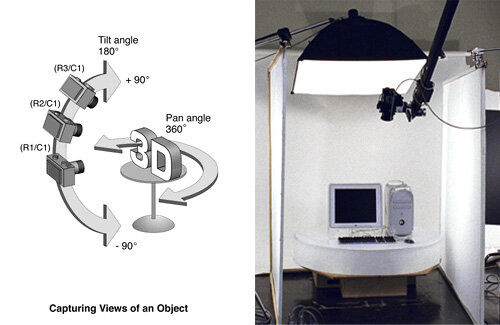
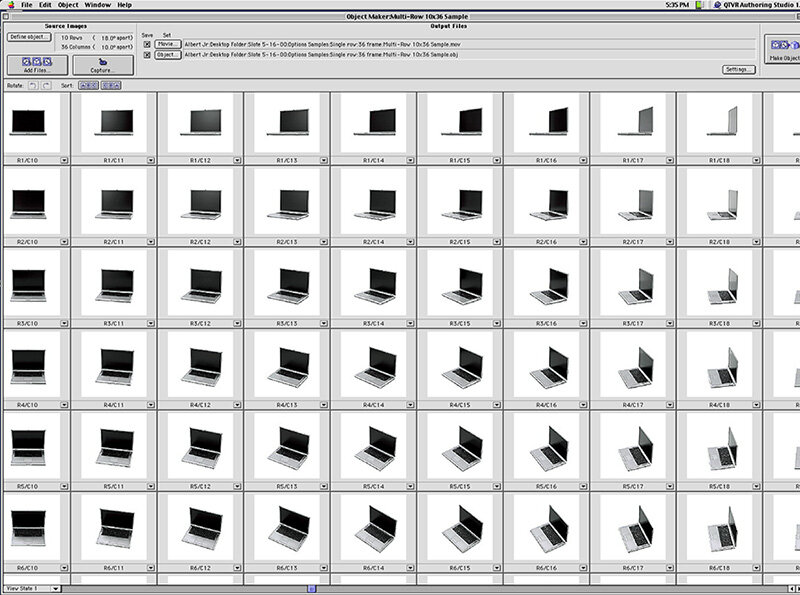
Apple's QTVR product 360s were photographed with custom-designed automated turntables and camera rigs created by the wonderful engineer, Lewis Knapp of Corybant West. As the turntable rotated and stopped every 10 degrees, images were captured until a full 360-degree rotation was made.
Almost all of the Apple 360s were of the "multi-row" variety, meaning that photos were captured both horizontally and vertically (x-axis & y-axis) using the motion control rig that raised the camera to precise and repeatable positions above the product. These QTVRs usually contained 360 total images and allowed the customer to virtually examine a product all around and also over the top.
For some products – like ipods – our clients at Apple requested that we additionally shoot the underside to allow viewers to see below the product as well as above. The trick to capturing the bottom was to shoot the whole sequence twice – flipping the product upside down for the 2nd run. When the upside down images were rotated 180° in post production, the effect was that of moving underneath it.
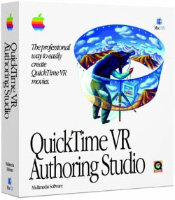
Once the images were captured, they were edited in Photoshop to remove the backgrounds, retouch minor cosmetic blemishes, and composite a screen image into every frame that showed a screen. The result was a folder of retouched, sequentially numbered jpegs. Apple's QTVR Authoring Studio software (replaced later by 3rd party programs) was used to stitch the retouched jpegs into web-ready QTVR files.
The finished QTVRs were delivered to Apple at two different resolutions: 360px x 360px and 480px x 480px. Why such small image sizes? Because anything larger would have taken forever to download on the slow dial-up modems that connected us to the internet before broadband came along in the early 2000s.
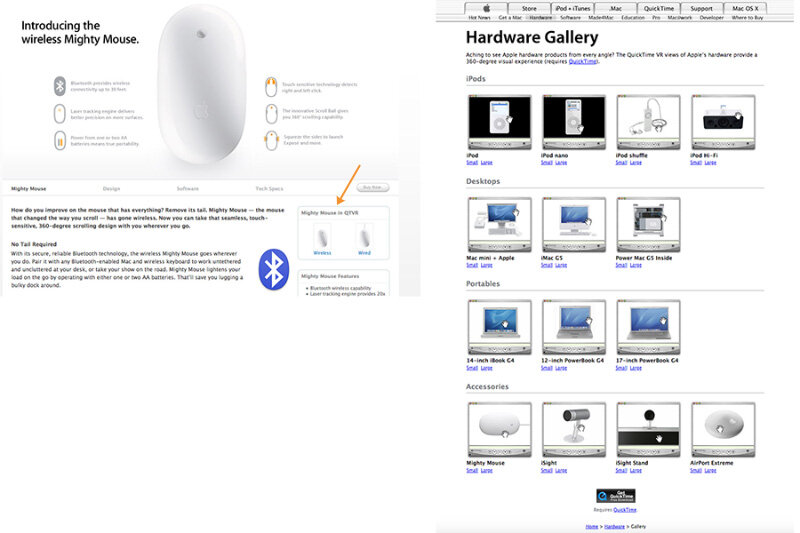
Final files with the product code name 'Gimme' as delivered in 2 sizes to Apple. The '.obj' files were the interactive web-ready files.
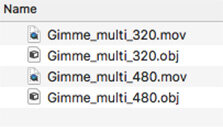
The final QTVRs were featured on the product page of all newly released hardware, and also on a dedicated 360 product photography page called the "QTVR Hardware Gallery".
Left: a product page with a link to the QTVR 360s. Right: Apple's QTVR Hardware Gallery circa 1993.
Apple eventually discontinued supporting the QTVR object movie plug-in in 2006, and later did the same with VR panoramas, forcing both 360 product photographers and panorama photographers to move to Flash and then to HTML5 for presentation on the web.
Remaking the 360s
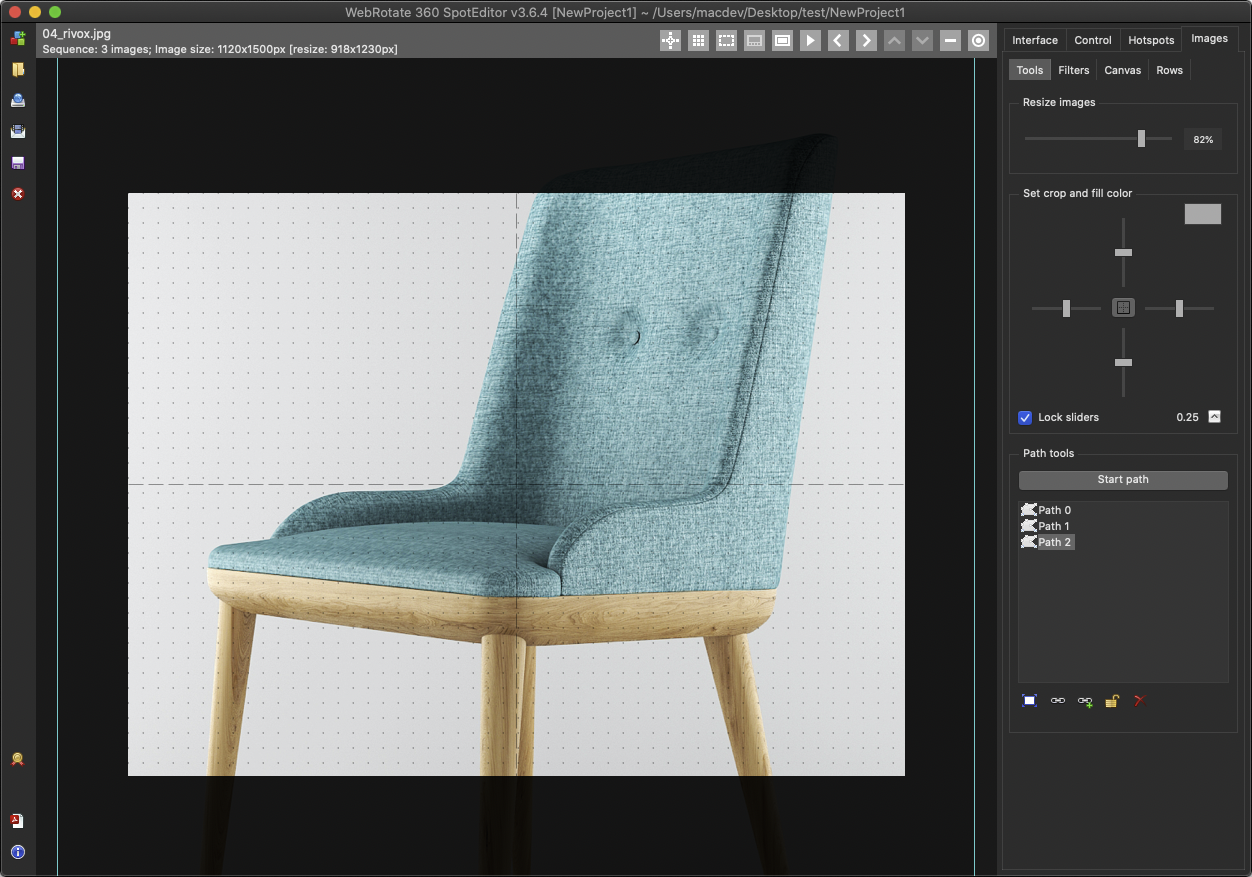
To remake the QTVRs in HTML5 for viewing on current systems, I simply imported the folder of original retouched jpegs into WebRotate's SpotEditor, adjusted the control and interface settings, and output the files to a new web-ready folder. This time around - with broadband speed - I could remake the 360 product spins larger than the originals, and include high resolution zooming as well as full screen mode. The folders were uploaded and are now hosted with WebRotate's new PixRiot server platform which simplified the uploading and has made a real difference in the download speeds as well.
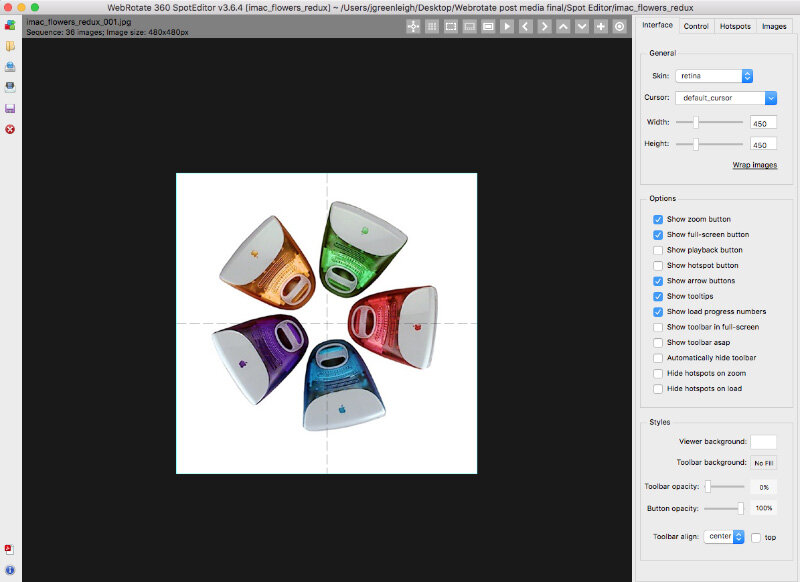
A screen capture of the WebRotate 360 SpotEditor.
I am excited to have finally remade a selection of the Apple 360s that led me into the world of 360 VR product photography and hope you enjoy them and share them with others.
To see announcements of new 360s added to the gallery - as well as other one-of-a-kind Apple history not found anywhere else - be sure to follow Flipside Studios on Twitter and Instagram.
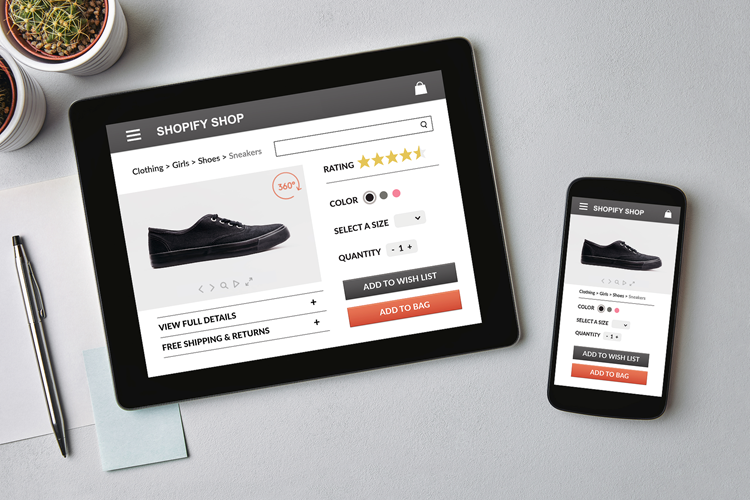
It's important to note that given Shopify limitations, your 360 product views have to be uploaded to a third-party web hosting such as webrotate's PixRiot, a GoDaddy server, etc. PixRiot, if you haven't had a chance to play with it is our new optimized hosting solution where you simply drag a published folder from your hard-drive to your PixRiot dashboard to host and share your webrotate 360 views online. PixRiot is not a requirement for using this integration.
There're three main integration methods available in the new app:
Automatic PixRiot integration
Image ALT integration
Programmatic Integration
Let's first review Automatic PixRiot integration which is a new method we added in v2.0:
Automatic PixRiot integration
It's the simplest integration we have so far. It relies on automatic matching of a product ID in your Shopify catalog with the name of your 360 product spin in PixRiot. In other words, if a user lands on a product page and the app finds a matching 360 product spin on PixRiot, the integration is activated automatically.
Here's how to configure it step by step:
1 Let's first find out the ID of our product which we can do by simply looking at the URL of the product page in our Shopify admin. The ID is this long number at the end of the URL:
If you don't like using this ID for some reason, you Shopify developer can use a global JavaScript variable that they can output in your product template with the matching PixRiot name as needed. The name of the variable is __PixRiotAssetName.
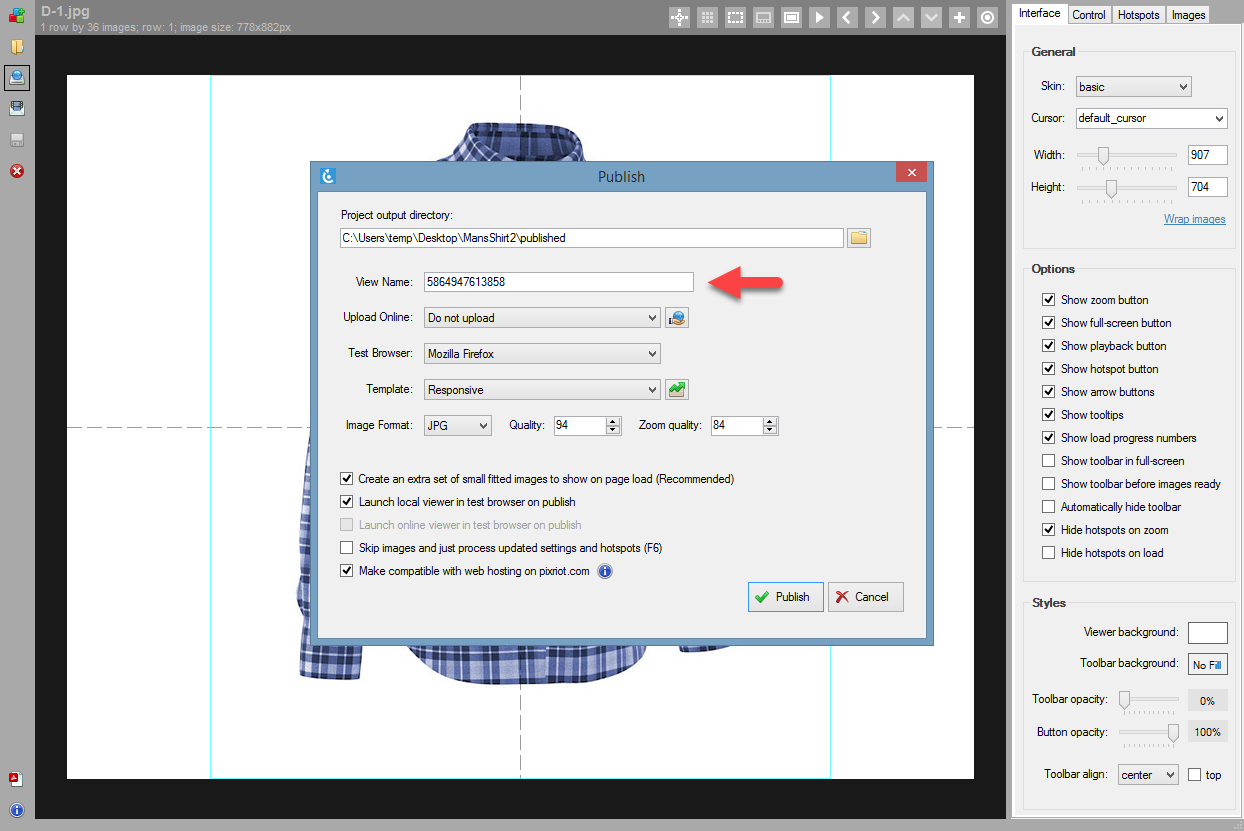
Let's copy this number and re-publish our 360 product view in WebRotate 360 SpotEditor (download) using the Shopify number as the View Name. Alternatively, we could create a new SpotEditor project using this ID as the actual project name:
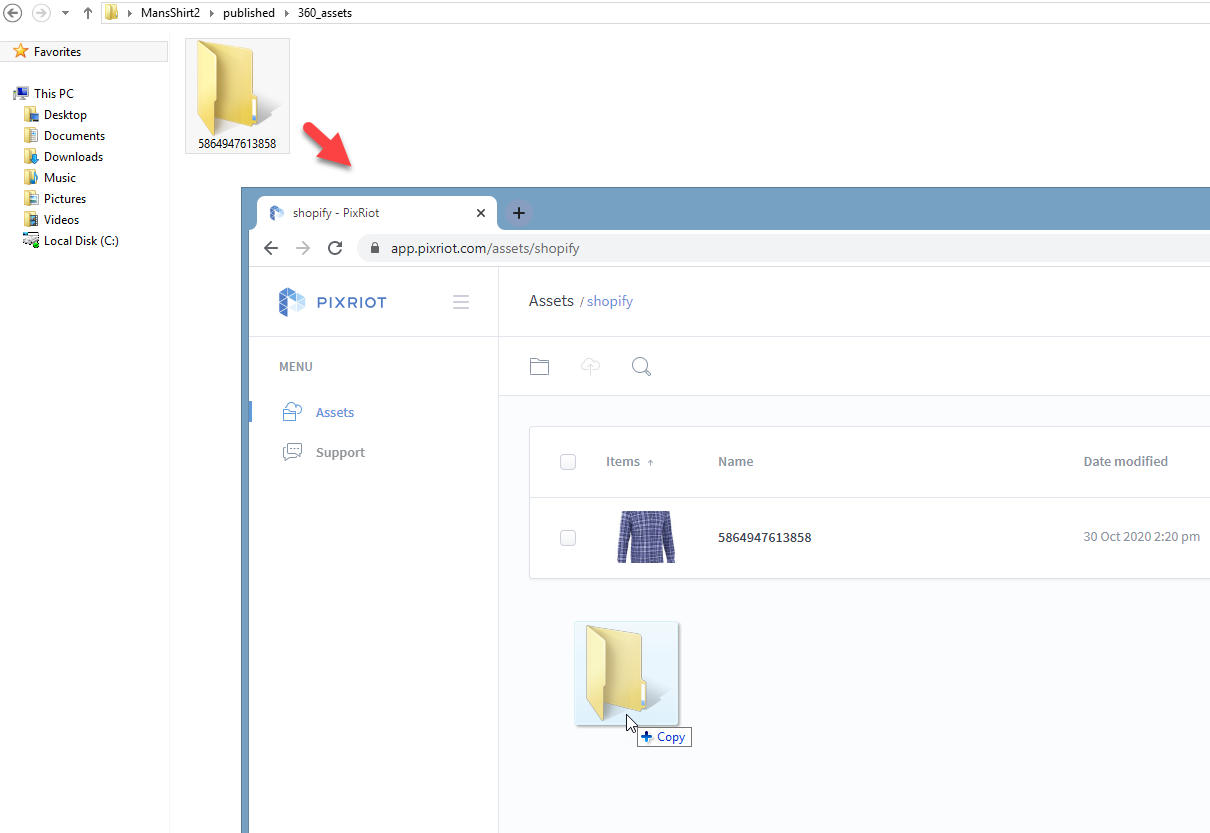
2 Now we can upload the published view to PixRiot under some folder like the shopify folder we created in the following screenshot. This folder and any sub-folders we can create there contain all required 360 product views for our app.
To upload, simply drag a single folder that just got created under published/360_assets that looks like our product id and drop it under your chosen folder in PixRiot:
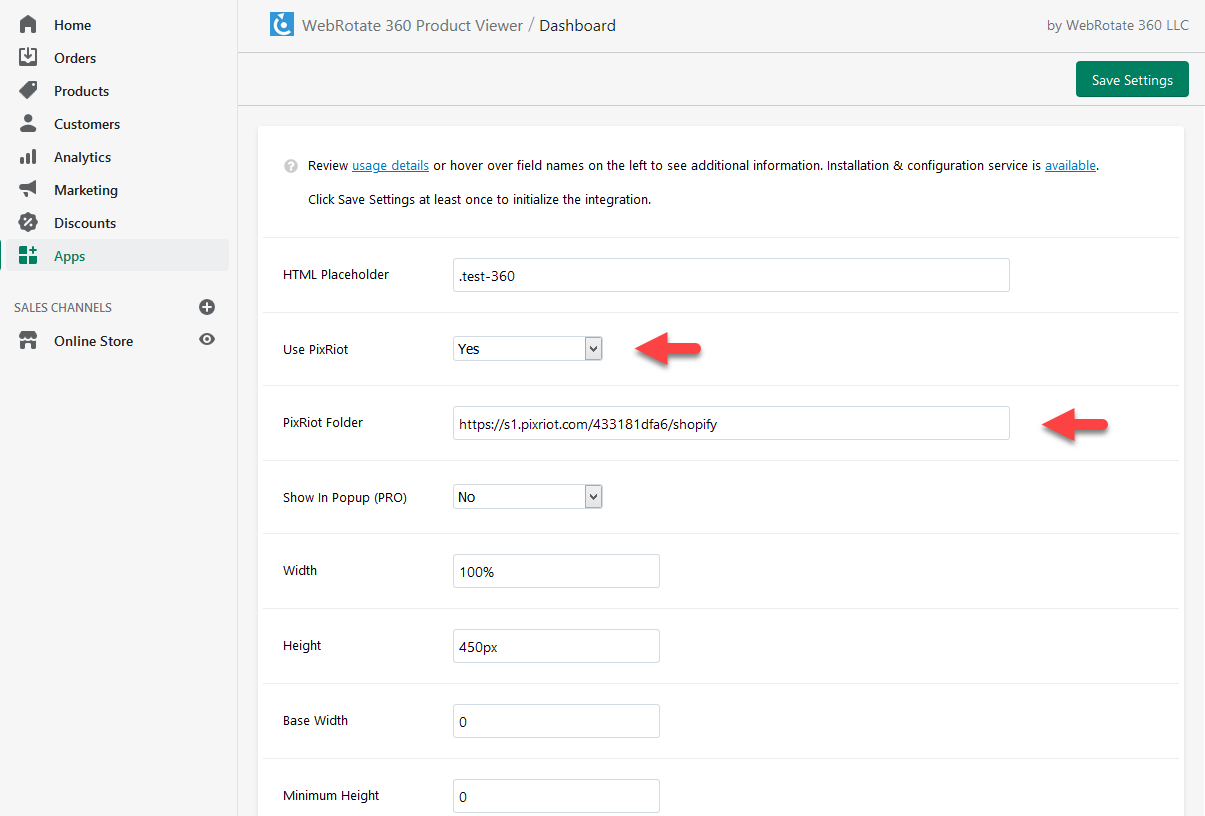
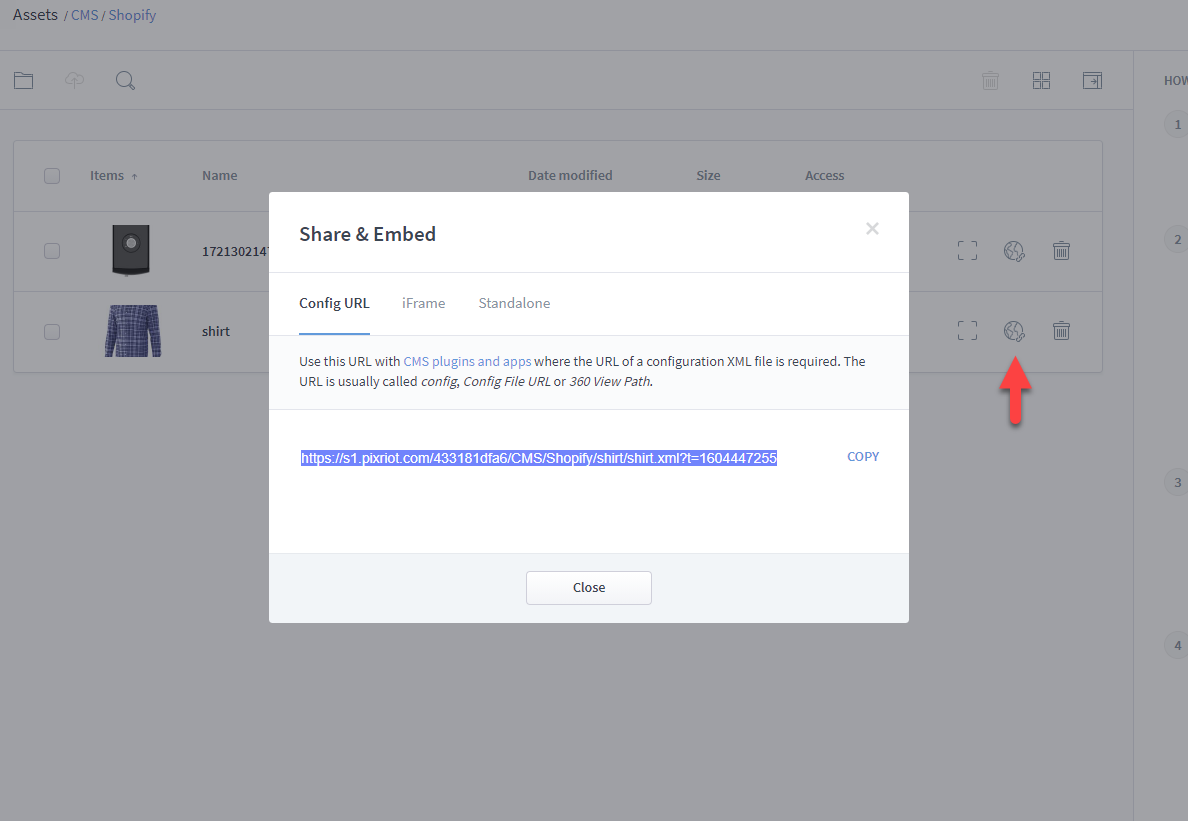
3 To configure the app, first select Yes under Use PixRiot and also enter the URL of the shopify folder under PixRiot Folder in the app settings. To get the URL of the folder, click Share (globe icon) next to the folder name in PixRiot and copy-paste the URL accordingly:
Now we need to decide where to place our 360 product view on a product page in Shopify and this is what the HTML Placeholder field is for.
HTML Placeholder is either a CSS class or id of an existing HTML element (container) on a product page where we want to see our embedded 360 product spins.
It can be also a class or id of an element that triggers a popup with a 360 product view, if it's configured in the app (e.g a thumbnail with a 360 view graphic, etc). If this sounds intimidating, please get in touch with us or your Shopify developer to find out how to identify or create such placeholder.
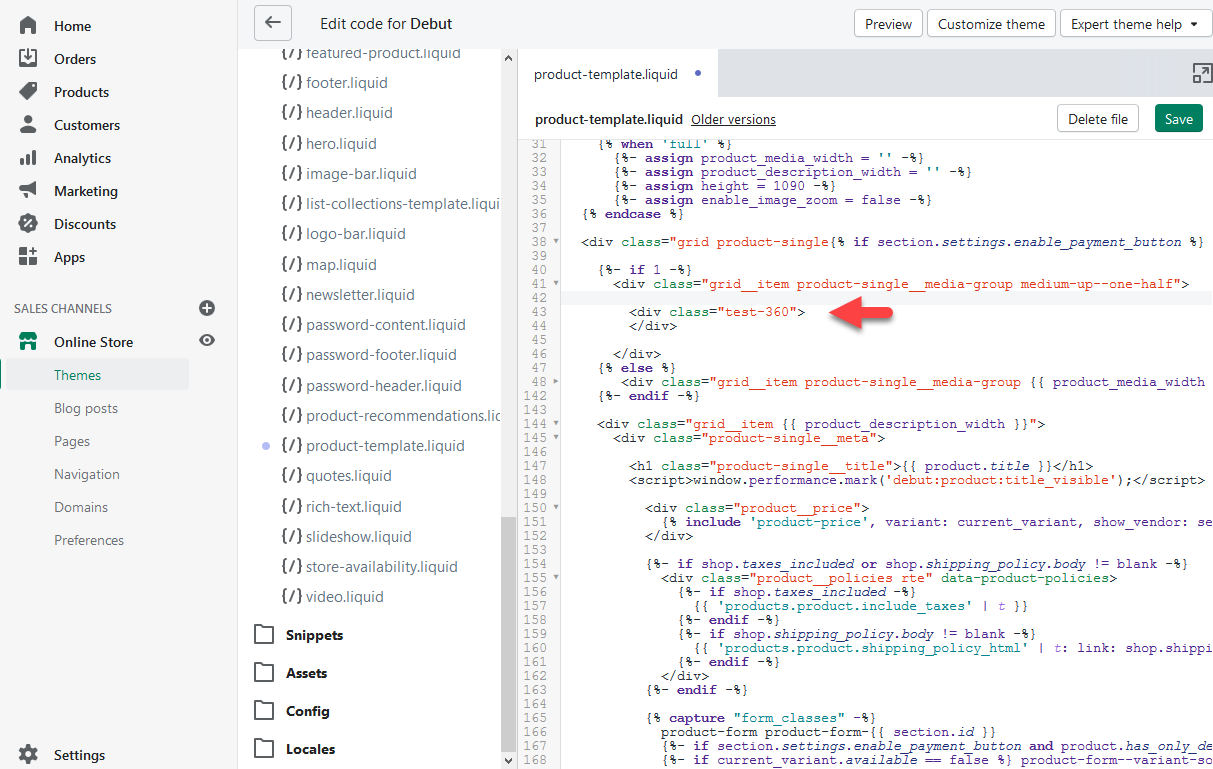
For this exercise, we will manually replace the gallery that came with our Shopify template with this empty div container in the product template as follows:
<div class="test-360">
</div>
Alternatively, we could make it a hidden 360 graphic as shown next and place it let's say next to our main product gallery and select Show In Popup (PRO) in the app settings. The app would make it visible automatically on a product page, if a matching 360 is found in PixRiot (not all of your products may have a 360 product images). If user clicks the graphic, it opens a clean popup with a configured 360.
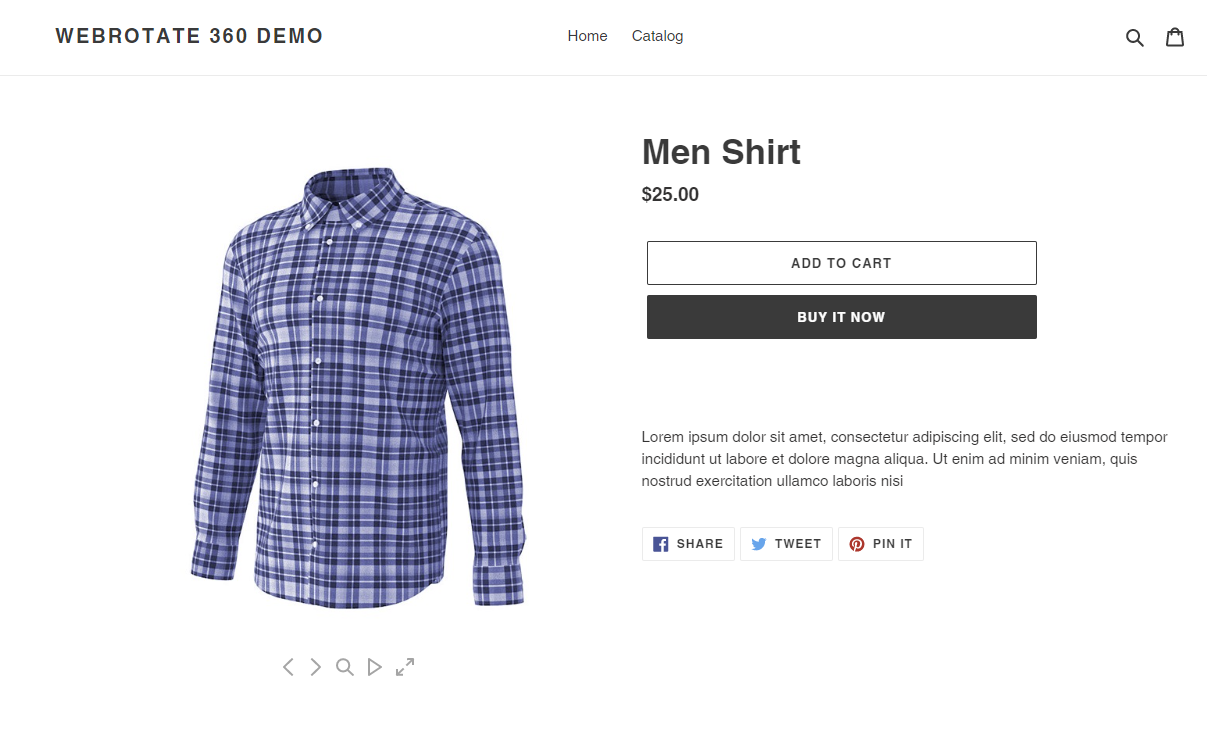
4 Finally, let's enter .test-360 in HTML Placeholder in the app settings in Shopify admin, save the app and clear browser cache to see our embedded 360 product spin as we intended:
You can fine-tune it further by updating viewer dimensions, its Base Width (important for responsive viewer height!), viewer skin, etc using the app settings as needed. Hover over the field names on the left in the app settings to see more details about each field there.
Remember to clear your browser cache each time you save the changes.
Image ALT integration
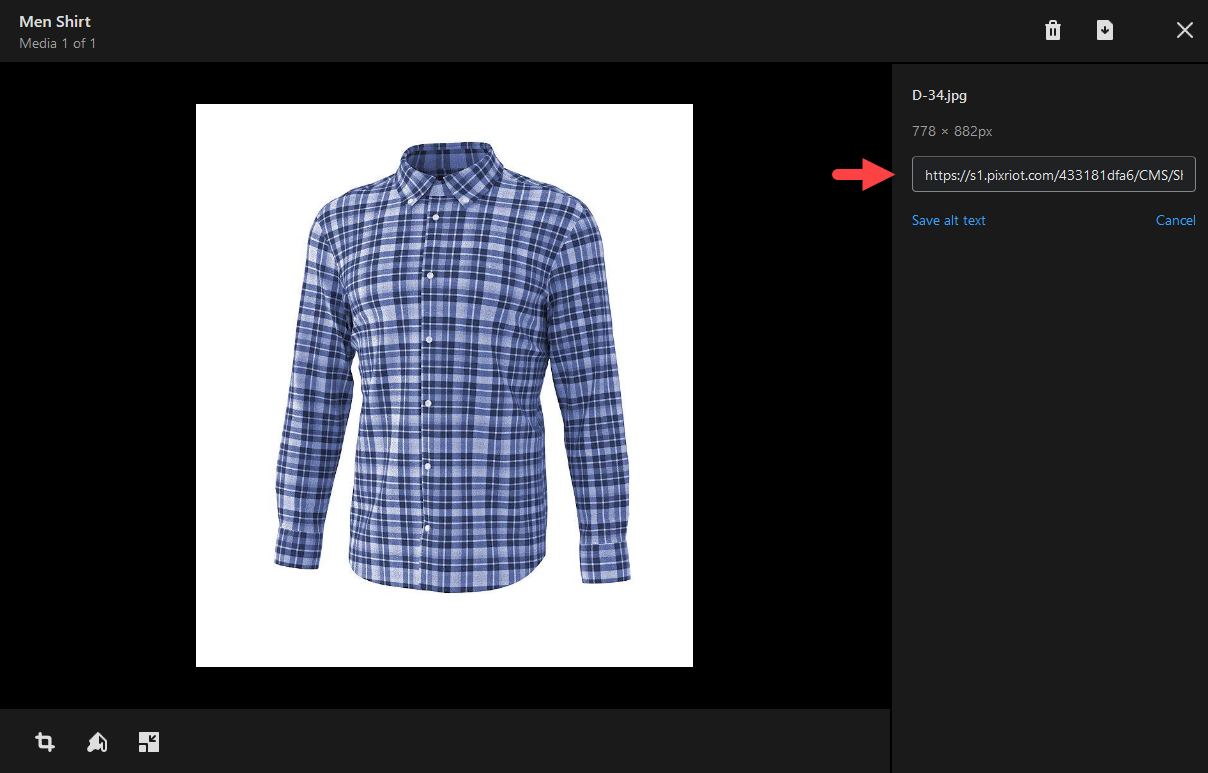
Instead of the automatic linking with PixRiot we reviewed earlier, here the app relies on the URL of a 360 product view that you can enter in the ALT field of any product image in your Shopify admin under Products.
The URL can point to a webrotate 360 product view on any third-party web hosting, including PixRiot. And it's the URL of a config XML file that WebRotate 360 publishing software creates on publish on your hard-drive under published/360assets/your-folder-name.
It's the same URL you see on the first tab of the Share & Embed form in PixRiot if it's uploaded there:
The integration will look for the image ALT on a product page that resembles our config file to see if a given product actually links to a 360 product view. And if it does, it will show it inside your configured placeholder (or via a popup) as we just discussed in bullet 3 under Automatic PixRiot integration.
Programmatic Integration
With this integration method, your Shopify developer can insert an HTML placeholder at a desired location on a product page programmatically and only for those products that have 360 product views. The placeholder container just needs to include the URL of the config XML file via the data attribute as shown in the following example:
Using this example, we also need to tell the app to use .test-360 as the HTML Placeholder in the app settings accordingly.
As with the other two integration methods we have reviewed, you can also configure this placeholder to work as a popup thumbnail and use the rest of the app settings as applicable.