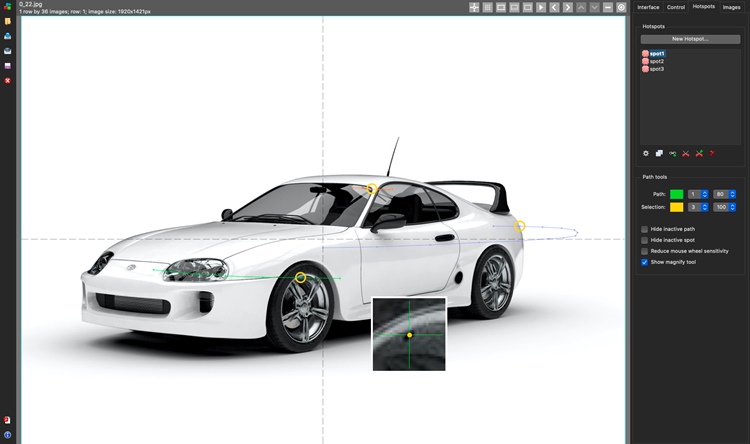
We're releasing a new feature in v3.6.5 beta later this week with a handy new tool to improve hotspot placement in your 360 product spins. It's really just a magnifying "glass" with a configurable zoom but a couple of extras make it quite more useful.
Update [Aug 22, 2023] Latest v5 now comes with the Auto-path feature that can be a huge help for hotspot creation.
Until now you mostly had to guess where to click on each image when creating a trajectory of your point of interest. True, you could zoom-in but even then, we don't let image zooming beyond the app boundaries while working inside SpotEditor. Also, it was hard to figure out where to click as the mouse cursor and the rest of the trajectory graphics could get in the way, blocking the image pixels you need.
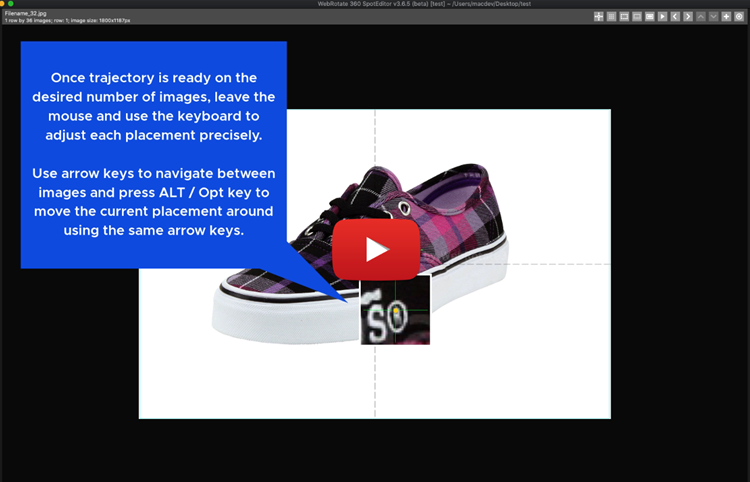
Now with the Magnify tool you have a configurable zoom to give you clear details as well as unobstructed view of the image pixels at all times. But what makes it even more useful is that when you leave the mouse with the Magnify tool still on, you can use the extra unobstructed view to fine-tune the trajectory via the keyboard by adjusting each hotspot placement using a combination of arrow keys and ALT key (Option key on macOS).
Check out this video, explaining the entire process:
In addition to Magnify, you will notice a couple of minor enhancements:
1 New Hide inactive spot option under Path Tools that lets you hide other hotspot placements within the same hotspot trajectory. In other words, if checked, you will only see the hotspot placement on the current image.
2 There are extra options in the hotspot context menu and via keyboard shortcuts to allow propagating current hotspot placement to the next or previous frame. Before you had to propagate to all images first when you needed to have the hotspot to stay at the same position and then delete each placement on those frames where you didn't need it.
3 At last the color and width preferences you make for your hotspot trajectory via revised Path Tools will be saved to your project and restored (per hotspot) next time you open the project.
More exciting hotspot features are coming soon...
PS: if you can't wait for the public release of the new v3.6.5 beta with this feature, request it here.
I have been a 3D animator since I purchased my first computer, (an Amiga 500) way back in 1988. Much has changed obviously, in regards to rendering technology, CPU speed and the amount of memory our glorious machines have. However, we as animators still have issues that crop up no matter how technology changes.
One issue that might crop up is how to use this 360 interactive animation technology that you see almost constantly on the Internet. Better yet, how do you even start to think about and use this technology. Think of interactivity as a film strip, which allows the viewer to push or pull their mouse through the presentation. Basically, you are able to present a widget, process, or an idea to the user by dragging your mouse and clicking on icons attached to the geometry which are called hotspots.
Hey, "old 3D animation guy" we get that… do you? Most of my clients think they can only rotate a widget and talk about its parts. Not so. Using the film strip idea above you can allow your users to get lost in your film strip and interact with your widget when you are not able to be there and present it yourself. Your creations do have limitations in the form of internet speeds, graphic cards and the device that your viewer is using to view them on, but that is another blog post all together.
Working with most clients is easy because they simply want to have their product ("widget") rotate in 360. A rotation around the widget's center axis gives the viewer the ability to not only see all sides of the widget, but any hidden features the client wants to showcase.
How many degrees of rotation per frame is adequate for a smooth presentation? I use 24 frames with a rotation of 15° per frame (360 divided by 24 is 15). Just target the camera to your widget and make the first frame zero on the Y axis and at frame 24 336° (360 minus 24 is 336) on Y. The software you use to compile your project will give you a smooth interpretation of the widget’s rotation. Just add hotspot of your choice, and you are ready to publish.
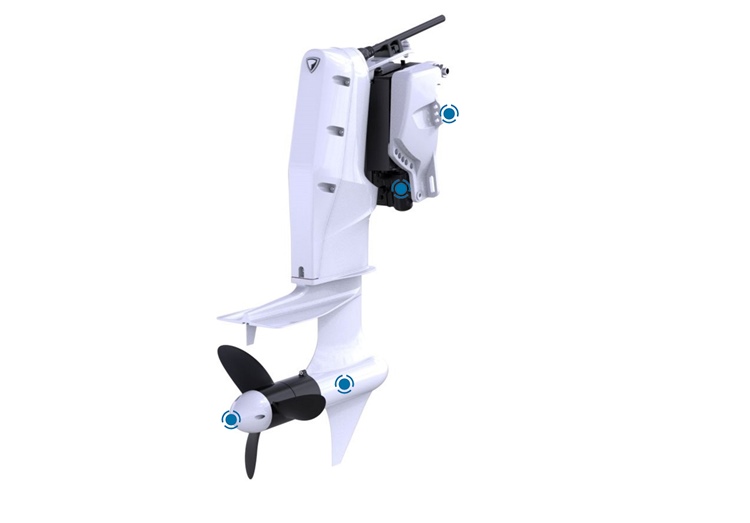
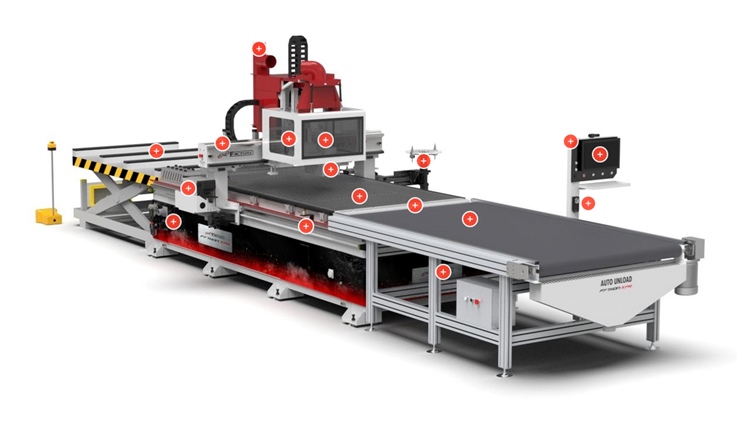
What if you decide to show your widget from all sides in full "3D" and then show a few hotspots as the viewer enjoys the multiple axes provided (see the video example at the bottom of the post)? Easy enough you would think, but here is a sure-fire way to do it...
Luxion KeyShot
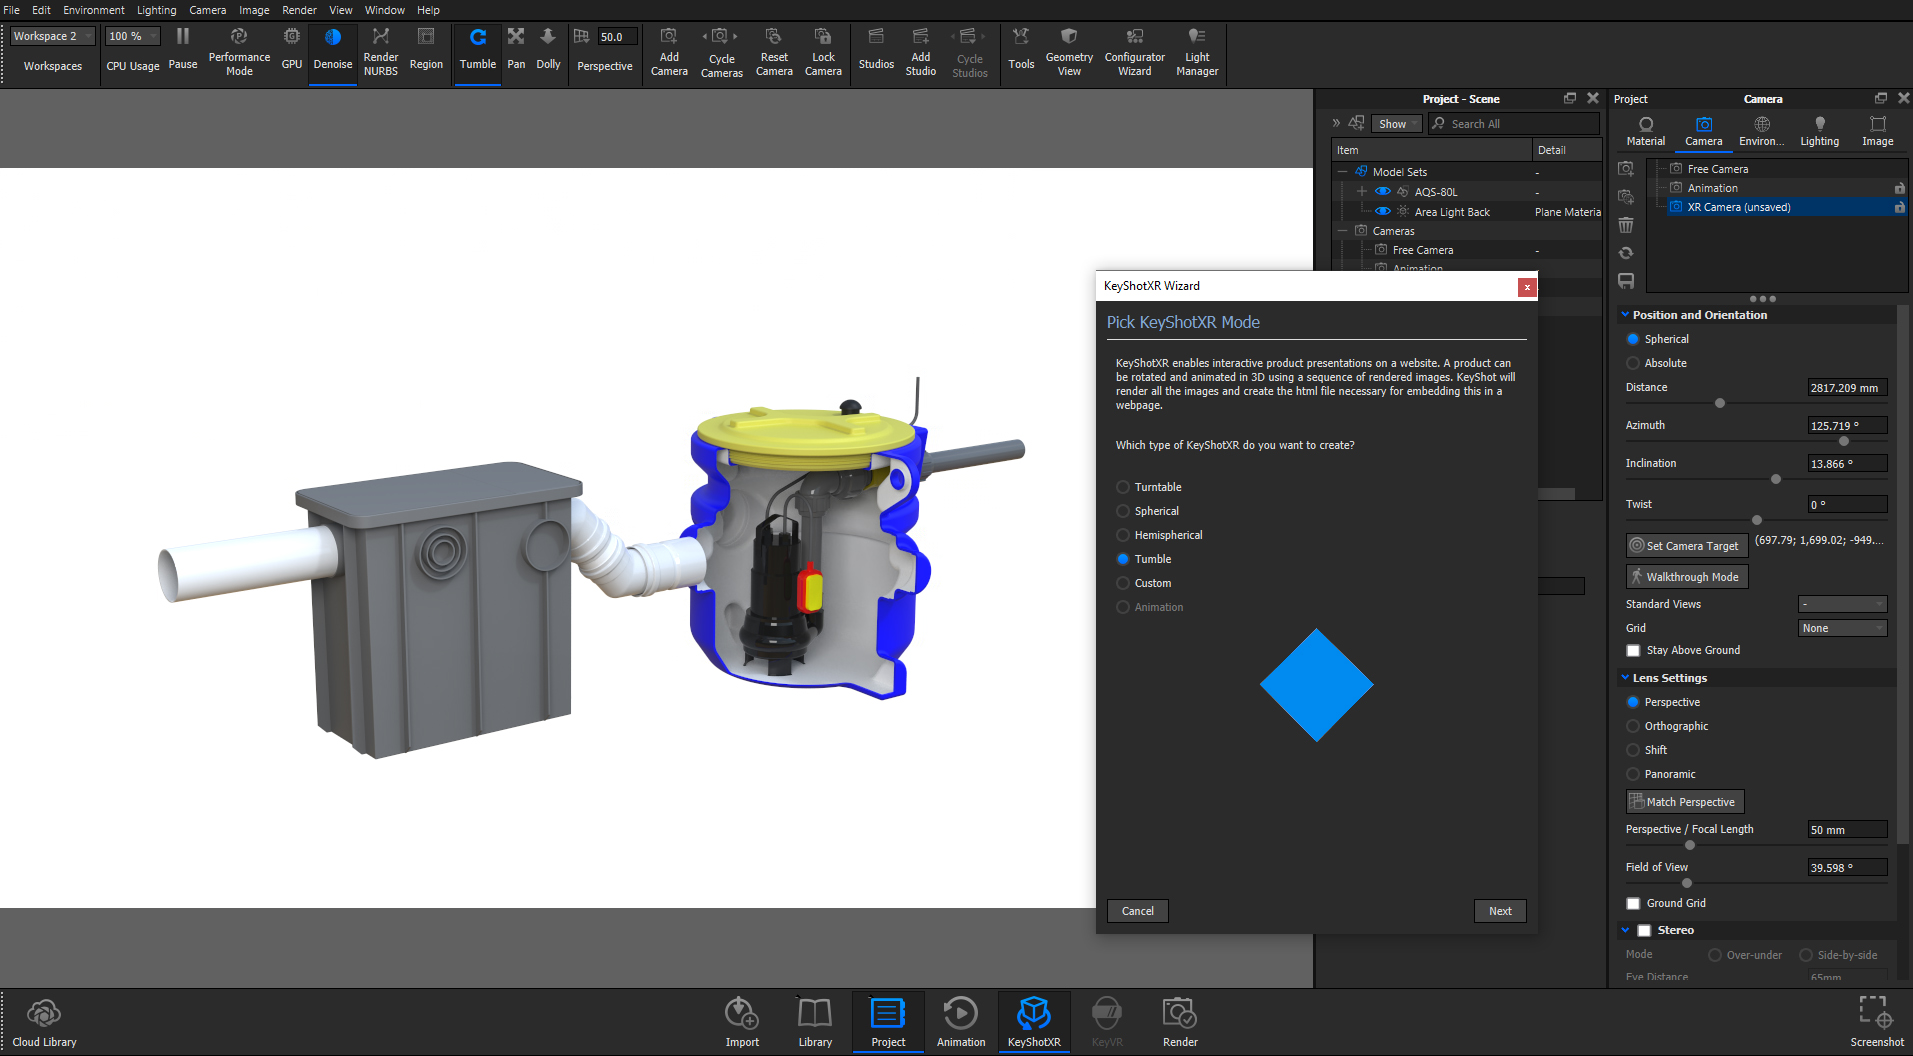
Some programs I use like KeyShot do this for you by selecting the "Tumble" feature from the KeyShot XR tab. In Keyshot, you first setup your animation. Setting the camera distance from the widget and lighting of the scene. Next, save your camera and select KeyShot XR from the bottom menu. Now, select tumble and choose "Object" as the rotation center. Since you have already setup your camera, you can select next from the "Pick Initial KeyShotXR View" menu.
For this example, I used 24 for "Horizontal Frames" and 12 for "Vertical Frames".
All that is left to do is name your animation, set the folder where the frames will be saved and set frame resolution (1920 x 1080 is what I usually use). Remember to render frames, not video when creating interactive projects. Use .png images if you want to change your background later, or .jpg to conserve room.
However, when I use Modo it can be a little tricky to get the results you're seeking.
Foundry Modo
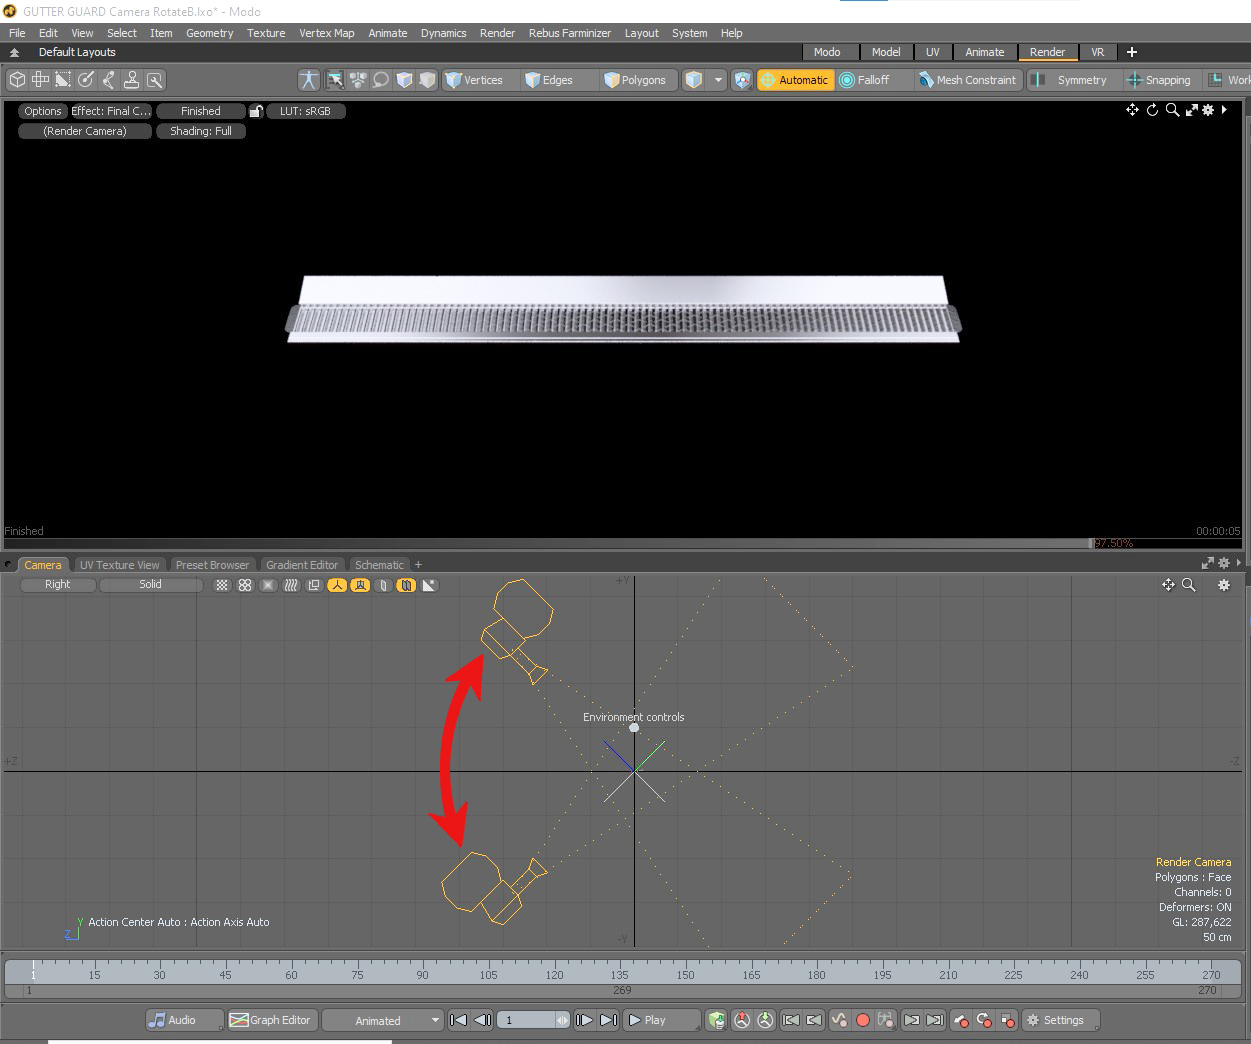
I start by creating a target for my camera, (usually the center of the widget) then parent the camera to the target after setting the desired distance. In the example here, the client wanted to see their widget from the top and the bottom while it rotated in place. The camera would be at 45° on the Y axis at the highest and lowest points of the project to see the top and bottom of the widget, while rotating around the Y axis as you moved up and down.
To do that, I decided to have four positions for the camera on both the positive and negative Y axis. I simply divided 45° by four to get an angle of 11.25°. Starting from 0° and moving up on the Y axis I got the following angles: -11.25°, -22.5°, -33.75° and -45°. The angles for moving down on the Y axis are: 11.25°, 22.5°, 33.75° and 45°.
To get the widget to rotate around the Y axis I simply applied a 360-degree rotation over 30 frames. Frame 1 is 0° and frame 30 is 348°. I programed the software to repeat this motion for the rotation of the widget for the length of the project. Since there are 9 positions that the camera can move on the Y axis, the project needed 270 frames total.
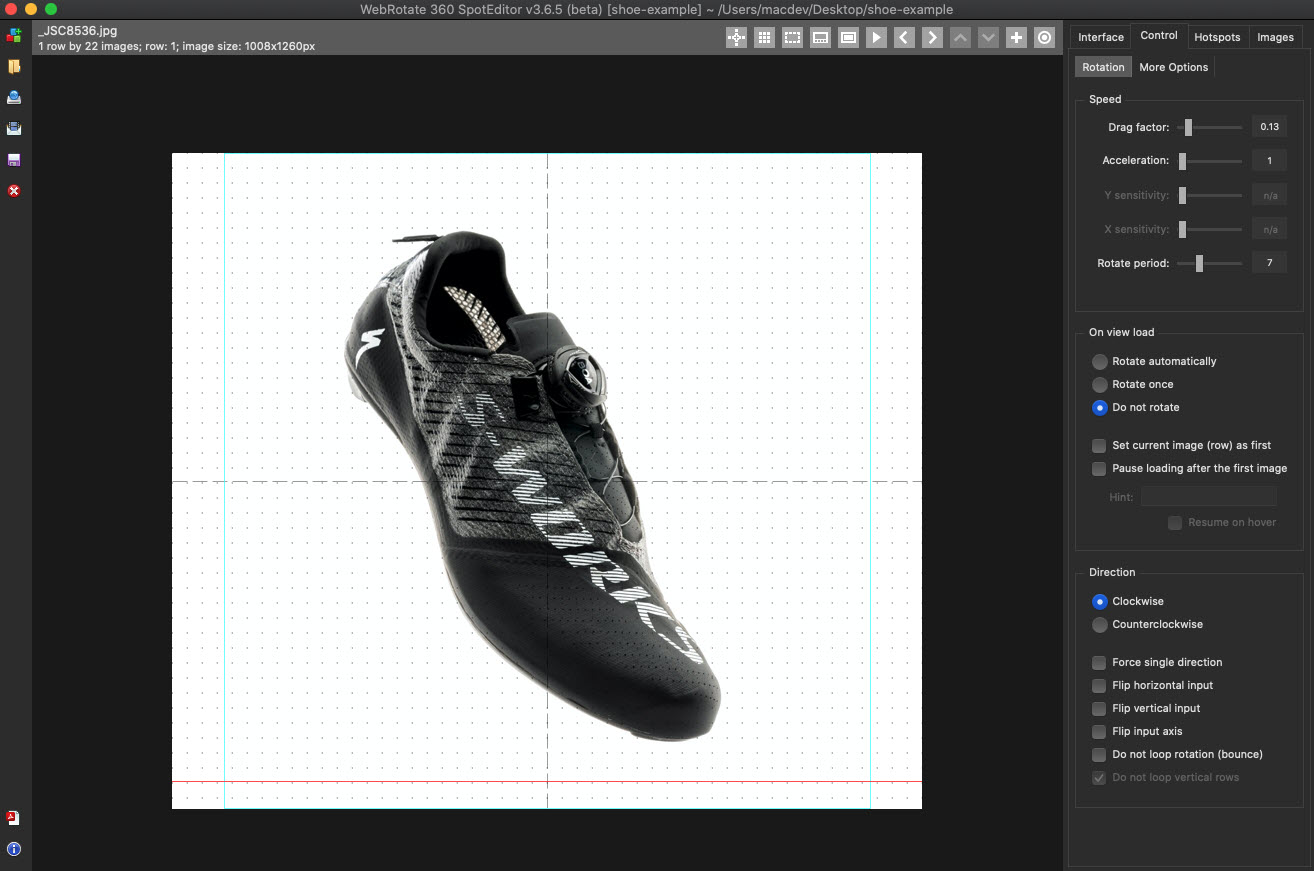
WebRotate 360 SpotEditor
Now let's review how to setup your project up in WebRotate 360 SpotEditor.
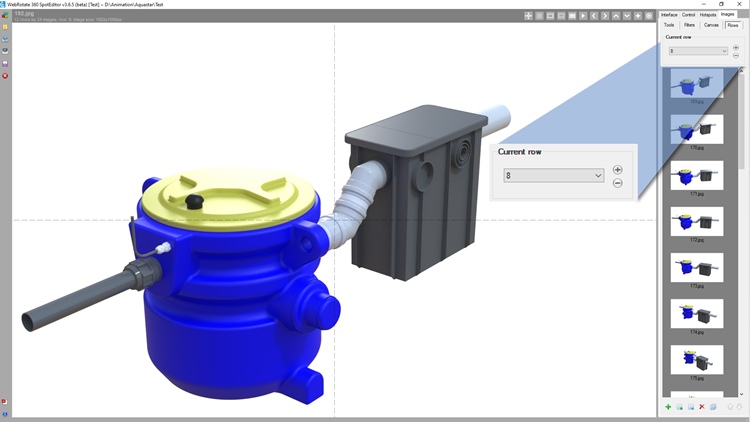
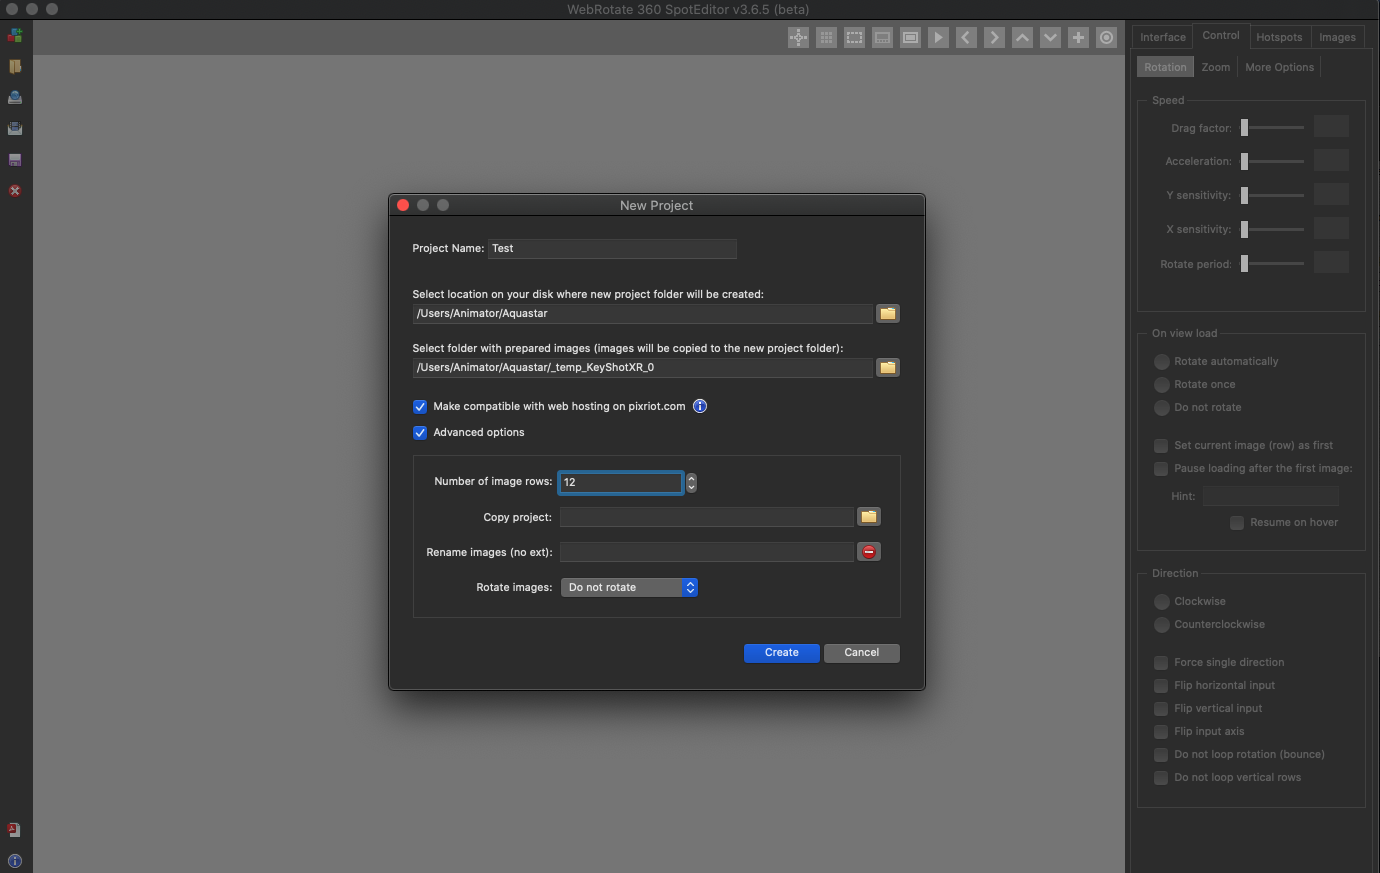
Start a new project in SpotEditor and make sure to check "Advanced options" on the New Project menu. You must tell SpotEditor how many image rows there are. In our case there are 12 rows with 24 images each. The software is pretty smart and does the math for you once you say 12 rows.
After your new project loads, go to the "Images" tab at the top right of the SpotEditor interface. There you find the "Current row" box where you can select which row of images you want to view. Hold the left mouse button and drag to move through each row of images. To see the finished widget, you will need to publish the project that will automatically launch a local preview in your browser.
Wrapping up
To wrap up, Keyshot does a good job in creating the images you need as well as the interactive files, but it lacks a few features that can make your interactive 360 or multi-row 3D product views stand out, so I use WebRotate 360 Product Viewer software. I have been using it for nearly 3 years and cannot recommend it enough.
If you have questions, or need help with your widget, process, or idea interactive project reach out, I would love to help or create the project for you.
Kyle Thatch is a professional 3D animator with over 20 years of experience producing 3D models, interactive 360 product animations, TV commercials, and other digital media.
Last week we released a new v3.6.5 beta build 507. Today there are more than 70 new features, enhancements and fixes in v3.6.5 beta of WebRotate 360 Product Viewer (see version history). And while we have plans for a few more before the final release, now is a good time to cover the most interesting ones that are already available in the latest downloads.
1. Built-in web server
Starting with the latest build 507 of v3.6.5, we have packaged a tiny web server with SpotEditor to finally stop requiring any extra browser configuration for your local tests. Now every time you publish in SpotEditor, your local browser previews are loaded via the web server that runs inside SpotEditor which doesn't trigger any security flags with modern web browser. You will also notice that the preview URLs will look like this:
http://localhost:63533/xyz (or some other local port number)
Though if you manually open published html files from your hard-drive, the extra steps discussed in this article are still required.
2. Videos, third-party content & scrollable content in hotspots
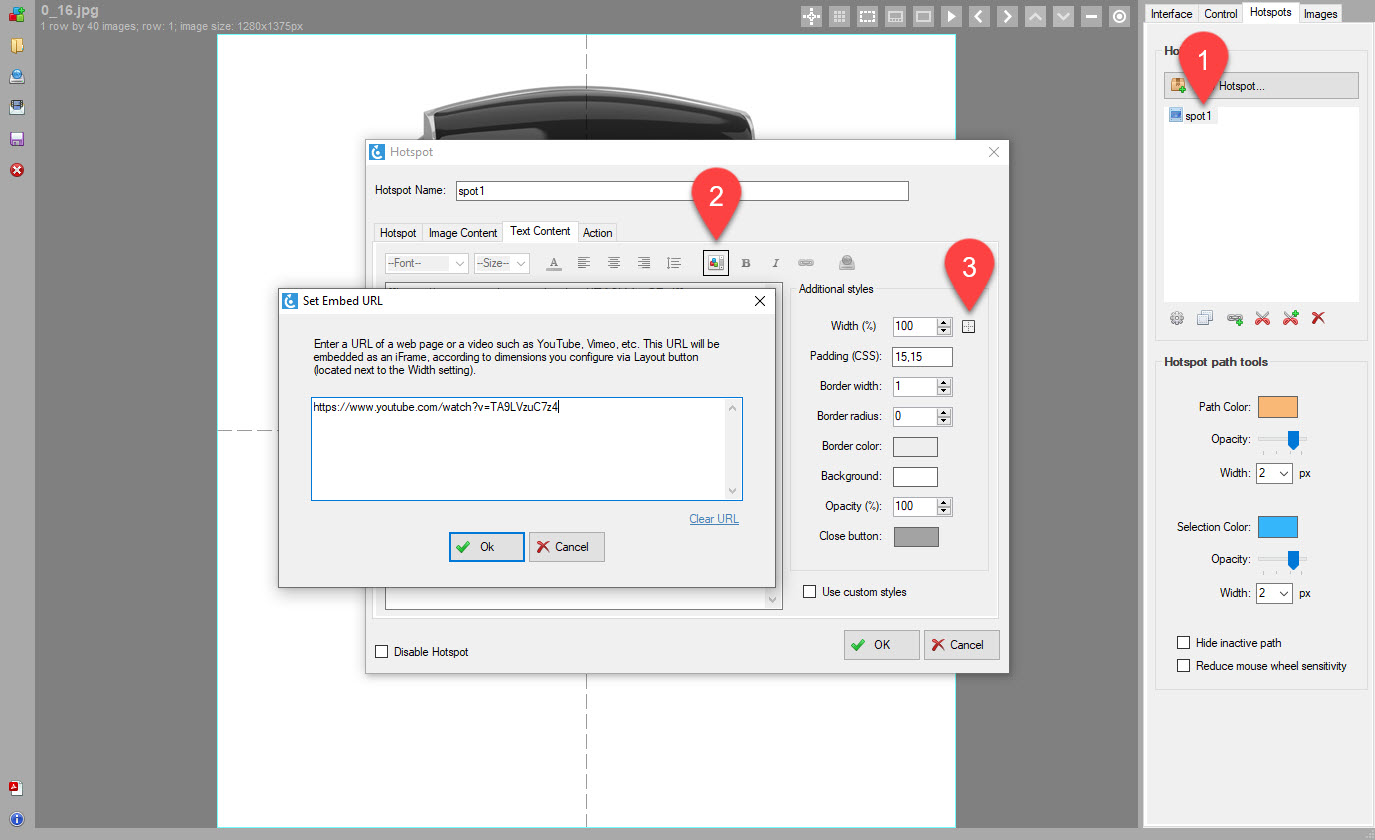
Historically it's been a challenge adding videos or "iframed" content in hotspot popups without some custom work. In the latest v3.6.5 we introduced advanced support for embedding videos, third-party content (e.g web pages, 3D panoramas, iFrames, etc) as well as using long scroll-able content inside the hotspot popups. Moreover in this hotspot mode, the popups are fully responsive and give you a lot of control over sizing either within the 360 product view itself or even outside of the view, i.e. centered on its parent page.
To activate this mode, first make sure to select the "lightbox" option under Render as on the first tab of the Hotspot form (third option). Then use button #2 in the screenshot on the Text Content tab to insert the URL of your custom content:
To see extended sizing and positioning options, click button #3 next to Width (%).
You may find that the close button that is automatically added in the top right corner of the popup overlaps the popup content. If so, simply add extra padding using Padding CSS option on the same tab. For example, if you enter 40,50 in the padding field, it will use 40px for top-bottom padding and 50px for left-right. Or use four comma separated numbers for top, right, bottom, left. Use Close button color picker to match your content color as required.
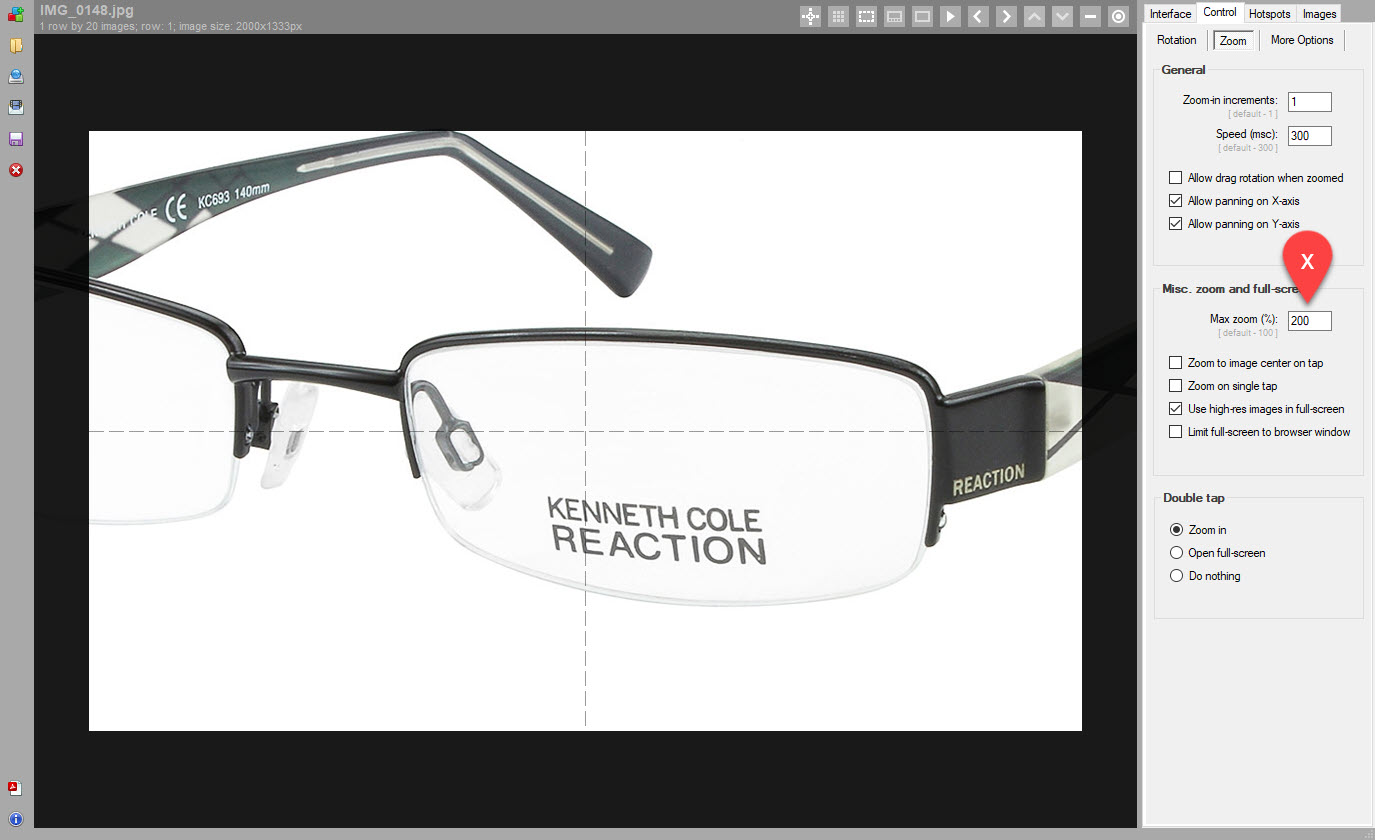
3. Configurable max zoom
This has been something we have resisted for a while. Zooming your high-res images over or below 100% of their published resolution never seemed like a good idea. Going over 100% makes images blurred and may slow down your browser (depending on how big you blow them up) while not zooming to 100% would seem like a waste of bandwidth.
But there're still good reasons to allow custom zoom scale and this is what this feature is about. Now you can set Max Zoom as percentage of your published image size and it can go both ways. For example, you may set it to 70% to ensure that when you zoom the view on a high-density retina screen (say an iPad with 2x2 pixels per dot), your zoom details remains sharp. Or you can set it to 200% to blow up the images and fill the screen to create a better presentation and reveal more information to the end-user.
Also note the new "Zoom to image center on tap" that works great for narrow objects and ensures that no matter where user taps on the screen, we always zoom in to image center. This make it more user-friendly when zooming 360 product spins with tall narrow objects, especially in conjunction with the recently introduced "Pane and Spin" feature in v3.6.4.
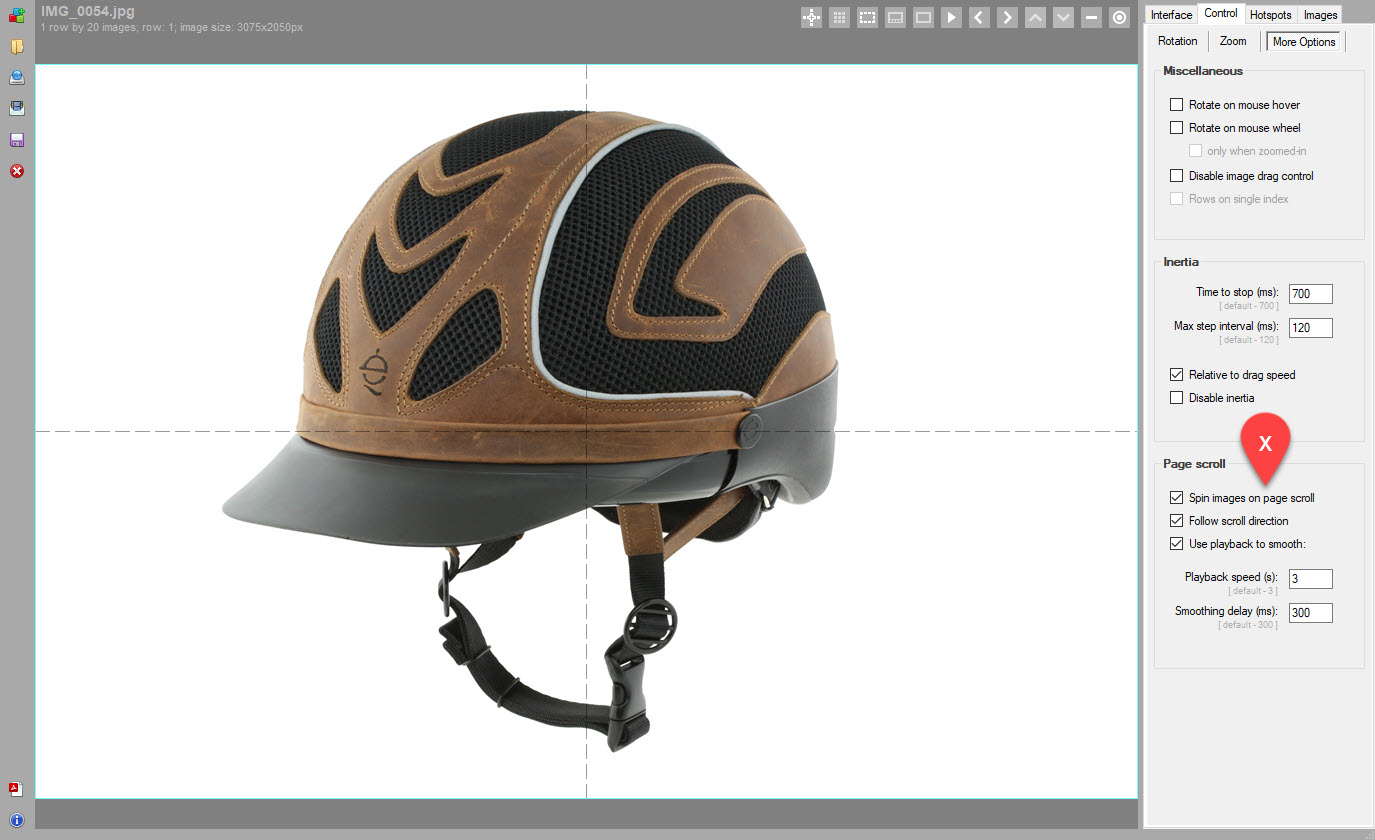
4. Spin on page scroll
Sometimes you may want to give user a hint that the image they see is not simply a still image but an interactive 360 product view. And there're existing ways to do this, including setting automatic playback or placing a "Hint" message on top of the view that you can do under Controls tab in SpotEditor. One overlooked option is to spin images automatically as user scrolls the page and this can be especially useful if your 360 product view is not placed at the very top of the page. With the latest release this is now possible under Control -> More options -> Page scroll
There are few options for advanced control:
Follow scroll direction: animate images according to the direction of page scrolling (up/down to clockwise/counterclockwise).
Use playback to smooth: if not checked, the speed of the image animation is relative to the amount of page scrolling. If checked, we activate the standard playback function on page scroll and you can then configure the speed of the playback and its responsiveness (to the release of the page scroll) in the same section.
The later creates smoother animation regardless of how fast user scrolls the page.
There's also a new template under Templates on the Publish form called Spin on page scroll that you may use to test this feature before delivering for integration.
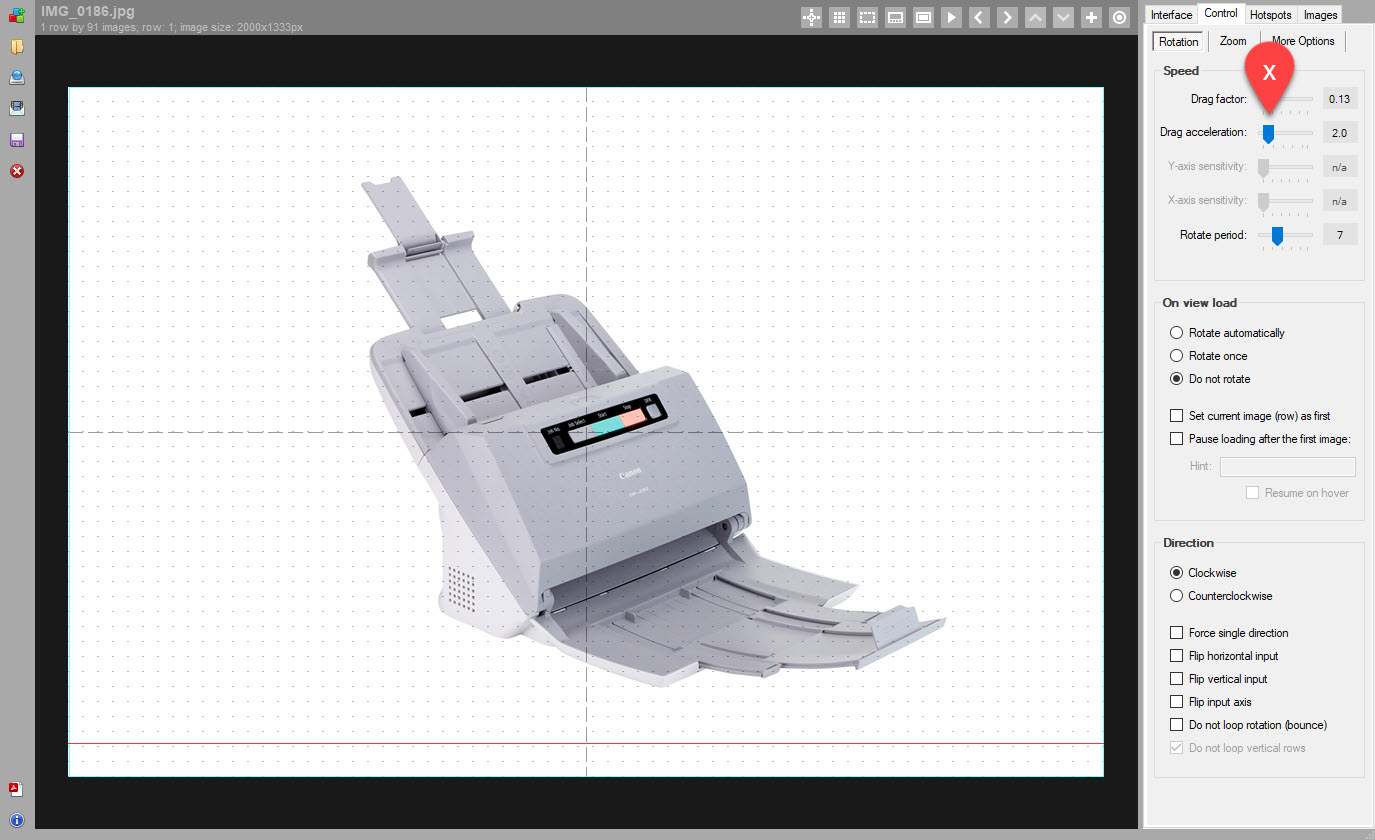
5. Configurable drag acceleration
Here's an extra tool for your animation control toolbox. It's designed for 360 product spins that consist of an unusually high number of 360 product images.
Usually, we recommend to stay somewhere between 20 to 72 images per rotation but on occasion our customers may produce spins that consist of a couple of hundred or so images. The large number of images creates a very smooth animation at the expense of slower loading but often is a necessity. For example, we see in architectural 3D renderings such as this one that unless you render almost 200 images, the moving background may result in some disorienting and almost dizzying effect. Or you can think of photographing a car on a parking lot in 360 degrees which also may benefit from the higher number of images (also due to the moving background and usually somewhat jerky 360 footage you get on a parking lot or via a drone).
This brings us to the issue where the large number of 360-degree images makes it harder to spin the view. In other words no matter how fast you drag it, it takes too long to go through the entire spin (because there're so many images!).
And this is where the new Drag Acceleration feature is very helpful. The default is 1 which means no acceleration, and you can then activate the acceleration by dragging the slider and selecting desired acceleration multiplier which will speed up the image animation based on how fast user drags their mouse or finger.
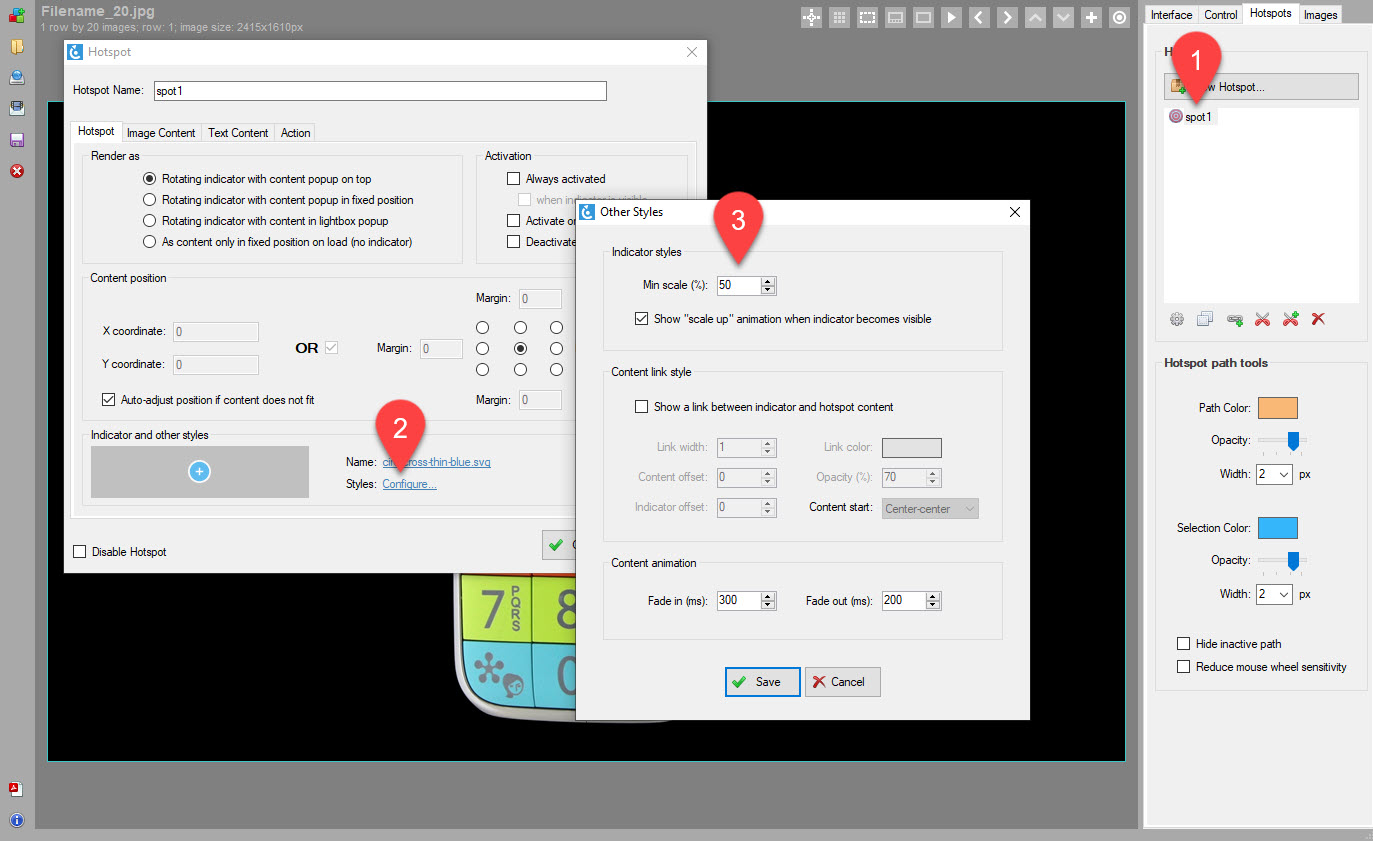
6. Responsive hotspot indicators
At last you can make hotspot indicators responsive so that they scale with your views and look sharp and neat on small screen devices. To activate responsive indicators, access indicator styles as per the following screenshot and set Min scale (%) to some number that works for your view and/or custom hotspot indicator.
For example, if you set it to 50% and your indicators are 32 by 32 px, they will scale with the view (i.e proportional to the change of the base viewer width that you configure on the Interface tab in SpotEditor), and no matter how small your 360 product view ends up on a mobile device, they will be at least 16 by 16 px.
By the way, one of the improvements in the latest v3.6.5 is better precision of hotspot indicator placement inside a 360 view (we transitioned to floating point numbers for the calculations of hotspot path) which also helps with the smooth scaling.
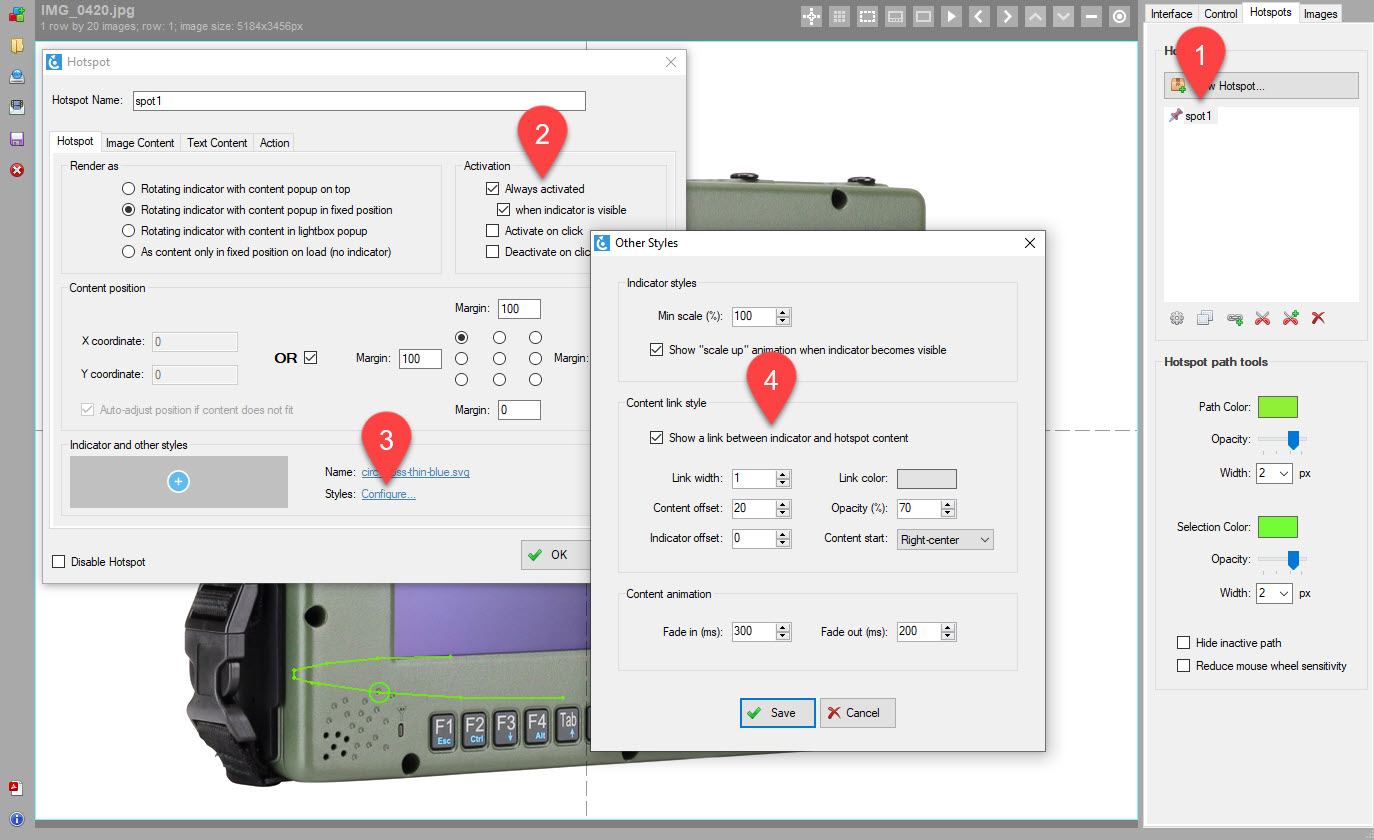
7. Always active & linked hotspot content
v3.6.5 introduces extra activation option called Always activated (see this recent example). Checking this option as shown in #2 in the screenshot below ensures that hotspot content, be it an image or text or custom styled html, is visible right away and no extra input is needed from user to "trigger" the hotspot.
Also unless when indicator is visible is also checked under Activation options, the content stays always visible, even when the hotspot indicator is not present on a given image. This can be useful in combination with the new content linking feature where a connecting line is added between the hotspot content and the indicator.
For example, user can select Rotating indicator with content popup in fixed position under Render as section of the Hotspot tab and position the hotspot content on the right side of the view at the top using Content position controls as shown in the screenshot. Then assuming a content link is also enabled as discussed below, when the hotspot indicator comes to view, a link between the fixed content and the indicator is shown and it links the two accordingly until the indicator disappears after following its configured trajectory.
To enable content linking, click Styles -> Configure on the Hotspot tab of the Hotspot form and then check Show a link between indicator and hotspot content under Content link style as per #4 in the screenshot:
Link width: pixel width of the link (default is 1px).
Content offset: offset from the content start position where to start the line.
Indicator offset: offset from the indicator center where to end the line.
Link color: hex color of the link (default is #eeeeee).
Opacity (%): opacity of the link (default is 80).
Content start: nine X-Y origins of the link relative to the content center.
Download or upgrade
There are more features, important fixes and enhancements in this release (e.g configurable resolution of imported images, new "zoom to hotspot" action, configurable "play to label" action, new API additions, etc).
To get this update in your existing SpotEditor installation, click blue "info" icon in the left toolbar in SpotEditor and select Check Updates.
Free version can be downloaded under "additional resources" using this button:
A popular problem with the e-commerce industry is the “expectations vs reality” experience most consumers suffer from. It mainly happens because they have only examined the product through a couple of photos that cannot represent what the product actually is. Interaction with the product plays a huge part in converting the visitors into paying customers, which is why physical stores are more successful at it.
The way out from this drawback for your e-commerce website is a perfect and interactive presentation of the product. 360 product photography has evolved how products are viewed online, clearing the path towards this way out.
What is 360 product photography?
360 product photography is a technique that allows the viewer to inspect the product from different angles. Series of photos are taken and then combined to develop an interactive rotating view. This more realistic experience almost edges out the advantage that physical stores have over online stores. The technique is being rapidly adopted throughout the e-commerce industry and has proved to be beneficial in increasing sales and lowering the return rate.
Why do we need it?
The sales conversion in the e-commerce industry depends on how well the customer perceives the product. Some flat photos are not enough for an effective perception and that is the answer to why we need 360 product photos. Certainly, 360 product photography will soon become a standard in e-commerce. The concept of capturing a 360 spin might seem complicated but the process is actually simple. This complete guide will show you everything you need to know about 360 product photography. Let's jump into it.
What do you need?
IDEAS:
Always start with a fresh and creative brainstorming session. It will be the base of the whole process. Make sure that you surf the web and find some great and innovative ideas. Always do your research accordingly to your product and what you have in mind.
That's how I make a perfect start!
CAMERA:
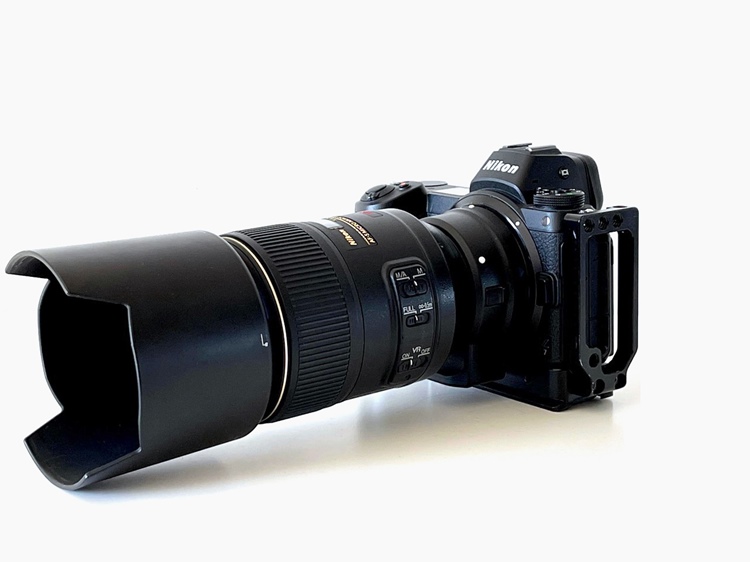
A great thing about 360 product photography is that you don’t have to look for any complicated specifications while choosing the camera. Any camera may it be a DSLR or mirrorless can be used as long as it offers a manual mode. Always remember that a camera is a mere tool here. The factor that will impact the most is how you use your creative juices to bring the most out of the next steps.
I use the Nikon Z7 with the Nikkor Macro 105 mm 2.8.
TURNTABLE:
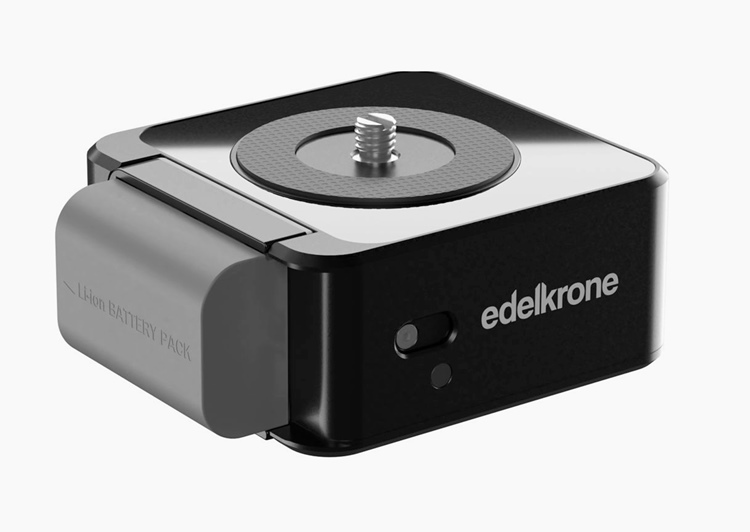
Using a specific 360 product photography turntable increases the effectiveness. Various companies make 360 turntables specifically for product photography and most of them come attached to their own software. The one I use is the edelkrone HeadONE with the turntable kit and it isn't tied up with software. The turntable kit comes with white matte and black glossy base options that you can choose from. It also includes a shutter release extension cable. The kit is attached to a motorized pan system that provides the rotation. The control app for the pan system allows regulating the rotation with the help of different settings making it a practical solution for 360 product photography.
The one I use is the edelkrone HeadONE with the turntable kit.
BACKGROUND:
As mentioned above, the product's success in the e-commerce industry depends on its visual representation. The key here is to present the product in a way that will make it stand out. So we need something which will not distract the viewer's attention. That’s why almost 80% of the websites use a pure white background. A pure white photographic paper will be the ideal solution to go for.
Savage Pure White Seamless Paper #66 is popular with product photographers.
TRIPOD AND REMOTE SHUTTER RELEASE:
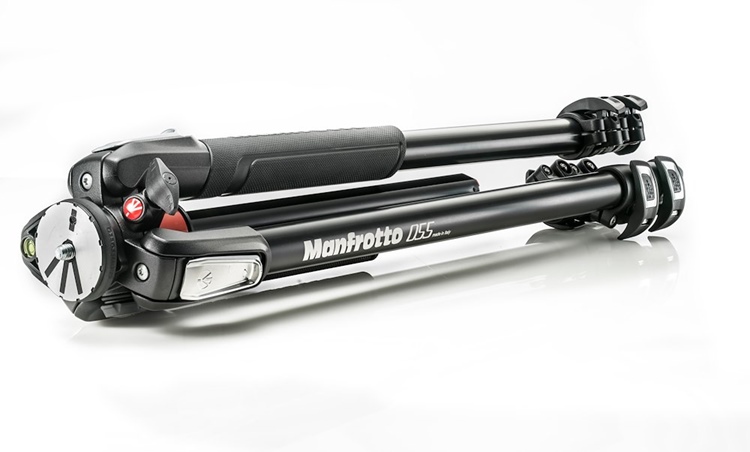
The photos should be perfectly clear without any camera shake so we can get a flawless 360 product view. If there is a camera shake even in a single frame, the spin can be affected. To keep the camera in place, use a steady tripod, and if you can add some weight to keep it in place and to avoid shakes while pressing the shutter release, use a remote shutter release. Usually, the turntables have their own app that you can trigger the camera without touching it and at the same time control the rotation.
The one I use is Manfrotto MT055XPRO3 tripod with arca Swiss plate and MH057M0-RC4 ball head.
LIGHTING EQUIPMENT:
Typically, two types of lights are used in studio product photography.
Strobe lights: Usually referred to as flash, strobe lights provide a high output lighting for a fraction of a second when the shutter is pressed. The biggest advantage is that it allows you to lower the ISO (50 – 200) and close down the aperture to f8 – f16 (depending on your lens).
Continuous lights: Continuous lighting for instance LEDs are kept on throughout the shoot. This type of light allows you to keep a check on what you are getting right away. You can also check if there is any variation during the rotation.
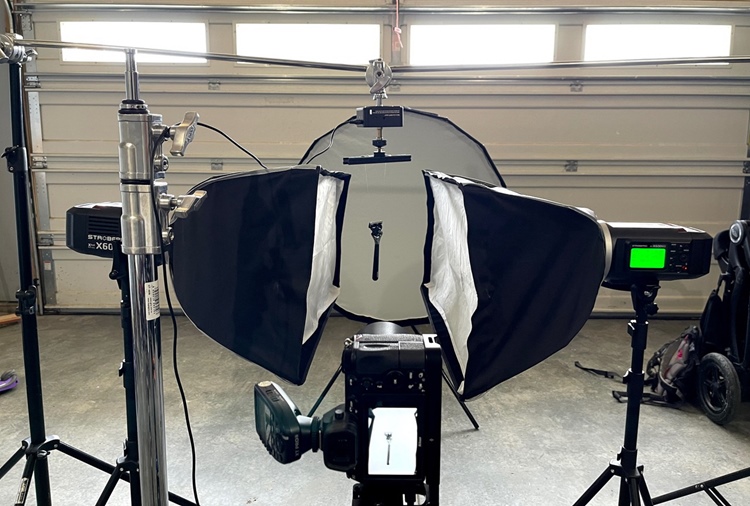
I use Godox strobes (2x AD200, 2x AD600) with XT Pro radio trigger and softboxes (Elinchrom strip boxes and Phottix Raja). See a quick "behind the scenes" video using my lighting gear in the following section.
In addition, using softboxes and diffusers is recommended to deal with hard light and nicely wrap the light around the product. You can make the photos look more professional with the help of additional accessories such as white foam (to bounce light), larger diffusers, light cutting black flags, etc. We will discuss an extremely effective lighting setup that I personally use further in the article.
Setting up the shoot
Now that we have all the necessary equipment, let us get to set up a perfect 360 product photography shoot.
MAKE THE PRODUCT PRESENTABLE:
As mentioned earlier, how good your product looks will directly affect sales. Using photo editors to clean up the product in every frame is far more daunting than just nicely cleaning the product during the shoot. You can use additional accessories such as a lint roller, canned air, gloves, etc. Also, be careful that your fingerprints are not visible on the product.
SETUP THE CAMERA & CENTER THE PRODUCT:
Set your camera on the tripod and make sure you are zoomed in enough to have white space in the background.
Perfectly rigging the product can be puzzling, but do not continue unless you are satisfied with this. Carefully place the product at the center; otherwise, each product frame will appear to be at different positions while spinning. Before placing the product straight away, measure a reference point. A reference point will be helpful even if the product is misplaced during the shoot. Perform a few test spins to make sure that the product does not wobble from its position.
SET UP THE LIGHTS:
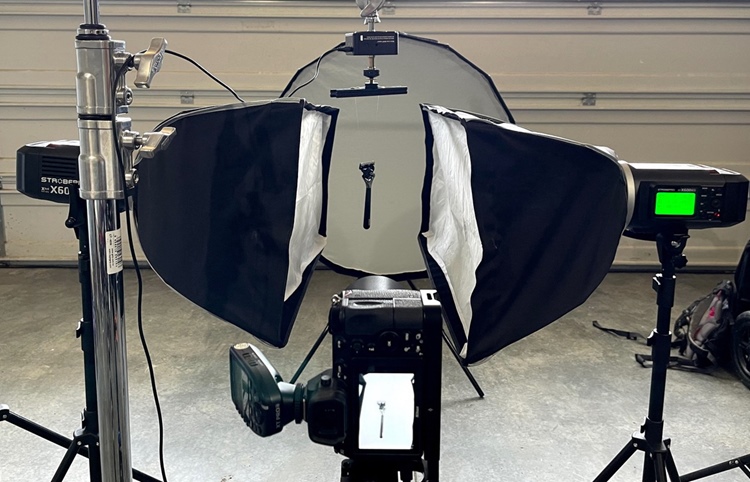
Now let us come to the most important element of 360 product photography i.e. lighting. The way you are going to control the light will decide whether your 360 product spin will look professional or amateur. Throughout my experience in this niche, the setup I have been most satisfied with is using 4 – 5 strobes.
1 – 2 for the background, depending on the size of the product
1 top-down with an octabox
2 stripboxes on each side of the product
See one of my shoots using this setup in this BTS video:
One of the reasons I work with strobes is that they have a clear advantage when the power comes in and that is important when shooting products because at the right aperture (f/8 – f/16) with continuous lights a higher ISO value (around 1000) would be needed to get the precise exposure and that could introduce some noise.
The next step would be changing the light positions accordingly to the object. The goal is to evenly lit the object and make the background look as white and clean as possible, and here, the top-down softbox will help you get the perfect white. Alter the lighting to achieve that balanced 255 white. Once you are there, you can even lower ⅓ of the stop on the background light. Avoid overexposing the background at all costs. It will kill the image quality by reducing the contrast due to diffraction.
One quick tip to avoid diffraction is to create enough space between the product and the background, in that case, it is safe to overexpose a bit of the background. A very helpful alternative to get a pure white background is with the blinky tool that almost every DSLR has nowadays.
The approach will also vary depending on whether the product is reflective or non-reflective. Non-reflective products are simpler to shoot than reflective objects. Reflective objects will need extra attention and different diffusers.
Time to start shooting
Now the real fun begins. Let us take look at how to shoot a flawless spin.
START WITH SOME TEST SHOTS:
A few test shots are helpful to find out any complications at the very start. You do not want to run into some unexpected problem in the middle or even after you finished shooting.
CAMERA SETTINGS:
Manual Mode: Always use manual mode to keep the exposure, aperture, shutter speed, and white balance consistent in every frame of the spin.
White Balance: Never use auto white balance as the color of the product might change with rotation. The best way is set the white balance accordingly is that if the background is white then it should look white in the camera frame. The colors should be not too cool or not too warm. If you are shooting RAW, you can easily adjust the temperature afterward. However, it is recommended to keep the colors as realistic as possible while shooting. A grey card can be helpful to set the white balance and if you want an even more professional look, you can get a color checker to make the color representation perfect.
ISO: Using the right ISO is crucial to get a clear and crisp photo. ISO basically controls the digital sensitivity to the light. At a higher ISO, the camera absorbs light faster whereas, at a lower ISO, the camera absorbs light slower. As we will be getting enough light through the lighting equipment, so there is no benefit of keeping the ISO higher. It is recommended to keep the value at 100 – 200 to avoid noise.
Aperture: For an overall sharp image of the product I use an aperture ranging f/8 – f/16 accordingly to the scenario. The reason I don’t suggest a certain aperture is that each lens has a sweet spot where they are sharper and usually it is in the center of these aperture values.
Image stabilization: If your camera has "image stabilization", you need to turn it off. It can result in complications by making the images slightly blurry. Although it is subtle, we want to get the best 360 product spin possible. However, the mirrorless cameras now with advanced technology don’t produce blurry images with the image stabilization on.
THE NUMBER OF FRAMES:
No one will like a 360 product spin that looks like a high-end video game running on the lowest spec console. 12 – 24 frames can be enough to get a nice and smooth spin. This also depends on the nature of the product. If it is a high-quality product (e.g. expensive jewelry) and you want to capture a higher degree of realism, you can go for even 72 frames. Personally, I find using frames above 72 to be overkill but it is totally up to the nature of the product.
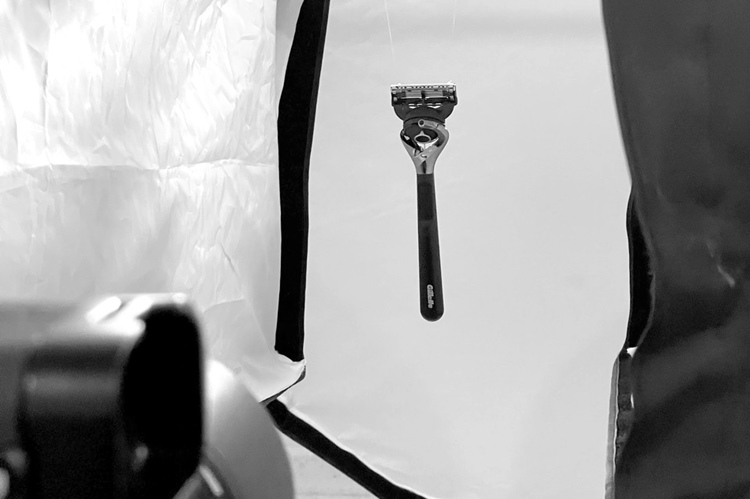
This 360 product view from my BTS video above has 22 frames:
An important point to consider is never shooting the same frame (such as starting frame) twice. If the starting frame appears twice, it will give an impression of pause.
IMAGE FORMAT:
You can use either RAW or Jpeg format. Jpeg format can help you in bulk image processing as they are smaller in size. However, I always use RAW format because it gives me more control over the photo while editing.
BE CONSISTENT:
If you shoot different products for the same website, always note down the settings you are using. It will help keep the consistency in all the products listed, ultimately giving a more professional look to the website. Taking some reference photos of the setup can also be helpful. Moreover, if you will be consistently shooting products for a certain client, you need to measure tripod height and lens angle.
360 PUBLISHING SOFTWARE:
After capturing some perfect frames, it is time to take them into the software. The market is filled with various 360 product photography software that can do the job but my go-to option always is WebRotate 360. I have come to this decision with proper and thorough research.
Final Word
Wrapping it up, this guide delivers an overview of a complete 360 product photography process. The only way to achieve the best result is by practicing and experimenting. Every product is photographed differently, Look for the pathway from this article and alter it accordingly to your own requirements and needs. Have a great day photographing!
Jose Soriano is a commercial photographer based in Calgary, Canada. His studio specializes in product photography (including 360 product photography), food photography, editorial and portrait photography.