
What was supposed to be a maintenance release with minor fixes and improvements, v3.6.2 is gearing up to be a hefty update, featuring some major new functionality and important enhancements. Let's review some of the features that we think should convince many webrotate users to upgrade soon or just skip to the last paragraph to learn how to download the latest v3.6.2 build or review our full version history here.
First things first.. new incremental zoom
With v3.6.2 you can configure the number of steps or increments that it takes to magnify images to their original dimensions. Whether you configure your 360 or 3D product views to use the second set of high-resolution images for zooming (and full-screen) or you have a single image set for everything, the incremental zoom will work just fine and the same zoom toggle button in the viewer toolbar is used to control the increments if they are configured.
As of v3.6.2 build 133, the zoom-out action is always a single step though as this seems to be most useful for an average end-user. But if you need to increment the "zoom-out" action as well, we have a new API to control the incremental zooming both ways. On top of this, you can supply a viewer coordinate (x,y) to specify the exact location to magnify at a given increment (the coordinate parameter is optional):
api.images.zoom(zoomStep /* 0 to max step */, { x: xCoord, y: yCoord });Think about the possibilities this can bring... For example, the new API can be combined with the hotspots APIs or your custom page controls where you can spin the view to a desired product feature while magnifying the desired image location at the same time and followed by a popup call-out with feature details. We should do a good example on this!
The overhaul of the zooming functionality allowed us to add a new option to change zooming speed as well. It has been always 300 milliseconds which is still a default, but you are in control now. The option can produce really smooth results which will largely depend on the number of configured increments and the image dimensions.
To configure both the increments and zoom speed, go to Controls->More Options->Zoom and update the zoom settings accordingly:

Selective zoom
We made a couple of attempts to implement selective zoom in v3.0 of WebRotate 360 Product Viewer and it didn't work out. Now it's done and works really well on both desktop and mobile. Combined with the incremental zooming, you can now double-tap, pan, double-tap, pan, etc and it will zoom-in precisely to your "selected" area of interest. This will give your visitors an extra tool for product exploration and research.
Selective zoom is enabled by default but if you have a good reason for making it optional, let us know.
Rows on single index
We have covered this feature in the recent blog post (New 3D Product Rotation Mode) so if you haven't seen it before, check it out. It's a great answer to our users who find the full spherical or hemispherical 360 product photography or 3D product rendering too time consuming or too slow for the end-user.
Apr 30, 2020: see this recent post that has more details and an example of how one photographer captured a few two-row 360 product veiws using a smart trick: Two-row 360 Product Photography With Eric Gordon of The Product Photography Studio.
In order to create such 3d spins, you will need to produce two rows of images. For example, you may photograph or render a horizontal row of 36 images (camera is stationary and the turntable makes a full 360-degree spin) and a vertical row of 20 images (camera moves vertically in a circular motion around the object). Then create two folders on your hard-drive and copy the horizontal images to one folder and the vertical ones to another.
Start a new project in SpotEditor, pointing to the folder with the horizontal images on the New Project form. Once images are loaded, go to Images->Rows and click on the plus sign to start adding additional rows. Set the number of rows to 20, i.e it should be equal to the number of images in your vertical spin, and point to the folder with the vertical images as per the following screenshot and select Ok to create the extra rows:

Check "Rows on single index" under Controls->More Options->Miscellaneous.
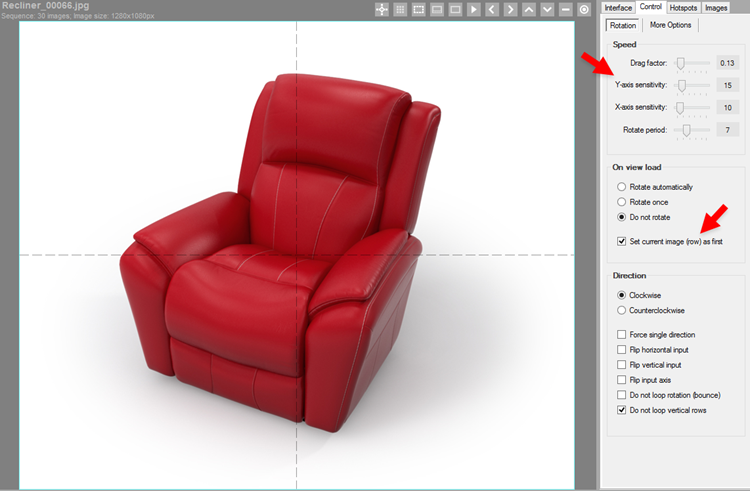
Adjust X-axis and X-axis sensitivity under Controls->Rotation->Speed for best results (for example, try 3 and 5 for Y and X respectively):
Now you can publish the project and it should work similar to this example.
Flip Axis
While sounds minor, this new function can be handy if your products are best viewed when they are presented in a single-row vertical 360-degree spin. In the previous releases a single-row spin could only be rotated via a horizontal drag (mouse or touch) which understandably looked odd when a product was actually turning vertically on the screen. This was especially noticeable on large touch-screen devices like what you can see here.
Now you can check Flip Input Axis under Control->Rotation->Direction to request viewer to treat the vertical mouse & touch input as horizontal and vice versa, so if you swipe across the screen vertically, the product will follow you touch gesture.
Download
Free version is available for download in the following link under "additional resources" and all our users who have previously upgraded to v3.6.0 should be able to download this update on the About form in SpotEditor (or request directly).