To just see the tutorial, scroll to the bottom of the post.
If you have been shopping on Amazon lately, chances are a good number of images you saw there were not actual photographs. Instead they have been produced in 3D modeling software and then rendered to look like a real thing. This recent trend is especially noticeable in categories such as electronics, appliances, furniture, automotive and similar.
About 75% of all images on IKEA's website are also CGI. Here's a case study by the developer of V-Ray, which is a 3d rendering software used by IKEA along with Autodesk 3ds Max and SolidWorks:
"While a lot of IKEA's imagery is photographed in the building's cavernous sets, an increasing proportion is CGI, created using 3ds Max in conjunction with Chaos Group's V-Ray for 3ds Max."
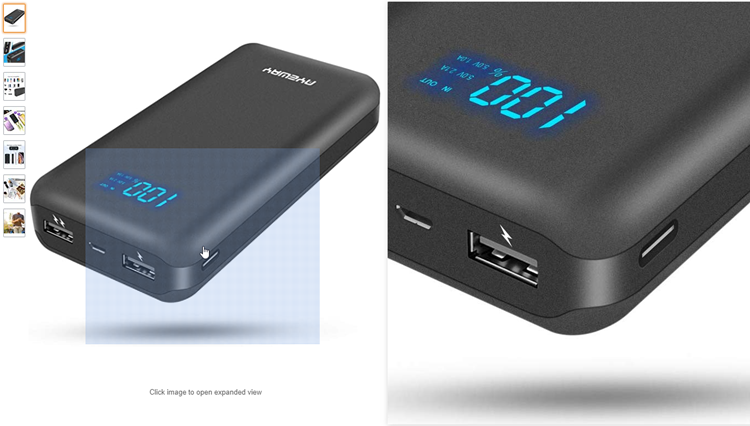
For those of us who spent years producing product photography it's easy to spot a 3D rendering like this cool Ayeway power bank on Amazon:
Here's an interesting CGI initiative by Wayfair who are setting up a 3D rendering platform designed for agencies and service providers to allow uploading 3D product models for final rendering and listing on Wayfair:
"Wayfair uses 3D modeling in place of traditional photography to generate 2D images for thousands of products. In place of the physical entailments of traditional photography, we create models using Autodesk's 3ds Max."
It's not just the large retailers who do it. Small companies around the world are jumping on board as the benefits often outweigh the usual ecommerce product photography. Here's for instance a UK company who exclusively use 3D product models in all of their product listings, including pretty awesome 360 product spins!
Check out how consistent, crisp and exciting the rendered images are:

When it comes to rendering 360 product views there are some extra challenges.
One issue is that we need at least 20 images (preferably 72) to create a complete 360-degree product rotation so the rendering times and further image processing increase proportionally. Then of course we need to learn how to animate our virtual camera to capture the entire turntable animation or a multi-row sequence.
Aug 3, 2023: Now you can use our advanced add-on for Blender that can create such multi-row 360 turntable animations and much more!
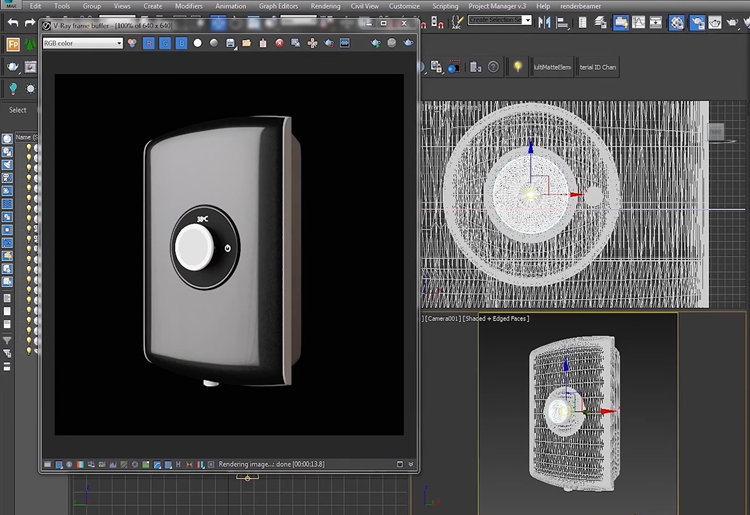
This is where the recent tutorial by Jamie Cardoso, a renowned author in this space, comes in handy. It takes you step by step through the setup of both the photorealistic lighting and camera animation as well as using a cool rendering workflow.
In the video below Jamie guides us through the camera setups for the two (out of three) types of image sequences we support at WebRotate 360:
1) Single row turntable animation where camera simply orbits around an object.
2) Our unique two-row setup where there's one horizontal row and a single vertical row. This setup saves a lot of time on rendering (or photography) while giving you pretty much a full 3D product view coverage. Not to mention the loading times for the end-user that are way better than our traditional multi-row 360 product views like this example.
Load and drag the demo cube horizontally and vertically to see the effect:
Apr 30, 2020: see this recent post that has more details and an example of how one photographer captured a few two-row 360 product veiws using a smart trick: Two-row 360 Product Photography With Eric Gordon of The Product Photography Studio.
So without further adieu, here's the timeline of what's covered in the following tutorial:
- 2:02 Set up the 3ds max scene
- 3:00 Load up the V-Ray rendering engine and set up the scene for draft renders
- 7:31 Create and setup a V-Ray Dome Light
- 8:40 Add the V-Ray Environment Exposure Control
- 8:55 Apply and edit the V-Ray HDRI Light
- 11:17 Create and Edit a Camera Animation
- 17:39 Create and edit a V-Ray Material
- 20:19 Add and Edit HDRI to the Environment
- 21:10 Add and edit a 3ds max LUT file in the Frame Buffer
- 22:37 Create and Edit a Stainless Steel Material
- 25:04 Set up V-Ray for High Resolution Renders
- 26:05 Create an Animatic Preview
- 26:41 Fixing Gamma Issues
- 27:25 Use LUT Explorer script to save the render with the LUT applied
- 29:36 Use Garagefarm to Render the frames
- 35:50 Create Photoshop actions to apply LUT files
- 39:20 Upload and launch your files using WebRotate 360 and SpotEditor
You don't have to use Photoshop to size the images as per the video. Our WebRotate 360 product view creator software helps with this and many other batch related routines in a much more convenient way than the Photoshop actions.
The final note is that with the two-row setup you can't use the option to set the number of rows on the New Project form as per the video. The workflow is a bit different and you can read more about it at the end of this recent blog post.
PS: if you are using SolidWorks, check out this video by planetsoftware GmbH on why & how to use it together with WebRotate 360. See English subtitles and video description for more details: https://www.youtube.com/watch?v=wbpFxRupKT8