tel: +1 (800) 996-8617
  • Google Adds 360 Product Views to Google Shopping

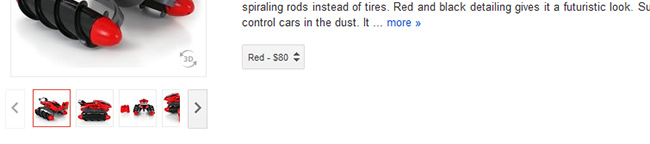
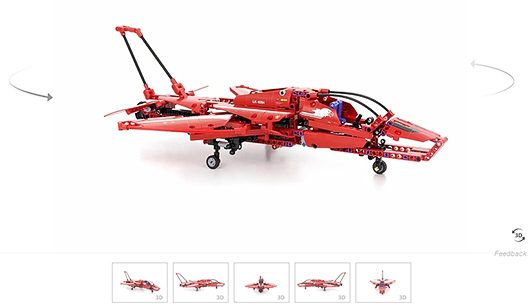
    In a somewhat unexpected move, Google just announced that they are adding support for 360 product views into their updated Google Shopping experience. The announcement includes a neat set of demo products and a quick form for the interested retailers to apply. This approach so far looks similar to what Google has done with Business Photos in the past, offering shops and restaurants to showcase their places in 360 degrees inside Google maps.

    The addition of 360 product views in Google Shopping is an exciting development which also raises a few questions.

    The idea itself is not new and has been successfully implemented by numerous online shops worldwide. In a global survey conducted by Adobe and released in 2010, more than 20% of their responders in more than 500 companies world-wide were planning on adopting 360 product views and 3D-vizualization technologies.

    Now at the end of 2012 the demand for such interactive shopping is seeing a hefty boost with the rise of mobile e-commerce. For Google who just started unifying their e-commerce tools into a solid shopping experience with Google Shopping, capable of competing with the likes of Amazon, this is also a very logical step forward.

    But there could be some challenges also. From retailer’s point of view, the main issue with the 360 product views is the actual production of the 360-degree imagery. Quality product photography is pretty demanding. It’s time-consuming and costly. When it comes to the 360 product photography this is even more important as the process is quite involved, often requiring specific experience and expensive professional 360 photography equipment.

    A good 360 product presentation consists of at least 20 to 40 images per product, and relies on the precise product positioning for a balanced rotation, as well as quality lighting and lots of creativity. This is especially true for products that are large, highly reflective or have unique shapes. Photographers have to build tricky suspension rigs, hangers, custom mannequins and similar solutions to make product appear as floating or suspended. At the end, all these factors contributed to a somewhat slow adoption of the 360 product presentations online, even though their benefits for retailers and shoppers in e-commerce are substantial.

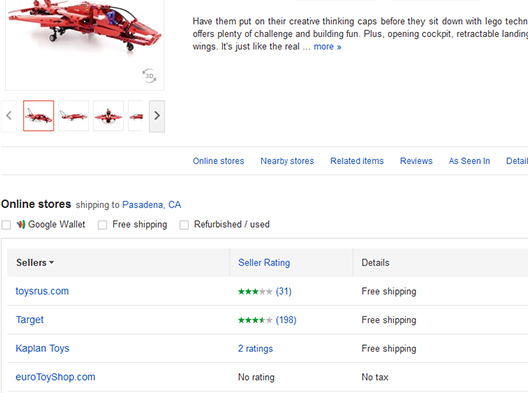
    What this means for Google is that their main audience for this new service is going to be product manufactures and not the resellers who so far is the primary target of Google Shopping. Resellers don’t like to spend too much on quality still shots left alone 360 photography, and the idea of sharing such unique imagery with their competition in Google Shopping the way it works now is not going to fly with these folks very well.

    On the other hand, high quality product photography and 360 views especially remain an important differentiator that some retailers rely on to compete for their clients. This differentiator will be lost if these images are shared between several competing retailers in Google Shopping, and frankly would make the shopping quite boring. Even today, browsing Google product listings with the same manufacture provided imagery over and over again is uninspiring.

    Also, unlike panoramic views of places in Business Photos that remain more or less the same for years, e-commerce inventory and product photography is constantly updated. For starters this requires certain automation in the way retailers would be interacting with the new service. Google has covered that part exceptionally well in the past with the product feeds that can automatically synchronize both product details and still images with Google’s product listing. Relying on an obscure web form or email to get 360 imagery to Google Shopping is, hopefully, just a start.

    Then of course there’s all the time and efforts required to re-shoot products in 360-degrees as new inventory comes in. One approach that Google is successfully applying with Business Photos is to partner up with local studios interested in the arranged photo-shoots. Google Business Photos currently lists 355 trusted photographers referred by Google in the U.S. which is not that bad considering that the service just launched about a year ago. This might work well for 360 product photography also as more professional studios embrace the idea. And with Google Shopping behind the 360 product views now, this should be a no-brainer.

    But may be a more concerning issue with Google Shopping today is that it slowly becoming a bidding playground since Google stopped offering it as a free service in October, 2012. A highly controversial move, this is pushing small sellers away from Google Shopping, adding to the concerns to the adoption of the new features.

  • Announcing PhotoGear 360 - Our New 360 Photography Equipment Store

    Today we have officially announced our new online store for 360 photography equipment and software, PhotoGear360.com. Here's an extract from our press release:

    Pasadena, CA (PRWEB) November 15, 2012 -- WebRotate 360 LLC has announced today the launch of its new online 360 photography equipment store, featuring best in class photography hardware, software and accessories for product photography studios, online retailers, computer game developers and alike. The new website can be found at PhotoGear360.com.

    The website has a selection of heavy-duty robotic 360 product photography turntables, lighting solutions and software, designed specifically for automated photography workflows and optimized 360 degree image capture.

    The company also offers its local customers an on-site assistance with the setup of 360 product photography studios using the equipment and software distributed through PhotoGear360.com.

    Full text of the press release can be found here

  • Mastering 360 Product Photography ~ Part I

    Check out our new post on PhotoGear 360 (our new 360 photogrpahy equipment store) that opens a 4-part series where we will share most important aspects of 360 product photography that we've learned here in our WebRotate 360 stuido. These chapters will cover everything from the basic alignment of your camera and the turntable to more involved topics such as 360 photography lighting, product suspension, post-production of your 360 product images and more. Below is a small extract from Part I that has some good details on the camera alignment when using a DIY 360 photography setup:

    If you are not using the included software (can be the case with our do-it-yourself 360 photography turntable) follow these steps. Place and center a tall rectangular object such as the wooden brick in the picture or a similar item on the turntable positioned for your first product shot, put your camera center point (via viewfinder) at the imaginary line going through the rotation center, then snap a test photo and review the image on your computer screen. The idea is to verify that the top edge of the brick (aligning edge 2 on the image below) is not angled in any way in relation to the top or bottom edge of your monitor screen or your image viewing application (screen edge 1).

    Keep adjusting your tripod head until you can see that both edges are parallel, while making sure that the left and right distances from the brick to the image borders (marked green) are equal and that you camera center point is still at that imaginary rotation axis. When you replace the brick with your product aligned for your first 360 degree product photo, this would guarantee that the rest of the rotation will be well-balanced.

    Quick tip: if not using the Ortery PhotoCapture 360 software that comes with our turntables, you may need to install remote shooting software that usually comes with the DSLR cameras to quickly snap and evaluate your test images on your computer or laptop screen.

    Read the full article »

  • Mastering 360 Product Photography

    This article is based on our first-hand experience producing thousands of 360 product views at our WebRotate 360 Product Photography Studio.

    Camera positioning and product centering

    Start by arranging similar products in groups and shoot them in batches to minimize changes to the setup as you progress with your photoshoot. Different products may require shooting from varying distances for best results. As a rule of thumb, never shoot products (except for small items such as jewelry and similar) from less than about 3 feet as the distortion of product shape and dimensions may be too pronounced on the final images. The larger the product the further your tripod and camera should be located. For small electronics such as small speakers, GPS systems, small radios, and similar 3-4 feet would be a good start for your test shots. For larger products such as a small computer desktop or large speakers, the distance between your camera and the product should be close to 5-6 feet or even further.

    Quick tip: 50mm or 60mm prime (non-zoom) lens work great with 360 product photography and provide enough crop area for shooting small to medium-sized objects similar to the ones mentioned above.

    Distorted image dimensions and shape when camera is too close to the subject

    Camera and turntable have to be properly aligned before placing a product. Good news is that once aligned, the setup would usually stay fixed for a batch of similar products which helps with consistent results and will minimize setup times and image post-production. It’s important to ensure that your camera and the turntable are horizontally aligned against each other and that the camera view center point sits exactly on an imaginary vertical line that goes through the center of the rotation (see more details below).

    It also helps making sure that the camera view is perpendicular to the front side of your turntable such that you can then use the turntable side to align your first product shots for each product. That in turn helps with a clean 360-degree product presentation, especially on those 360 frames where product sides show straight and where they will be aligned nicely both vertically and horizontally against the boundaries of your 360 product viewer or a web page in general.

    Quick tip: use Pan / Tilt tripod heads as they provide just enough camera movement to properly align your camera. The ball heads make it quite more difficult.

    The desktop software included with most popular professional 360 product photography turntables has two perpendicular dashed guides intersecting at the center of the live camera view. These guides help aligning the turntable, your product and the camera. Make sure that the vertical guide goes through the center of the rotating platform of your turntable and the horizontal guide is parallel with the front side of either the table or your product. Also verify that the distance from the left and right edge of the live view to the starting points of your turntable, or your centered product, is the same on each side (see next paragraph for visual explanation).

    Software that comes with most of the turntables has helpful guides for camera alignment

    Quick tip: use a sturdy hardwood desk or a collapsible heavy-duty table to mount your 360 photography setup and make sure it doesn’t sit on a carpet floor as even a slight shift of the table or your camera may require realigning all from scratch.

    If you are not using the included software (can be the case with our do-it-yourself 360 photography turntable) follow these steps. Place and center a tall rectangular object such as the wooden brick in the picture or a similar item on the turntable positioned for your first product shot, put your camera center point (via viewfinder) at the imaginary line going through the rotation center, then snap a test photo and review the image on your computer screen. The idea is to verify that the top edge of the brick (aligning edge 2 on the image below) is not angled in any way in relation to the top or bottom edge of your monitor screen or your image viewing application (screen edge 1).

    Keep adjusting your tripod head until you can see that both edges are parallel, while making sure that the left and right distances from the brick to the image borders (marked green) are equal and that you camera center point is still at that imaginary rotation axis. When you replace the brick with your product aligned for the first 360 shot on the turntable, this would guarantee that the rest of the rotation will be well-balanced.

    Use combination of on-screen lines and distances to align your camera

    Quick tip: if not using the Ortery PhotoCapture 360 software that comes with our turntables, you may need to install remote shooting software that usually comes with the DSLR cameras to quickly snap and evaluate your test images on your computer or laptop screen.

    Next step is to center your product. Every product has to be centered when placed on the 360 photography turntable to ensure that the product doesn’t wobble on the final 360 view. Draw two perpendicular lines across the center of the rotation on the platform itself (using a pencil) so that you can align and center your product against these lines before the shoot. To make this reusable, cut a piece of white paper, matching the dimensions of the rotating platform, and then glue it with a double sided tape to the top of the platform. Then find and mark the rotation center on the paper and draw the two perpendicular lines across it. Now you can use these guides for product centering.

    You can also try finding some visual guides on the sides of your product to help identifying its natural center of symmetry. Plastic products often have joining lines or marks or screws next to the center that could help positioning it on the turntable. If such marks are not present and you can’t quickly center the product, use a flexible ruler (the soft type used in fashion designs works best) to measure each product side and then align the product using these measurements against the center of the rotating platform and the perpendicular guides you draw in the previous step. The best results are achieved when the rotation center of your turntable matches the center of symmetry of a given product.

    The turntable software has the capability to do a quick 360-degree run to verify that your product doesn’t wobble during the test rotation and that nothing is cropped out of the camera view. We recommend to do a test run for each batch of products that share similar shapes and dimensions. If time permits, going through the full set of 360 images and creating a test 360 view is always a good idea. This is relatively painless with the automation that professional 360 photography equipment provides.

    Quick tip: wear cotton (antistatic) gloves when working with products that can be easily stained with fingerprints and try not to clean your product until it’s clear how it will be arranged on the set as it takes time to position each product and it will accumulate lint and fingertips the longer you move the product on the set.

    We have recently moved all posts from our old photogear360 blog here, so here's some related material you may find useful:

Subscribe to our newsletter

Sign up to our newsletter to keep a pulse on our latest developments, informative posts and beta releases. We don't abuse it!

Signup