Check out our new post on PhotoGear 360 (our new 360 photogrpahy equipment store) that opens a 4-part series where we will share most important aspects of 360 product photography that we've learned here in our WebRotate 360 stuido. These chapters will cover everything from the basic alignment of your camera and the turntable to more involved topics such as 360 photography lighting, product suspension, post-production of your 360 product images and more. Below is a small extract from Part I that has some good details on the camera alignment when using a DIY 360 photography setup:
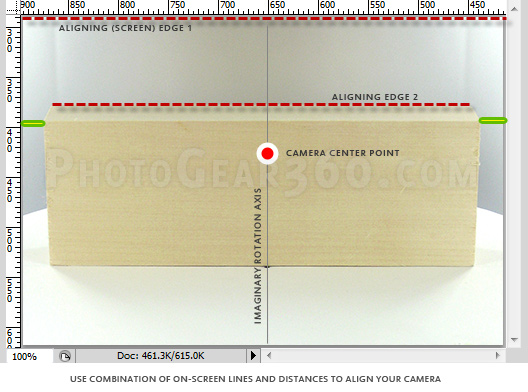
If you are not using the included software (can be the case with our do-it-yourself 360 photography turntable) follow these steps. Place and center a tall rectangular object such as the wooden brick in the picture or a similar item on the turntable positioned for your first product shot, put your camera center point (via viewfinder) at the imaginary line going through the rotation center, then snap a test photo and review the image on your computer screen. The idea is to verify that the top edge of the brick (aligning edge 2 on the image below) is not angled in any way in relation to the top or bottom edge of your monitor screen or your image viewing application (screen edge 1).
Keep adjusting your tripod head until you can see that both edges are parallel, while making sure that the left and right distances from the brick to the image borders (marked green) are equal and that you camera center point is still at that imaginary rotation axis. When you replace the brick with your product aligned for your first 360 degree product photo, this would guarantee that the rest of the rotation will be well-balanced.
Quick tip: if not using the Ortery PhotoCapture 360 software that comes with our turntables, you may need to install remote shooting software that usually comes with the DSLR cameras to quickly snap and evaluate your test images on your computer or laptop screen.
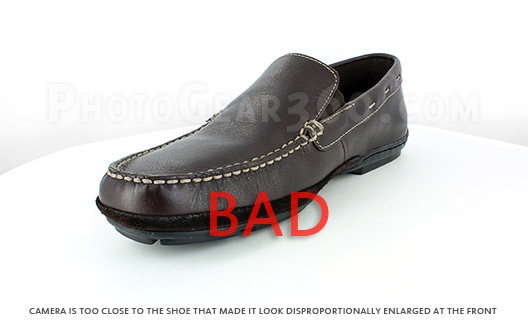
Start by arranging similar products in groups and shoot them in batches to minimize changes to the setup as you progress with your photoshoot. Different products may require shooting from varying distances for best results. As a rule of thumb, never shoot products (except for small items such as jewelry and similar) from less than about 3 feet as the distortion of product shape and dimensions may be too pronounced on the final images. The larger the product the further your tripod and camera should be located. For small electronics such as small speakers, GPS systems, small radios, and similar 3-4 feet would be a good start for your test shots. For larger products such as a small computer desktop or large speakers, the distance between your camera and the product should be close to 5-6 feet or even further.
Quick tip: 50mm or 60mm prime (non-zoom) lens work great with 360 product photography and provide enough crop area for shooting small to medium-sized objects similar to the ones mentioned above.
Camera and turntable have to be properly aligned before placing a product. Good news is that once aligned, the setup would usually stay fixed for a batch of similar products which helps with consistent results and will minimize setup times and image post-production. It’s important to ensure that your camera and the turntable are horizontally aligned against each other and that the camera view center point sits exactly on an imaginary vertical line that goes through the center of the rotation (see more details below).
It also helps making sure that the camera view is perpendicular to the front side of your turntable such that you can then use the turntable side to align your first product shots for each product. That in turn helps with a clean 360-degree product presentation, especially on those 360 frames where product sides show straight and where they will be aligned nicely both vertically and horizontally against the boundaries of your 360 product viewer or a web page in general.
Quick tip: use Pan / Tilt tripod heads as they provide just enough camera movement to properly align your camera. The ball heads make it quite more difficult.
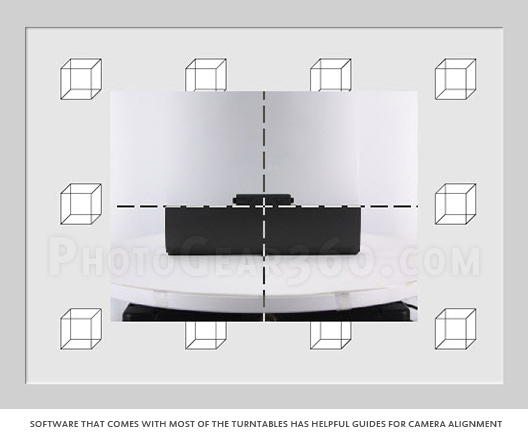
The desktop software included with most popular professional 360 product photography turntables has two perpendicular dashed guides intersecting at the center of the live camera view. These guides help aligning the turntable, your product and the camera. Make sure that the vertical guide goes through the center of the rotating platform of your turntable and the horizontal guide is parallel with the front side of either the table or your product. Also verify that the distance from the left and right edge of the live view to the starting points of your turntable, or your centered product, is the same on each side (see next paragraph for visual explanation).
Quick tip: use a sturdy hardwood desk or a collapsible heavy-duty table to mount your 360 photography setup and make sure it doesn’t sit on a carpet floor as even a slight shift of the table or your camera may require realigning all from scratch.
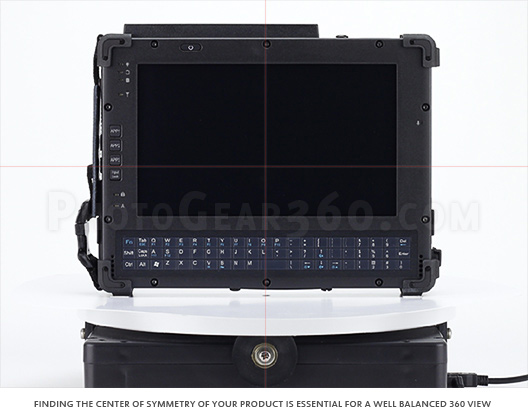
If you are not using the included software (can be the case with our do-it-yourself 360 photography turntable) follow these steps. Place and center a tall rectangular object such as the wooden brick in the picture or a similar item on the turntable positioned for your first product shot, put your camera center point (via viewfinder) at the imaginary line going through the rotation center, then snap a test photo and review the image on your computer screen. The idea is to verify that the top edge of the brick (aligning edge 2 on the image below) is not angled in any way in relation to the top or bottom edge of your monitor screen or your image viewing application (screen edge 1).
Keep adjusting your tripod head until you can see that both edges are parallel, while making sure that the left and right distances from the brick to the image borders (marked green) are equal and that you camera center point is still at that imaginary rotation axis. When you replace the brick with your product aligned for the first 360 shot on the turntable, this would guarantee that the rest of the rotation will be well-balanced.
Quick tip: if not using the Ortery PhotoCapture 360 software that comes with our turntables, you may need to install remote shooting software that usually comes with the DSLR cameras to quickly snap and evaluate your test images on your computer or laptop screen.
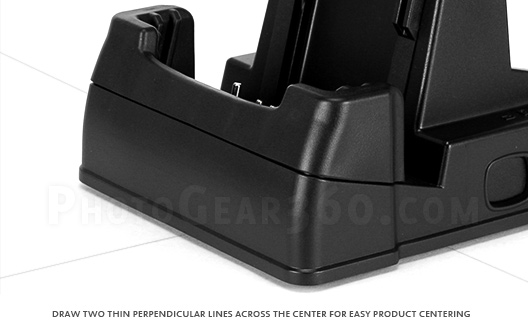
Next step is to center your product. Every product has to be centered when placed on the 360 photography turntable to ensure that the product doesn’t wobble on the final 360 view. Draw two perpendicular lines across the center of the rotation on the platform itself (using a pencil) so that you can align and center your product against these lines before the shoot. To make this reusable, cut a piece of white paper, matching the dimensions of the rotating platform, and then glue it with a double sided tape to the top of the platform. Then find and mark the rotation center on the paper and draw the two perpendicular lines across it. Now you can use these guides for product centering.
You can also try finding some visual guides on the sides of your product to help identifying its natural center of symmetry. Plastic products often have joining lines or marks or screws next to the center that could help positioning it on the turntable. If such marks are not present and you can’t quickly center the product, use a flexible ruler (the soft type used in fashion designs works best) to measure each product side and then align the product using these measurements against the center of the rotating platform and the perpendicular guides you draw in the previous step. The best results are achieved when the rotation center of your turntable matches the center of symmetry of a given product.
The turntable software has the capability to do a quick 360-degree run to verify that your product doesn’t wobble during the test rotation and that nothing is cropped out of the camera view. We recommend to do a test run for each batch of products that share similar shapes and dimensions. If time permits, going through the full set of 360 images and creating a test 360 view is always a good idea. This is relatively painless with the automation that professional 360 photography equipment provides.
Quick tip: wear cotton (antistatic) gloves when working with products that can be easily stained with fingerprints and try not to clean your product until it’s clear how it will be arranged on the set as it takes time to position each product and it will accumulate lint and fingertips the longer you move the product on the set.
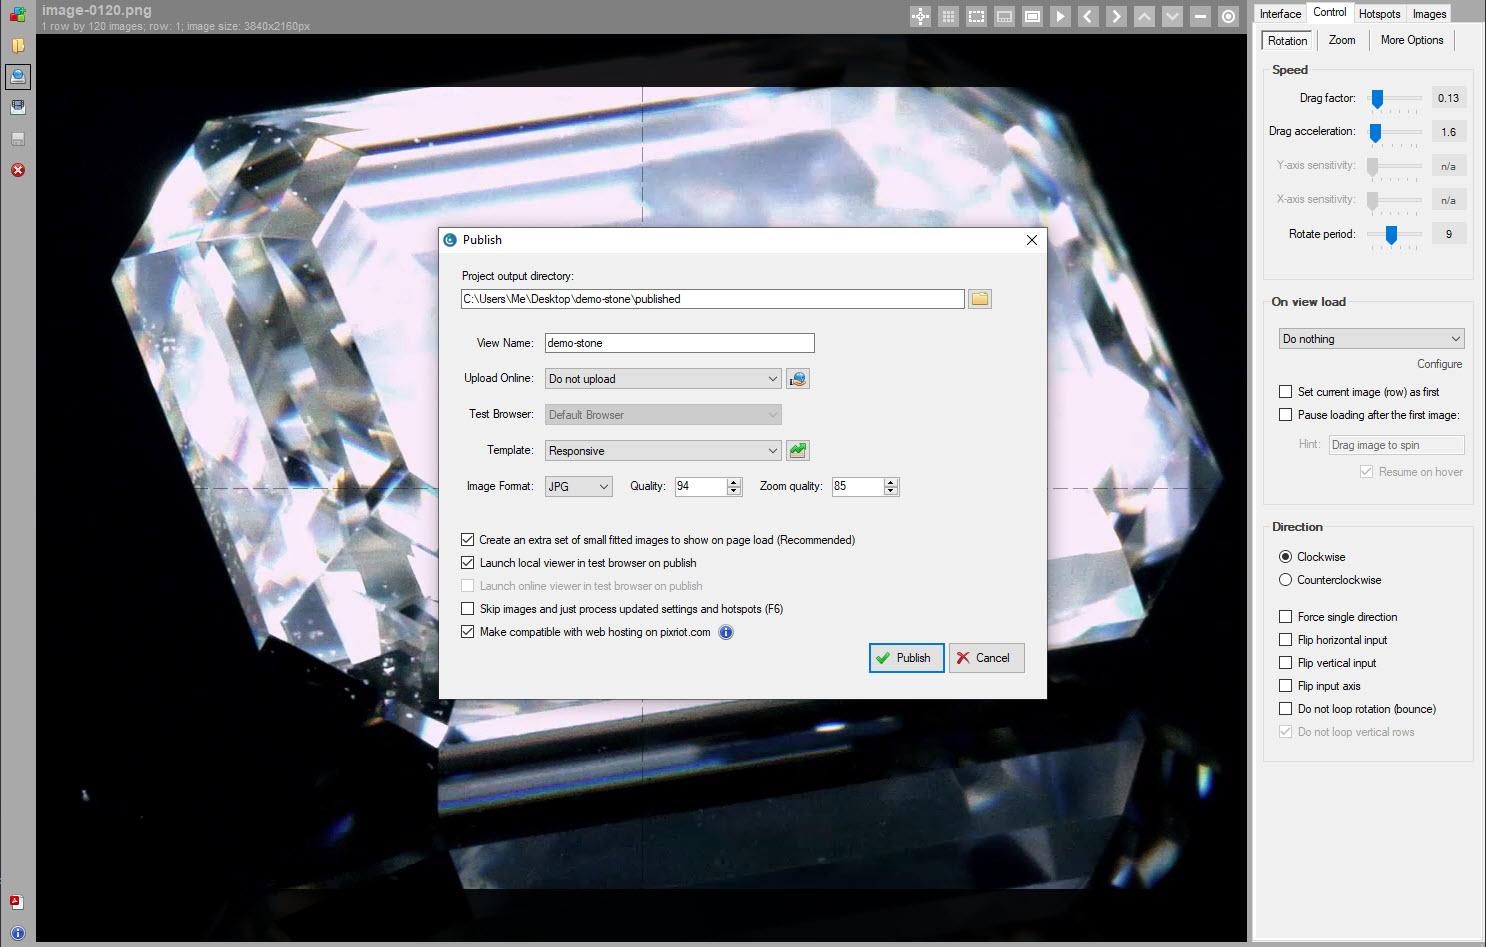
Once 360 product photos are captured, import them into WebRotate 360 Product Viewer software (macOS or Windows) for final processing and publishing. You may also upload the images to our optimized 360 product image hosting dashboard that comes with CDN delivery, analytics, multi-user management and more.
We have recently moved all posts from our old photogear360 blog here, so here's some related material you may find useful:
Jan 20, 2015 - Our completely reinvisioned & reworked module for PrestaShop 1.6.x has been released. Find out more HERE
Follow this simple guide to integrate WebRotate 360 Product Viewer into your Prestashop web store. Once integrated, your visitors will see an interactive product view with zoom capability, 360 rotation, extensive hot-spot / annotation features (and more!) conveniently located in place of the main product image (if configured for a given product).
The current version of the integration was tested on 1.4.x (including 1.4.9) and 1.5.
Step 1 - Download and copy necessary files
Download WebRotate 360 Prestashop Integration, unzip, and copy files and folders as follows (you can also install directly under Modules in the Admin - please still follow these exact steps below):
Copy 360assets folder to the root of your site (it's just a sample 360 product view).
Copy AdminWebRotate360.php from webrotate360/admin/tabs into admin/tabs folder.
Copy WebRotate360.php from webrotate360/classes into classes folder under site root.
Copy webrotate360 folder from webrotate360/modules into your modules folder located in the root (overwriting any files that were created there automatically if installed using the Add from my computer option or directly from the Prestashop Addon Marketplace).
Step 2 - Install
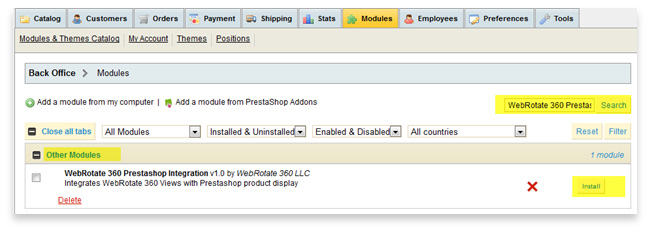
Login in your Prestashop admin and navigate to the Modules section. Then expand Others section in the Modules list or use Search box and type webrotate to quickly find the module. Once found, select Install to install the module. Remember to backup your database before proceeding with the installation to ensure that you can restore your data if something goes wrong with the module.
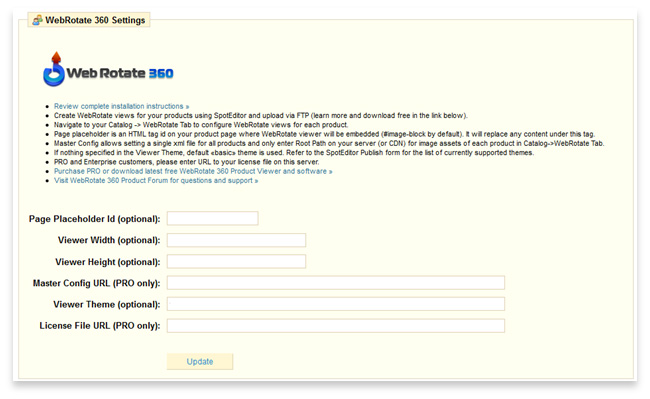
Once the module is installed, please select Configure and carefully read the instructions.
Step 3 - Configure
In the most basic setup you don't need to enter anything on the module configuration screen (see immediately below). Important: if using Prestashop 1.5, please still enter your desired width and height of the viewer on your product pages or just style #image-block in your theme's CSS to have fixed width and height as Prestashop 1.5 doesn't have fixed dimensions for #image-block style in the default theme.
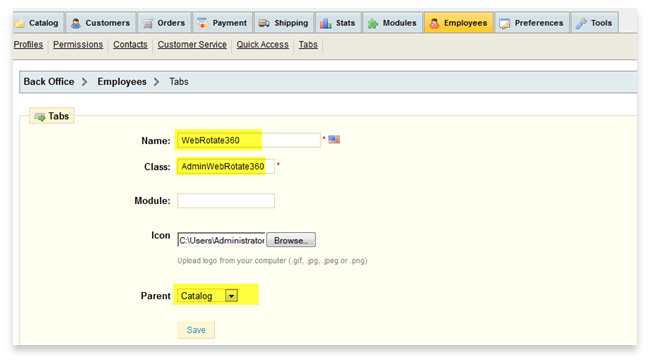
Step 4 - Create Admin Tab
In Prestashop version 1.4.x or lower navigate to the Employees tab and select Tabs immediately below. Then select Add new and enter WebRotate360 as Name and AdminWebRotate360 as Class. Leave the Module field empty. Set Parent to Catalog. You can also assign a tab icon that is included in the supplied zip under admin as tab_logo.png.
Save the tab which will now appear in the menu under your Catalog in the Prestashop Admin.
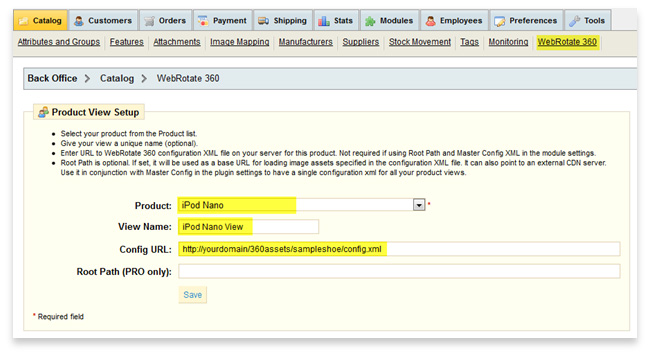
Step 5 - Assign Product Views
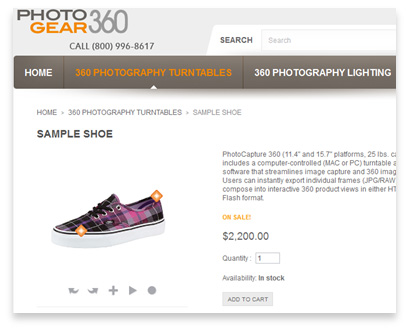
Navigate to your Catalog and note the new menu called WebRotate360 at the end of the first line below the Catalog tab (Prestashop 1.4.x). Expand the new tab and select Add new.Carefully review the instructions and follow these steps to try the test 360 rotation (sampleshoe) included with this package:
Select your test product from the Product combo-box.
Give this view a unique name that you could later recognize (e.g same as your product name for example).
Enter Config URL which would be http://yourdomain/360assets/sampleshoe/config.xml that you have copied in the first step of this integration guide.
Now the sample 360 degree spin should be visible when you expand your test product page in the Prestashop front-end of your store.
To create your own interactive views download our software on our standalone product viewer page, watch tutorial videos located on the same page, or use our new forum for additional information. Visit our new equipment store to browse professional 360 photography equipment that we use in our own studio.
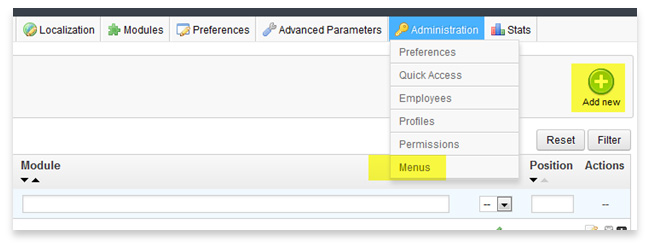
Appendix. Creating Admin tab (menu) in Prestashop 1.5
Prestashop 1.5 has a different location for adding your WebRotate360 Admin tab (now called menu) as discussed in the Step 4. To add the new Catalog menu for WebRotate360 in 1.5, please navigate to Administration->Menus, select Add new and enter the same information as discribed in Step 4. Once saved, the new menu will show up under Catalog.
Aug 12, 2013 - If using Prestashop 1.5.4.1 and up, please download updated AdminWebRotate360.php from here and overwrite the same file under your admin/tabs folder.
Nov 04, 2013 - If using Prestashop 1.5.6 and up please delete your /cache/class_index.php after installing the module.
Jan 20, 2015 - Our completely reinvisioned & reworked module for PrestaShop 1.6.x has been released. Find out more HERE
If you're still having issues with the module, please let us know on our forum here.
Follow this simple guide to integrate WebRotate 360 Product Viewer into your Facebook pages. Once integrated, your Facebook visitors will be able to see extra tabs such as these ones on Pepsi's Facebook page. These tabs can be clicked on and expanded to show your 360 view presentations embedded inside your Facebook pages. It's important to understand that the Facebook tabs only allow embedding content that you host on your own or third-party servers.
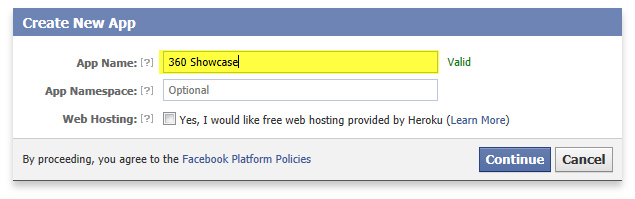
Select Create New App in the top-left corner and give your new app a unique name. You can leave namespace field empty. Also for the purpose of this guide, we will use your own web hosting so you can skip on the Heroku hosting offer at this time.
Select continue, enter the Security Check Requirements and then Submit your new application. Once loaded you will see the Settings page for your new application.
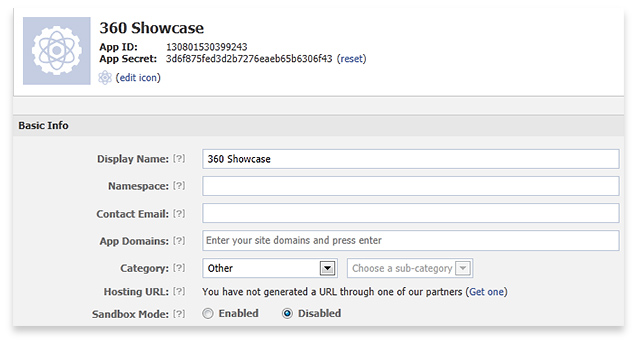
Step 3 - Configure Basic Information
Since this application will only be used on your own Facebook page, you can skip most of the information on the Basic Info tab and proceed directly to the Page Tab section as is.
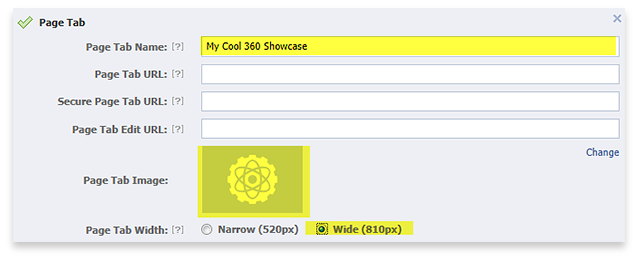
Expand the Page Tab section located on the bottom of the Settings page. Give your tab a name and select an image that will show on your Facebook page once this tab is finalized. The image can be a nice 360 arrow graphic with your product or showcase. Set Page Tab Width to wide (810px) to give your interactive content more space inside the Facebook page.
Step 4 - Create You 360 Content
Create your 360 product spin using WebRotate 360 SpotEditor inlcuded in the free download and copy a published folder via FTP to your server. To learn more about SpotEditor, please refer to this video tutorial.
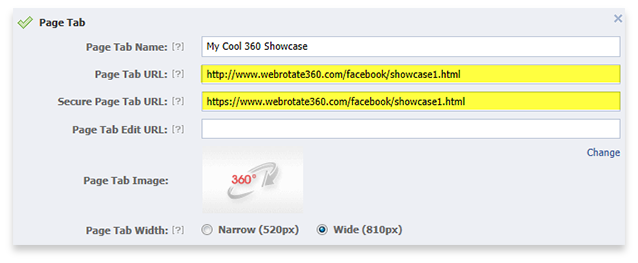
Note the location of the auto-generated html page created by SpotEditor and ftp'ed to your server and enter the URL to this html file on your server under Page Tab URL and Secure Page Tab URL under Page Tab section on the Settings screen (use https:// instead of http:// at the front of the URL secured URL).
If you don't have an SSL certificate configured on the server where you are hosting 360 degree product photos, the integration will still work for those visitors who don't have secured browsing enabled in Facebook, which is most of the Facebook users at this time. But you should consider configuring an SSL certificate to ensure this Facebook integration will work for everybody going forward.
Verify that the URLs point to your 360 degree spin and select Save Changes.
Step 5 - Add New Page Tab
Now that you have finished with the configuration of your Facebook Page Tab, you can use this URL below to add the new tab to your Facebook page. But first you will need to replace YOUR_APP_ID with the APP_ID that Facebook assigned to your application (you can see it in the image above under Step 3).