Dan Morgner’s video sums up the challenges of 360 product photography in one neat timelapse! From assembling a lighting setup for pure white background to spinning the turntable, the process takes some effort.
And even though we prefer continuous lighting here and we love to automate the spinning whenever possible, the basics of quality 360 product photography remain the same and this DIY video is a good overview.
This post was revised on September 10, 2018 to incorporate the latest viewer release.
As with Squarespace that we have integrated recently, Weebly still lacks support for third-party plugins. So our approach to integrating with Weebly is very similar to Squarespace which also shares some similarity with the embed shortcodes in our WordPress and Joomla plugins (full list).
Weebly doesn't allow uploading folders with 360 product images to their hosting so a separate web hosting account is required. For example, you may use an existing website hosting you may already have outside of Weebly, setup an extra hosting account, or consider our optimized PixRiot service. We would be happy to upload your tests to our servers free of charge if you need to run any tests (just let us know).
Now lets review how to integrate your published views in Weebly.
1) For a quick youtube-style integration using iFrame, please refer to our user guide under Web Integration -> Embed via iFrame. If this works best for you, you may ignore the rest of the post.
2) Publish a 360 product view using WebRotate 360 SpotEditor that you can download here. Here's a quick video that walks you through the basic steps.
3) Upload the contents of the 360_assets folder that you will see in the published folder under your SpotEditor project directory (or wherever you have chosen to output your published 360 product view) to your web hosting. You can upload it right away on publish in SpotEditor using our built-in FTP option (check "Upload assets only") or use a popular FTP client such as FileZilla or a browser based file manager that comes with your web hosting.
4) Once uploaded, note the location of the xml file inside the uploaded folder (e.g http://my-domain.com/360-views/my-product/my-product.xml). You'll will need this URL for the next steps.
For a quick test, you can also use this URL of our example 360 product view:
You may replace round.css with your WebRotate 360 viewer skin of choice (e.g, basic.css, thin.css, empty.css, retina.css, zoom_dark.css, zoom_light.css).
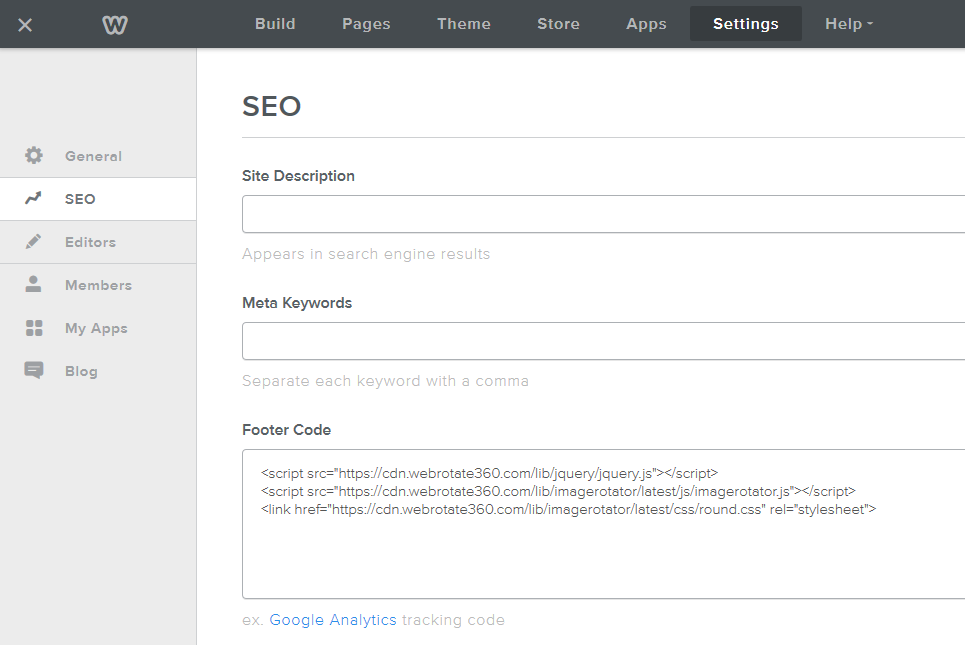
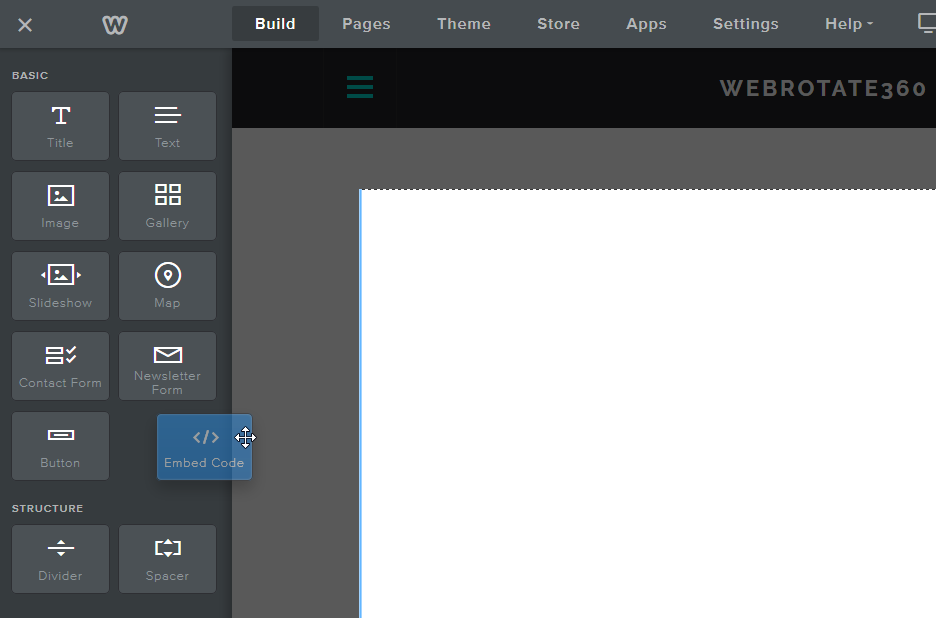
7) Close Settings and expand a Weebly page where you need to add your 360 product spin.
8) Select Build and drag the Embed Code widget onto your page as needed.
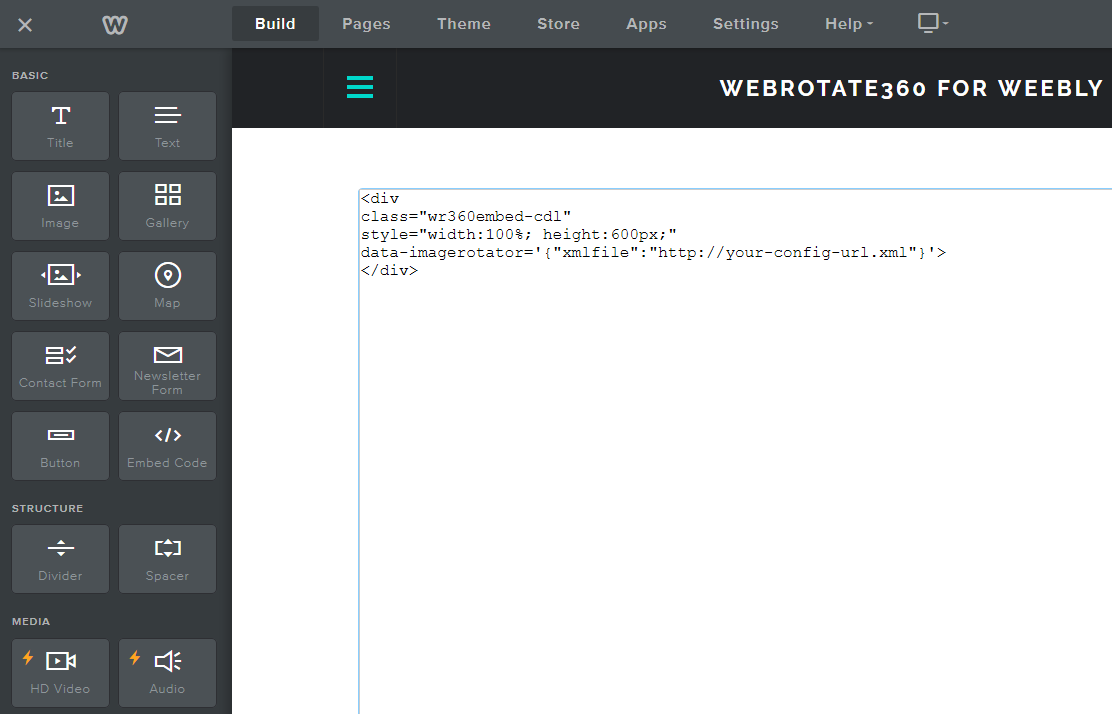
9) Click on the embed code widget that you have just placed on your page to enter the edit mode and paste the following snippet, replacing the URL next to "xmlfile" with the one your have uploaded in the previous step or the example URL we show in step 4. Change width and height values as needed.
basewidth - viewer width in pixel that you can set to allow the viewer window to scale not just horizontally, which works by default if a parent container has relative width, but vertically as well. It usually represents your default viewer width in the page layout before any responsive scaling is applied. When it's set, the height of the viewer is automatically scaled relative to the scaled width.
minheight - if basewidth is specified, this setting represents the minimum viewer height in pixel. This can be helpful on small mobile screens where you may not want the viewer height to go beyond some fixed minimum.
events - set it to true if your website has Google Analytics integrated and you would like to track user engagement with your 3D product views as per this recent article on our blog.
name - if specified, this name will appear in your Google Analytics event tracking so you could sort out the events by each view.
rootpath - if you host images on a CDN server or if you need to have a single xml config for all of your 360 views, you can configure the image location using this path. Please find more details in our user guide under API / rootPath.
graphics - absolute path to a folder with hotspot indicator images (if you use hotspots!). Note that we share all default indicator images on our CDN, so this path will work: https://cdn.webrotate360.com/lib/imagerotator/graphics
onready - pass your JavaScript API callback that accepts one parameter being the viewer API object. Please refer to our user guide under API / apiReadyCallback for more details about various API functions we currently support.
February 19, 2020 - reworked and much improved Mac software v3.6.4 is now available. The new installation is a simple 18 MB download and doesn't require separate third-party components that were causing issues in the older releases. PRO version is available upon request and via built-in software update option after Feb 24, 2020.
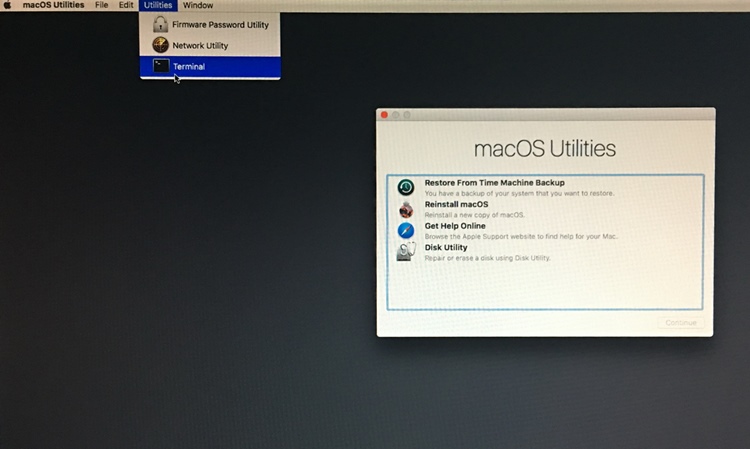
If you are on OS X El Capitan or newer macOS, you will need to temporarily disable the new OS "rootless" mode before installing required Mono Framework and X11 as follows:
Restart your Mac and hold down Command + R keys on the keyboard while booting to enable recovery mode. Keep holding these keys until you see the macOS Utilities window similar to the sreenshot above.
Once booted in recovery mode, navigate to Utilities > Terminal in the top menu as per the screenshot.
Enter csrutil disable in the terminal window and hit the return key on your keyboard.
Restart your Mac again via the Apple menu -> Restart.
Install Mono Framework and X11 as described in readme.txt (supplied with the Mac download) and reboot.
Re-enable "rootless" mode by going through steps 1 to 4 and entering csrutil enable in the terminal window in step 3.
Double check that SpotEditor app was copied outside of the extracted zip folder and if not, copy it to your desktop for a example. If it doesn't start on the first attempt from your desktop, please check System Preferences->Security & Privacy->General tab to see if it's locked there and unlock if so.
Sept 22, 2017 - the latest version of Safari 11 adds extra restrictions for the local previews of WebRotate 360 product views. To be able to preview your published work locally in Safari 11 and up, navigate to Safari's Develop menu and check "Disable Local File Restrictions" as shows in this screenshot.
June 22, 2017 - if you have access to Windows environment, for the time being (while we're working on a native Mac "rewrite"), we suggest our Windows app as it's easy to install and works much better.
October 08, 2015 - X11 can be downloaded here: http://xquartz.macosforge.org/landing/ Mono Framework 2.10.9_12 is included in our Mac downloads as MonoFramework-MDK-2.10.9_12.macos10.xamarin.x86.dmg
Here's a great e-commerce template we would like to share with our followers. We prepared it for one of our clients recently but you may find it useful as well.
It was made super responsive (try resizing your browser once it's loaded) to look nice on desktops, tablets and phones, and includes our in-place reloading feature that loads 360 or 3D product views without page refresh. We don't have anything similar in SpotEditor yet, so you may grab the template below and convert it for your needs. Upcoming v3.6 release will have it integrated as an extra publishing template inside SpotEditor.
Click this image to see it in action and download below:
To use this template for your own projects, please follow these steps:
Publish your SpotEditor project as usual.
Copy a single folder that you will find under published/360_assets in your SpotEditor project directory to 360_assets next to view1, etc in the root of the template.
Open template's sample.html for edit and scroll down to the JavaScript section around line 163.
You will see that the initial 360 product view is currently pointing to the following viewer config file: 360_assets/view3/view3.xml. You can replace this path with yours accordingly.
The same view3.xml is then loaded again if user clicks on the third thumbnail, so you can again replace the second reference to "360_assets/view3/view3.xml" with your own xml path for your initial 3D view.
Then replace the other two xml references inside apiObj.reload(...) with your own xml path for the first an second thumbnails.
Replace thumb PNG files in the root of the template folder (we provided a Photoshop PSD file to help with the preferred image dimensions if needed).
PS: the template uses one of our recent stable v3.6 beta builds so you may notice a couple of new things with this template:
1. New responsiveMinHeight setting that you can see in sample.html. This setting was just introduced in v3.6 to make mobile views look better. It allows to configure a minimum viewer pixel height, making sure there's enough padding space for 360 product images when the viewer resizes itself to fill your scaled web pages on small mobile screens.
2. New bounceRows flag under rotation element in view1.xml designed for 3D product views that controls whether to loop through the vertical rows when you drag images vertically or bounce at the first or last row if your 3D CAD renderings or 360 product photography doesn't have a full set of rows to cover all angles in a vertical spin. We were bouncing rows by default in the previous v3.6 beta releases and there was no way to change the behavior.. So now if you manage to export enough 3D rows to cover a full vertical spin, it will work (full 3D at last, yay!)
3. New flipHorizontalInput flag under rotation element in view2.xml which makes images spin in an opposite direction to mouse & touch drag. Note that we already had the rotateDirection flag that would make this possible, but it would also affect the playback direction and the arrow buttons accordingly. This was not good enough for one of our clients who is involved in 360 bullet time-lapses in that they needed the playback direction to work separately from the drag so that they could preserve the original order in which the images were shot. It's mind boggling, but we had to do it :)
So when the new v3.6 build is released, hopefully in the next few weeks, these settings will be available inside SpotEditor user interface (among a few more new features!).
PS: if you decide to integrate this template into some ecommerce site or your ecommerce demo, it may be more useful to reload the views at the same image position to make color changes and similar look nicer. Here's how you could change a single line in sample.html to reload a view at the same image index as currently shown: