Turntable Animator for Blender
WebRotate 360 Turntable Animator for Blender is an advanced tool that automates the creation of interactive turntable animations using existing 3d models. Features include multi-row 360 product views, hotspots, active polygonal areas, desktop & web viewer, and more.
- For additional capabilities, use this plugin with our publishing software, CMS plugins, and PixRiot for hosting and sharing your 360 product spins online with analytics.
- Features
- Quick Start
- User Guide
- Purchase
Features
- Seamlessly integrates into Scene properties.
- Uses Blender's 3D Viewport as a "viewfinder" for quick animation setup.
- Animates selected object instead of camera, allowing for photo-realistic lighting rigs.
- Simple and intuitive multi-row 360 view setup for full 3D and hemispherical 360 product views.
- Create simple interactive hotspots using "empties".
- Create custom polygonal hotspots via vertex groups or meshes.
- Integrated camera and crop region controls for quick adjustments.
- Fast render option to quickly preview rendered results before final render.
- Multiple target options, including simple image sequence render, a SpotEditor project or an interactive 360 asset that can be upload online, e.g. via PixRiot.
- Comes with a QuickView application that helps with instant "as-is" previews of the interactive viewer.
Quick Start
For a detailed description of all plugin features, including multi-row 360 object spins, build targets, simple & polygonal hotspots, select the User Guide tab.
-
1Install Plugin
You will receive a download link with the plugin upon the purchase of the core product.
Install .zip file your receive with your license details as a usual Blender plugin. Also download and install an optional WebRotate 360 QuickView app so you can instantly preview and test interactive 360 views you build in Blender. If you simply need a set of standalone 360-degree product images, QuickView is not necessary. WebRotate 360 publishing software (SpotEditor) can be used for previews as well and is one of the main build targets of the plugin.
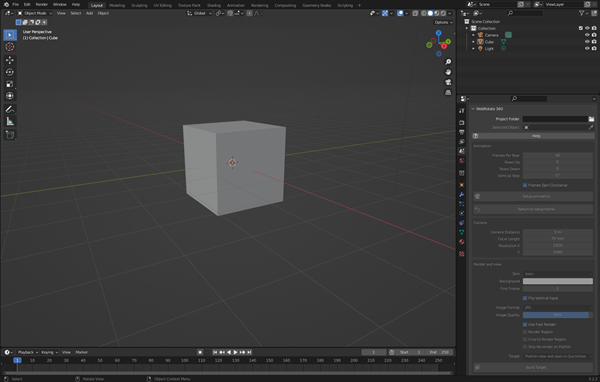
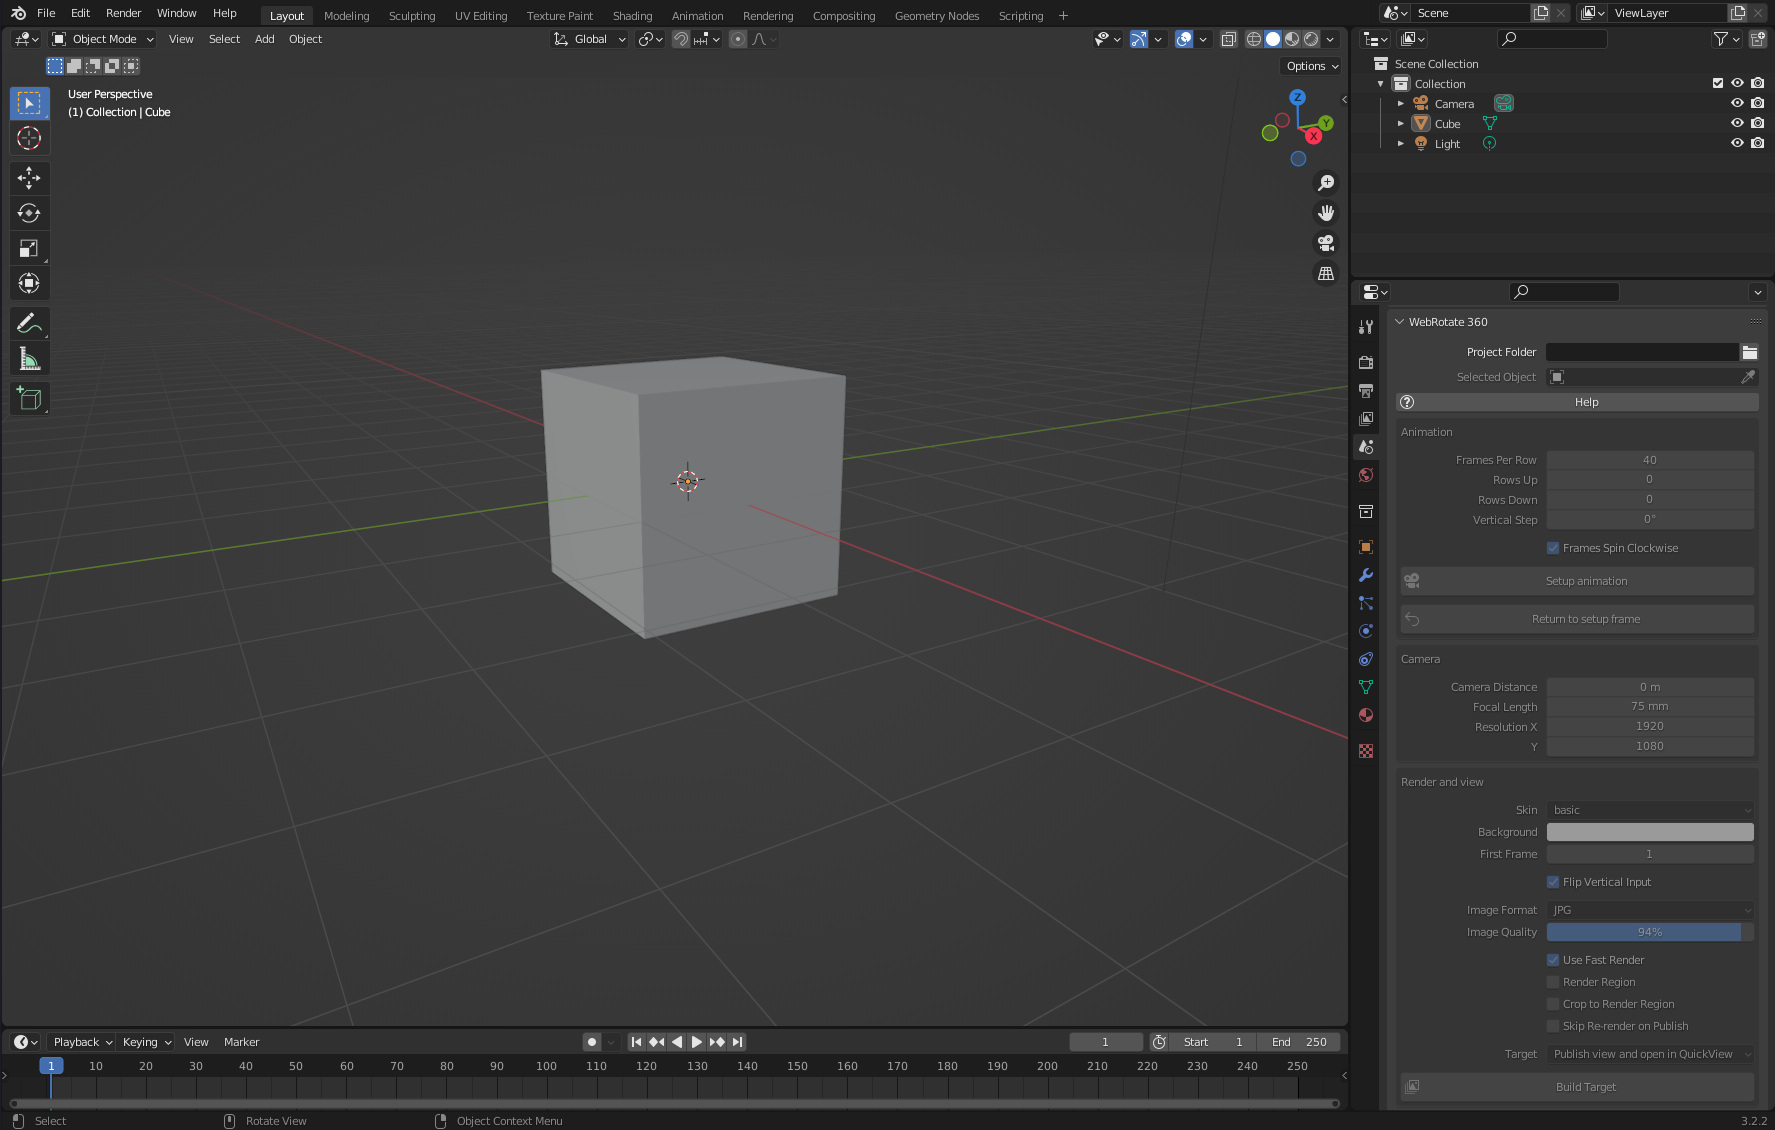
Once installed, navigate to Scene Properties and expand WebRotate 360.
-
2Setup Animation
Select a folder on your hard-drive for your WebRotate project under Project Folder and pick an object you are animating under Selected Object.
Position the object in 3D Viewport at an angle and distance where you would like to start the animation. Think of the 3D Viewport as a camera viewfinder. Use Numpad keys or mouse as needed to adjust the viewport.
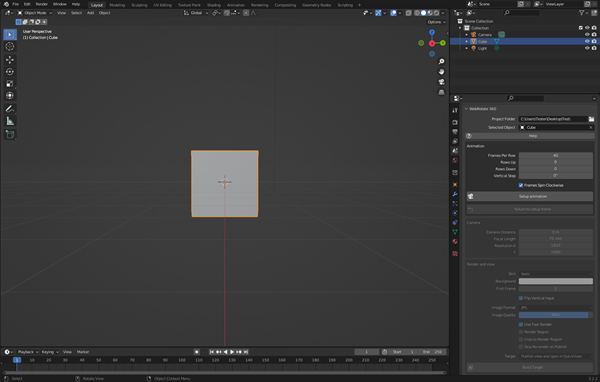
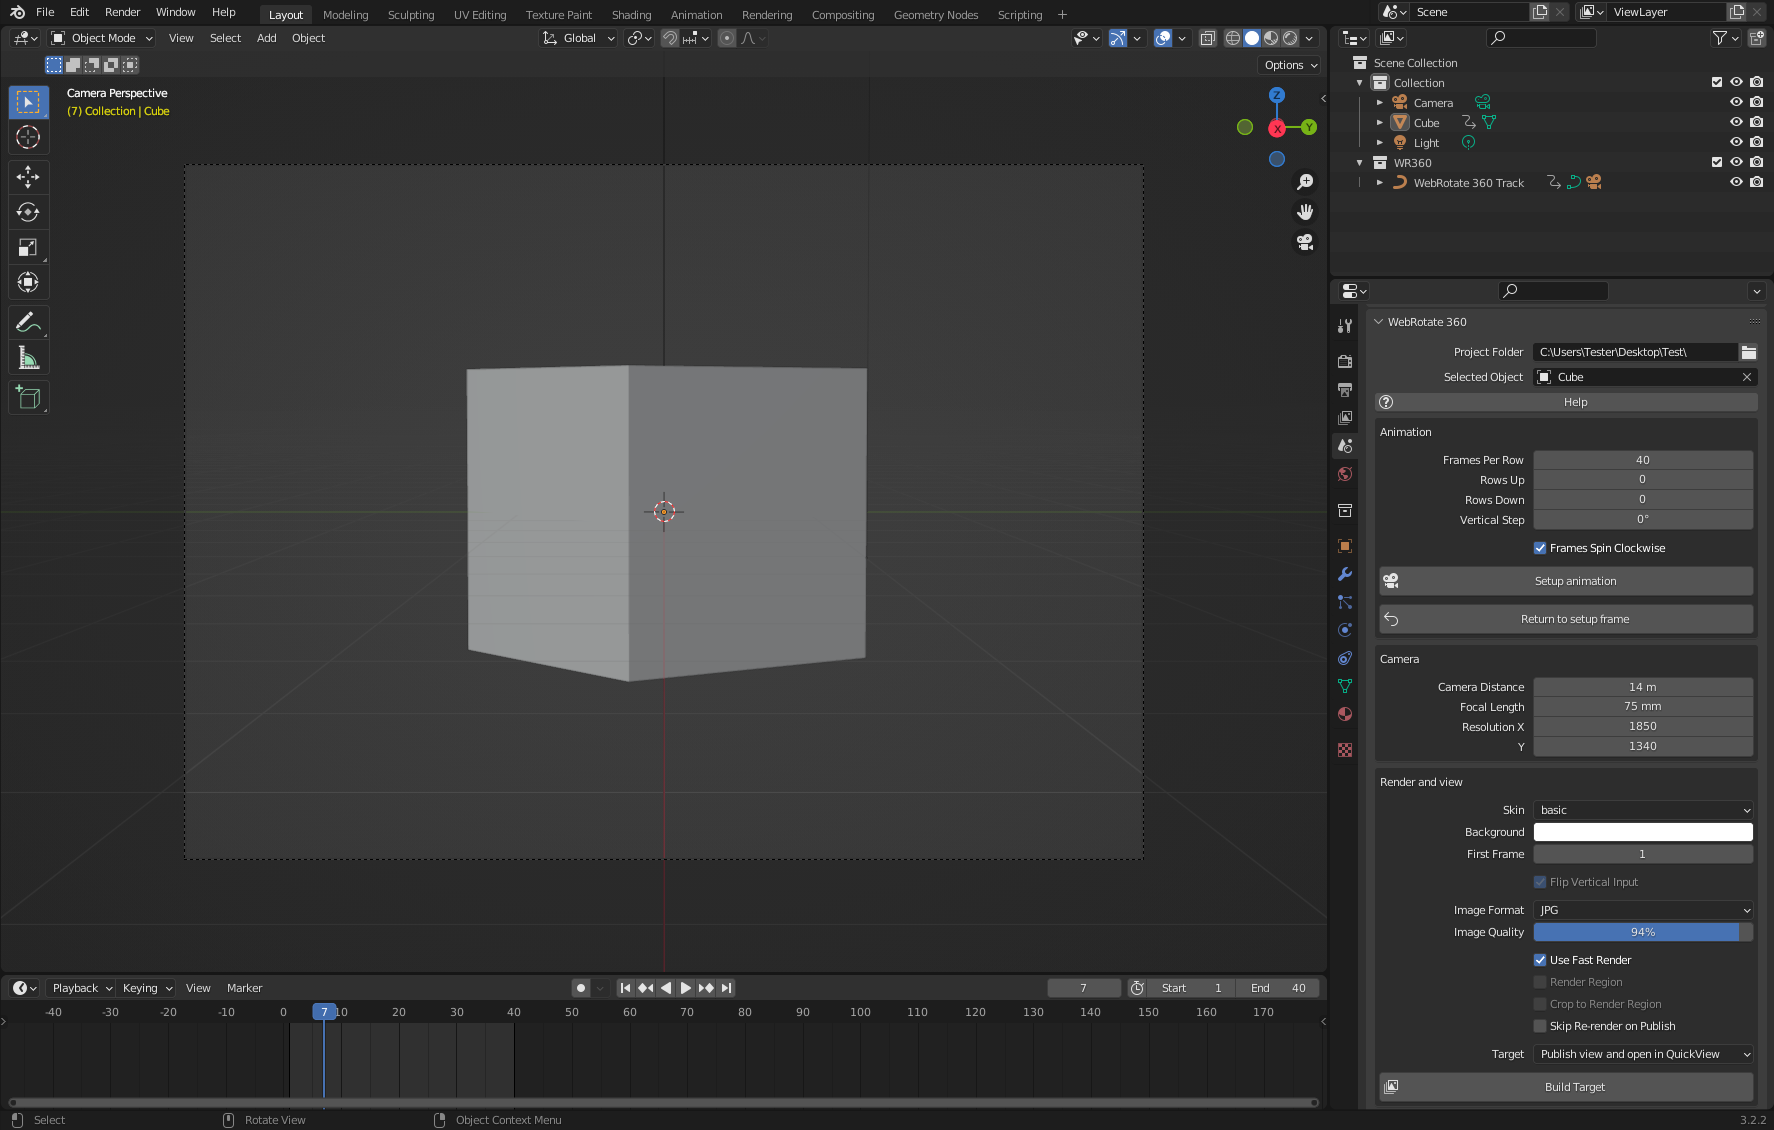
Enter the number of frames per row and click Setup animation. This automatically puts the viewport into camera view and you can now review your animation by dragging the playhead of the animation timeline.
Use Camera settings to further fine-tune the presentation of the object while in the camera view.
-
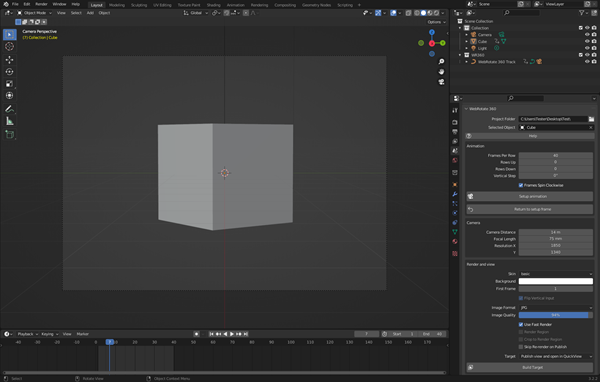
3Build Target
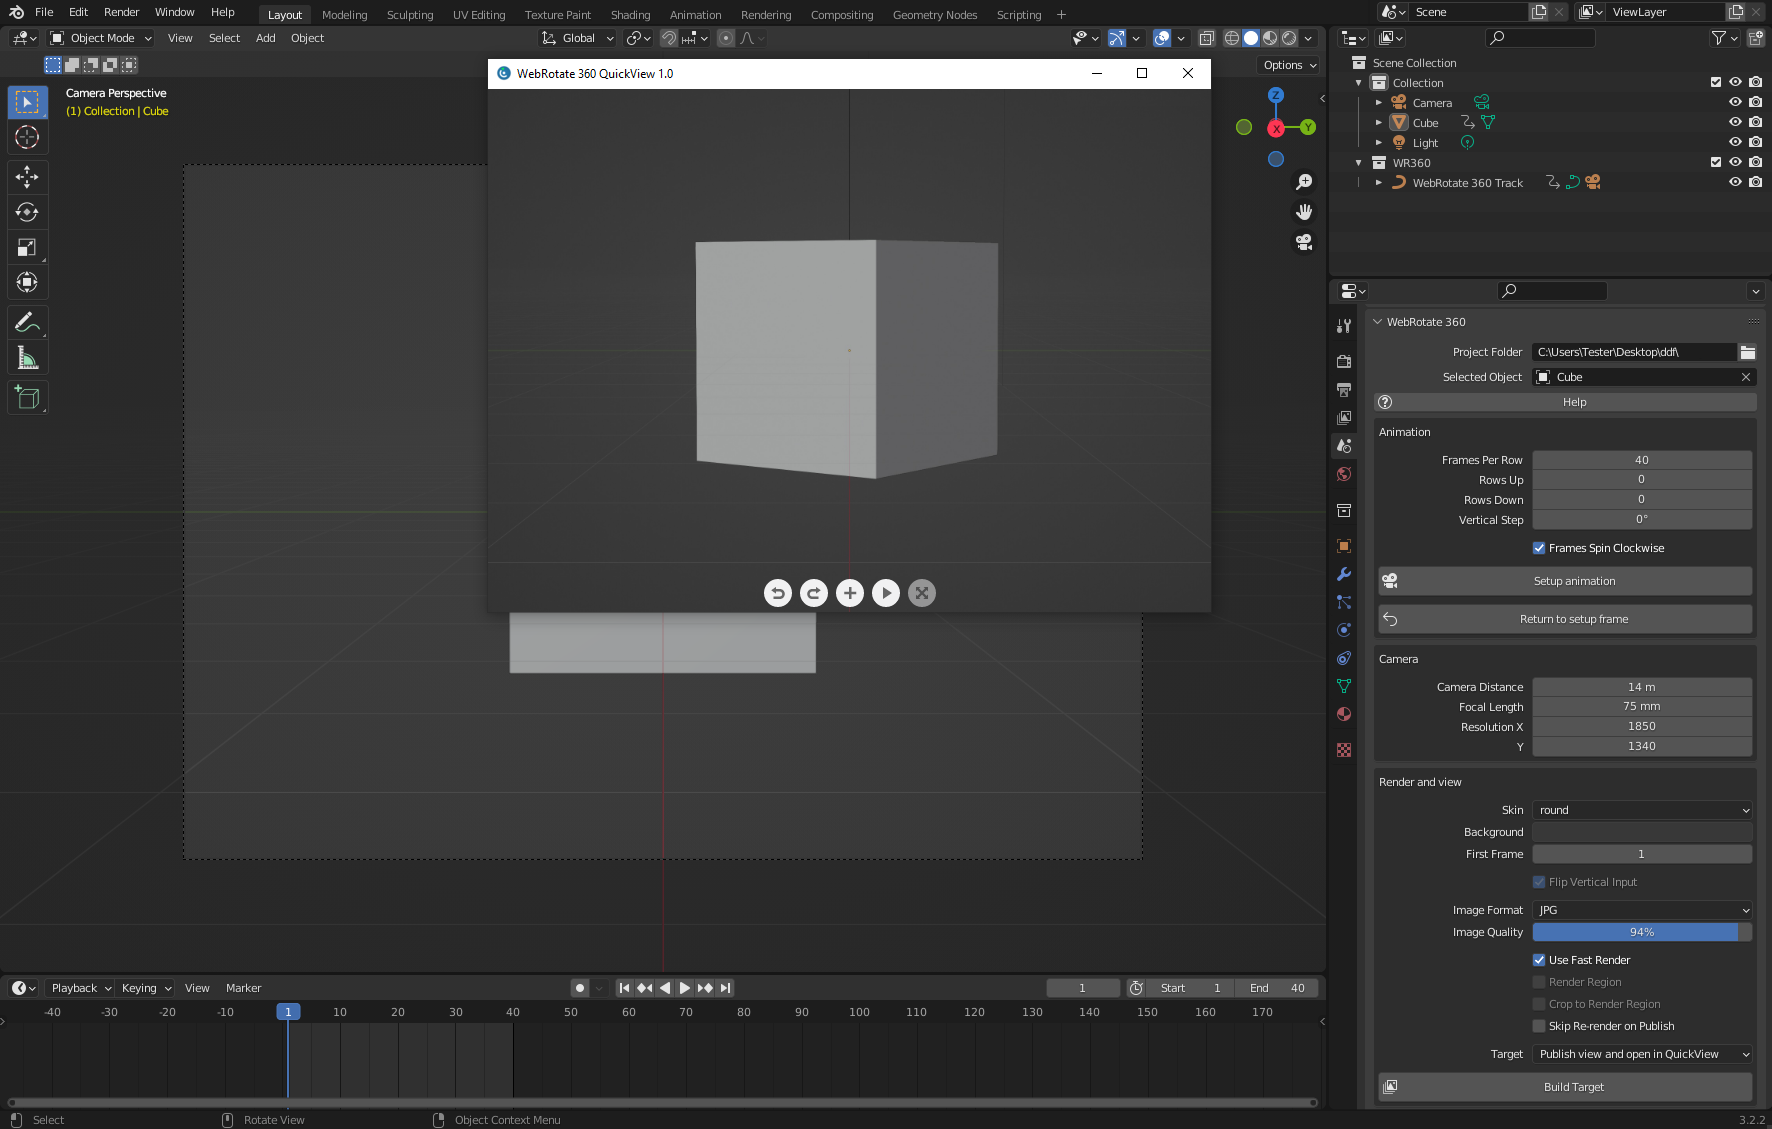
Check Use Fast Render under Render and view for a quick draft run. Select "Publish view and open in QuickView" under the Target drop-down.
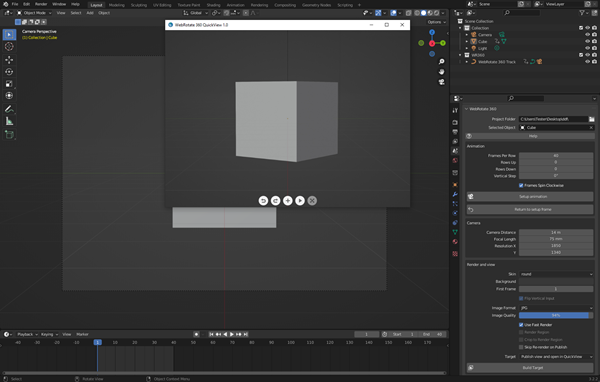
Press Build Target to start image render. Once rendering is complete, an interactive 360 object view will be launched inside the QuickView app using draft images.
A published 360 asset, which is a folder named after your project, can be found in the project folder under published/360_assets/.
This folder can be uploaded online and used with our CMS plugins, PixRiot hosting, WebRotate 360 Product Viewer APIs or viewed offline via QuickView (by double-clicking .view file).Once you are happy with the draft, uncheck Use Fast Render to use your original setup (i.e Cycles or Eevee) and rebuild the target.
Find additional details about available build targets in the User Guide at the top of the page.

User Guide
Use this plugin to either render turntable animations as sequences of standalone images (e.g for Amazon, marketing presentations, etc.) or to publish web-ready highly interactive webrotate 360 views that you can upload to your own website, view offline or use with PixRiot.
-
1Installation and Setup
You will receive a download link with the plugin upon the purchase of the core product.
Navigate to Blender Preferences -> Add-ons, select Install and pick webrotate-360-turntable-animator.zip you have received upon successful purchase. The plugin will appear in the Scene Properties as WebRotate 360.
Start by selecting Scene Properties in object view and expanding WebRotate 360 section.
Project Folder
Use Project Folder to set the location of a new project on your hard-drive. If you have previously used WebRotate 360 SpotEditor (separate software) to create a project and would like to re-use it, select the folder of the SpotEditor project instead.
Selected Object
Select or pick a scene object that you plan to animate. The rest of the scene can include lights, backdrops, etc. as needed. One of the key advantages of the plugin is that only the object you select is animated while the reset of the scene stays stationary. This helps producing realistic studio-like effects.
If your 3D model consists of multiple meshes, add Blender's Empty object to the center of the expected rotation for the entire model and parent all meshes to the Empty. Then pick the Empty as a Selected Object.
-
2Animation
Use your mouse or keyboard to position selected object in 3D Viewport at an angle and distance that you plan as a starting point of the animation. To put it differently, imagine as if the 3D Viewport is your photo-studio and the object sits on an invisible turntable surrounded by the environment, lights, etc and you are adjusting the viewport perspective and distance to the object as if looking through the camera viewfinder before starting the photo-shoot.
It's possible to render either a "classic" single-row 360-degree product view that spins horizontally left and right, or a multi-row 3D view that can do both at the same time. A row represents a set of animation frames that comprise a 360 degree spin ("turntable animation"). A multi-row view simply consists of several such rows that are captured at different vertical camera angles.
The Animation section allows to setup both options as follows:
Frames Per Row
Enter the number of frames in a single horizontal row. In a single-row 360 view, the number of frames is equal to the number of rendered images in the published output. It's up to you how many frames to use and you can review these examples to see how the different number of frames (images) perform online. It's usually recommended to stay between 20 to 80 images per row for the optimal performance and smoothness of the spin.
Rows Up
This setting only applies to the multi-row views. It's the number of vertical steps to move camera up from the original position you setup in the 3D Viewport (setup frame). Each such step represents an extra row of frames and consists of the same number of frames as entered under Frame Per Row.
Rows Down
This setting only applies to the multi-row views. It's the number of vertical steps to move camera down from the original position you setup in the 3D Viewport (setup frame). Each such step represents an extra row of frames and consists of the same number of frames as entered under Frame Per Row. For hemispherical views for example (example), where you can't see the bottom of an object, you may enter 0 here and enter a desired number of vertical camera steps via Rows Up.
Vertical Step
Enter the number of degrees that the camera should move up and/or down at each vertical camera step in multi-row views.
Frames Spin Clockwise
Determines the direction of the object rotation in the animation. If you plan on finalizing your projects in WebRotate 360 SpotEditor (see "Target" below), you can always change the direction of the row animation there.
Setup animation
Click this button to create the animation based on the animation settings above and the current 3D viewport. This puts 3D Viewport in camera view that will be used for image rendering later on. To quickly check the result, navigate to the Timeline panel and review the animation frames by dragging the playhead (current frame indicator). Note that the timeline is reset each time you click the button to show the initial "setup" frame of the animation as per the current 3D Viewport.
If the object is too close or too far in the camera view, fine-tune it in the Camera section of the plugin as needed. Or you can simply exit the camera view (Numpad + 0), adjust the viewport and hit the setup button again.
Return to setup frame
If you have exited camera view, use this button to return to the setup frame you have chosen in the last animation setup.
-
3Camera
Every time you run the animation setup, it automatically puts the viewport into camera view. Use these settings to quickly adjust the distance to the object, camera's focal length and its resolution in pixels to fine-tune the presentation of the selected object in camera view.
Note that the final image resolution can be adjusted further under the Render and view section via Render Region and Crop to Render Region (see below).
-
4Hotspots
There're two types of interactive hotspots you can create in Blender using the plugin. Both options feature an information popup you can assign to a hotspot that activates on click or tap.
- Indicator hotspot - a small configurable graphic that spins with a point of interest you choose.
- Polygonal hotspot - an active polygonal area that covers selected region you chose.
Note that all hotspots can be extended in a number of ways in WebRotate 360 SpotEditor upon publishing the project in Blender as discussed in the last section. There you can style hotspot popups, show video, image or custom HTML content, add custom indicator images and animations, add connecting lines between points of interest and popup content, add hotspot actions like scripted label animations or JavaScript callbacks, and more.
To see some of the key hotspot features you can add in SpotEditor, review these examples.
Indicator hotspot
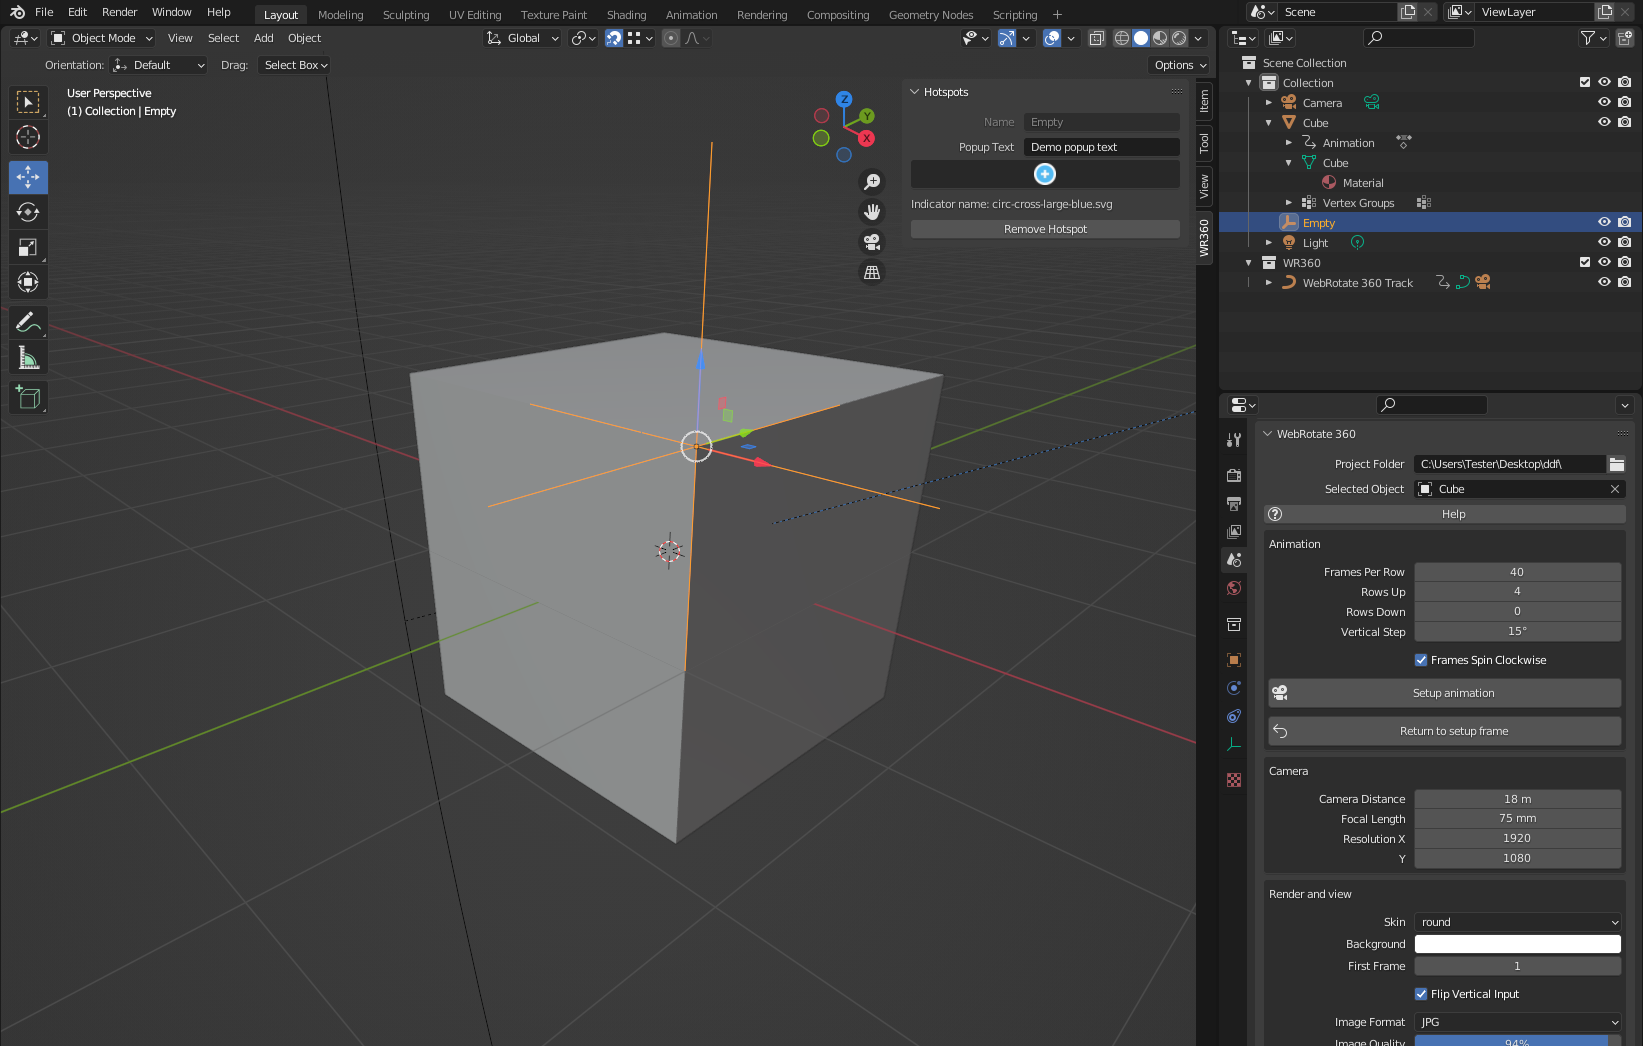
Each indicator hotspot is mapped to Selected Object via Blender's Empty object. To create an indicator hotspot, first add an Empty -> Plain Axes to a scene via Add menu in the Object mode and attach it to some point of interest inside the mesh of the object you plan to animate (Selected Object). Use Blender's Snap feature in vertex snapping mode to make it easier to precisely attach the Empty to a vertex of choice.
Name the Empty as needed to uniquely identify the hotspot and then "parent" it to Selected Object. To parent, first select the newly added Empty, then the mesh itself, and press Ctrl + P keys or use Parent -> Object via right-click context menu. Once parented, the Empty is moved under the parent object in View Layer.
Select the Empty again and expand WR360 tool panel. Click Hotspot from Empty to create the hotspot. Enter text of the informational popup for this hotspot and chose a different hotspot indicator graphic via indicator drop-down. Remember that these can be customized further in WebRotate 360 SpotEditor upon publish.

Polygonal hotspot
There are two ways to create polygonal hotspots:
- From Vertex Group - this method works best for 2D areas, such as the sides of a cube.
- From Mesh - this method works best for 3D surfaces.
Creating a polygonal 2D representation of a 3D surface is a complex problem that cannot be reliably solved across an unlimited variety of 3D shapes. However, there are three Projection Types available under the WR360 tool panel that we believe should work for most applications our clients use for polygonal hotspots.
For Vertex Group hotspots, the mapping is done based on a selected object's vertex group. To create a new vertex group hotspot, follow these steps:
- Add a Vertex Group under Object Data Properties and give it a unique name to identify the hotspot.
- Switch to Edit mode and select the vertices that form the desired polygon for the hotspot.
- Click Assign under Object Data Properties to add the selected vertices to the new group.
- Select the object and expand the WR360 tool panel.
- Click Hotspot from Vertex Group and enter the text for the informational popup related to the selected vertex group.
- Utilize available color options to style the polygon as needed.
To add additional vertex group hotspots, simply create a new Vertex Group with the required vertices following the steps mentioned above. Then, select the new group under Vertex Groups and use the WR360 tool panel to update its info text accordingly. The Projection Type for vertex group hotspots can be either Gift wrap or 2D polygon.

For Mesh hotspots, follow these steps:
- Select a mesh that outlines the area for the desired hotspot.
- Expand the WR360 tool panel and click Hotspot from Mesh.
- Update the hotspot text and polygon colors as necessary.
- The Projection Type for mesh hotspots can be either Gift wrap or Consecutive quads (which requires the mesh to consist of quads).
Note that the styles of the hotspot indicators and polygon colors are shared between the hotspots but you can update them individually in WebRotate 360 SpotEditor as required.
-
5Render and View
Skin
The interactive viewer that is published by the plugin comes with several built-in skins that you can chose using the drop-down. These skins affect the style of the viewer toolbar buttons, hotspots, etc., and are made of simple CSS style-sheets and SVG images which you can modify later, if you chose to publish the project in WebRotate 360 SpotEditor. See our website examples that feature both built-in and custom skins.
Background
Use this property to match the background color of your rendered scene with the background of the interactive viewer. In most applications, it's best to not have gradient backgrounds or object reflections that touch or go beyond the edges of the rendered images such that the image background smoothly transitions to the background of the viewer regardless of the viewer resolution.
First Frame
Pick the frame of the animation that should be loaded upfront upon publishing the project. This determines the first image and row that the user will be interacting with.
Image Format and Quality
For most applications, it's recommended to go with JPG format as PNG image files, on average, are 3-4 times lager than JPG which becomes an issue when loading 360 product views consisting of many images over the Internet (may be not be as important for offline viewing). Use PNGs only when your workflow includes an extra step where you will convert to JPG for the final output, which can be done in WebRotate 360 SpotEditor for example.
Use Fast Render
When checked, the plugin will use a "draft" GL render of the viewport instead of the rendering engine configured in the Blender project (e.g Cycles or Eeeve). Use this option for quick evaluation of the animation setup, hotspot configuration and other viewer settings.
Render Region and Crop
Depending on your scene setup, it may be useful to not render scene elements around Selected Object to save on rendering time, remove light rigging, etc. Drag the sides of the region rectangle inside the camera view to tell Blender what to render. Check Crop to Render Region to physically crop the final images to match the region. Note that you can crop further in WebRotate 360 SpotEditor.
Skip Re-render on Publish
Check this setting to make the plugin skip image re-render upon re-publishing and only process updated viewer or hotspot settings. For example, if you add a new hotspot or change the first frame of the view or its skin, it's best to check this setting before selecting the build command to see instant results.
Target
Target is a type of output you can publish using this plugin. Choosing the default target will render the images as configured in the animation, create an interactive 360 view, and launch it in the QuickView app as shown in this screenshot:
There are three target types you can select as plugin output:
- Sequence of PNG or JPG images.
- Interactive 360 view that can be uploaded online and integrated using WebRotate 360 Product Viewer APIs, CMS plugins (e.g WordPress, Magento, etc), viewed offline using provided QuickView application (download) or shared as an embed code, if uploaded to PixRiot.
- Project for SpotEditor which is a publishing software for Mac and Windows that provides advanced features for editing and publishing interactive 360 and multi-row 3D views with hotspots. The software can be download here (see WebRotate 360 Product Viewer downloads).
Please note that QuickView for macOS and Linux is not available until August - September 2023.
Select a target as follows:
- Publish view - create a viewer component in the Project folder you selected. To view the published media, install WebRotate 360 QuickView, navigate to your project folder under published/360_assets and double click .viewer file. Alternatively, upload online and integrate using CMS plugins or API or simply upload to PixRiot which offers CDN hosting with analytics, embed codes, private folders and more.
- Publish view and open in QuickView - same as above, but the QuickView app is launched automatically, if installed on your computer.
- Publish project - publish SpotEditor project file which is created in the project folder you selected and has .wr360 file extension.
- Publish project and open in SpotEditor - same as above, but SpotEditor is launched automatically, if installed on your computer.
- Do not publish and just render images - simply render a set of still images that you can use with third-party solutions (e.g Amazon) or import into a new project in SpotEdior.
Build Target
Build and run selected target output.

Purchase & Download
WebRotate 360 Turntable Animator is available with either PRO or Enterprise license of WebRotate 360 Product Viewer.
If you have previously purchased our software and are still within your free upgrade period, you can request access to the addon here.