Check out our new post on PhotoGear 360 (our new 360 photogrpahy equipment store) that opens a 4-part series where we will share most important aspects of 360 product photography that we've learned here in our WebRotate 360 stuido. These chapters will cover everything from the basic alignment of your camera and the turntable to more involved topics such as 360 photography lighting, product suspension, post-production of your 360 product images and more. Below is a small extract from Part I that has some good details on the camera alignment when using a DIY 360 photography setup:
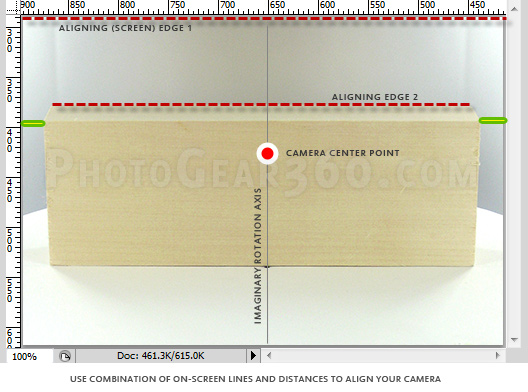
If you are not using the included software (can be the case with our do-it-yourself 360 photography turntable) follow these steps. Place and center a tall rectangular object such as the wooden brick in the picture or a similar item on the turntable positioned for your first product shot, put your camera center point (via viewfinder) at the imaginary line going through the rotation center, then snap a test photo and review the image on your computer screen. The idea is to verify that the top edge of the brick (aligning edge 2 on the image below) is not angled in any way in relation to the top or bottom edge of your monitor screen or your image viewing application (screen edge 1).
Keep adjusting your tripod head until you can see that both edges are parallel, while making sure that the left and right distances from the brick to the image borders (marked green) are equal and that you camera center point is still at that imaginary rotation axis. When you replace the brick with your product aligned for your first 360 degree product photo, this would guarantee that the rest of the rotation will be well-balanced.
Quick tip: if not using the Ortery PhotoCapture 360 software that comes with our turntables, you may need to install remote shooting software that usually comes with the DSLR cameras to quickly snap and evaluate your test images on your computer or laptop screen.